概述
阻塞队列(BlockingQueue)是 JDK 的一个接口,阻塞,简单来说就是当某些条件不满足时,让线程处于等待状态。我们经常使用 BlockingQueue 实现经典的生产者-消费者模型,当队列满的时候,生产者被阻塞。当队列为空时,消费者被阻塞。如果我们自己实现,需要考虑到很多细节,甚至可能造成死锁等问题,而有了 BlockingQueue 就不一样了,我们可以方便安全实现生产者-消费者模型,线程的阻塞、唤醒等操作都由框架帮我们实现了,只需要调用相应的 API 即可。
BlockingQueue 继承体系

- Iterable:迭代器实现,可以通过
iterator()遍历数据。 - Collection:定义与集合相关的 API,比如添加、删除等操作。
- Queue:除了重写
add(E e)方法外,还额外定义了 5 个 API,比如offer、poll()、peek()等等。 - BlockingQueue:增加了 7 个新的 API 接口,比如抽干
drainTo()、带超时的poll()、可响应中断的take()等等。
从接口的继承关系看出,BlockingQueue 可看成一个 Collection,具备相关的增、删等操作。它又继承了 Queue 接口,具备队列属性,具有 FIFO 特性。然后轮到自己对阻塞相关 API 的定义,都是 BlockingQueue 接口中。一般而言,我们会对队列进行插入、移除、获取 等三种类型操作,BlockingQueue 提供 4 种不同方法用于不同场景:
- 抛出异常。
- 返回特殊值,比如 null 或 true/false。
- 线程阻塞等待,必须等到操作成功。
- 线程阻塞等待,直到操作成功或超时返回。 | | 抛出异常 | 返回特定值 | 阻塞 | 超时 | | —- | —- | —- | —- | —- | | 插入 | add(e) | offer(e) | put(e) | offer(e, time, unit) | | 移除 | remove() | poll() | take() | poll(time, unit) | | 检查 | element() | peek() | not applicable | not applicable |
BlockingQueue 实现类的各个实现都遵循表格中制定的规则。在实际的开发中,我们应该重点关注阻塞和非阻塞实现。如果要求不阻塞,可以选择返回特定值,如果要求线程阻塞,那么选择阻塞那一栏的 API 。
BlockingQueue 不接受 null 值,否则会抛出
NullPointerException异常。因为 null 值有在BlockingQueue有特殊含义,如果允许 null 值插入,那么会造成语义冲突。
BlockingQueue 单个方法是线程安全的,但是批量的集合操作(比如 addAll、retainAll)不一定是原子操作。比如 allAll() 可能添加一些元素后中途抛出异常,此时 BlockingQueue 已经添加了部分元素,这种情形是正常情况。
BlockingDeque
BlockingDeque 是一个线程安全的阻塞的双端队列,允许用户从任意一端插入、取出队列中的元素。内部是基于双向链表实现。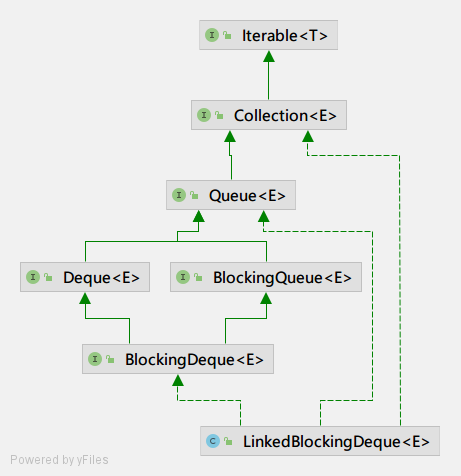
BlockingDeque 接口继承了 BlockingQueue 和 Deque,让自己拥有了双端队列能力。而且自己也实现了阻塞操作,比如 offer 、takeFirst 等等。方法总结如下:
操作头结点:
| 抛异常 | 特定值 | 阻塞 | 超时 | |
|---|---|---|---|---|
| 插入 | addFirst(o) | offerFirst(o) | putFirst(o) | offerFirst(o, timeout, timeunit) |
| 移除 | removeFirst(o) | pollFirst(o) | takeFirst(o) | pollFirst(timeout, timeunit) |
| 检查 | getFirst(o) | peekFirst(o) |
操作尾结点:
| 抛异常 | 特定值 | 阻塞 | 超时 | |
|---|---|---|---|---|
| 插入 | addLast(o) | offerLast(o) | putLast(o) | offerLast(o, timeout, timeunit) |
| 移除 | removeLast(o) | pollLast(o) | takeLast(o) | pollLast(timeout, timeunit) |
| 检查 | getLast(o) | peekLast(o) |
BlockingDeque 和 BlockingQueue 的关系
通过 BlockingQueue API 可以让 BlockingDeque 的行为表现和 BlockingQueue 一致,队尾新增元素,队头插入元素。
BlockingQueue 实现类
BlockingQueue 有丰富的实现类,而且这些工具类经常在我们的项目中被大量使用。
容量 公平/非公平
| BlockingQueue 实现类 | 数据结构 | 实现原理 | 适用场景 |
|---|---|---|---|
| ArrayBlockingQueue | 数组 | 容量固定。默认非公平 | |
| LinkedBlockingQueue | 链表 | 容量随意 | |
| PriorityBlockingQueue | 堆 | 无界队列,按元素优先级排序,按照优先级顺序出队,每次出队都是优先级最高的元素 | |
| DelayQueue | 堆 | 放置实现 Delayed 接口的对象。只能在对象到期后才能从队列中取走,插入操作永远不会被阻塞,获取操作可能会被阻塞 | |
| DelayedWorkQueue | 堆 | ScheduledThreadPoolExecutor 内部类,对元素排序,以便执行定时任务和周期性任务 | |
| SynchronousQueue | 双栈 | ||
| LinkedTransferQueue | |||
| BlockingDeque | 双向链表 | ||
| LinkedBlockingDeque | 双向链表 |
ArrayBlockingQueue
有界 数组 可重入锁ArrayBlockingQueue 实现相对简单,它总共有以下几个属性:
// java.util.concurrent.ArrayBlockingQueuepublic class ArrayBlockingQueue<E> extends AbstractQueue<E>implements BlockingQueue<E>, java.io.Serializable {// #1 存储元素的数组final Object[] items;// #2 读操作指针,指向下一次读取的位置(poll、peek、remove)int takeIndex;// #3 写操作指针,指向下一次写入的位置(put、offer、add)int putIndex;// #4 当前存在队列中元素的数量int count;// #5 全局锁,实现队列的并发控制final ReentrantLock lock;// #6 条件一:队列非空。一旦满足该条件,就可以唤醒消费者继续消费元素// 因为队列有元素,消费者才能继续消费private final Condition notEmpty;// #6 条件二:队列非满。一旦满足该条件,就可以唤醒生产者继续生产元素// 因为队列没有存满,生产者才能继续生产private final Condition notFull;}
并发操作原理:
- 读操作、写操作都需要获得
AQS锁(lock.lock())才能进行操作。 - 元素数组为空,将阻塞消费者读操作,内部调用
notEmpty.await()进入读等待队列排队(notEmpty)。 - 元素数组已满,将阻塞生产者写操作,内部调用
notFull.await()进入写等待队列排队(notFull)。
其实理解起来非常简单,比如对于消费者,满足阻塞的条件就是队列为空,而满足唤醒的条件就是队列非空,notEmpty 就是指唤醒线程的条件 Condition。当队列为空时,我们调用 notEmpty.await() 阻塞在这个 Condition 上,一旦队列非空,就会调用 notEmpty.signal() 方法唤醒所有等待线程。
构造函数
ArrayBlockingQueue 有 3 个构造函数,下面是其中之一:
capacity:队列容量,必填。限制了队列中最多同时存在的元素数量,如果无限容量,则存在系统资源耗尽的风险。fair:指定独占锁ReentrantLock是公平锁还是非公平锁。默认是非公平锁,因为它的执行效率更高。public ArrayBlockingQueue(int capacity, boolean fair) { if (capacity <= 0) throw new IllegalArgumentException(); this.items = new Object[capacity]; lock = new ReentrantLock(fair); notEmpty = lock.newCondition(); notFull = lock.newCondition(); }返回特定值的写操作:offer
// java.util.concurrent.ArrayBlockingQueue#offer(E)
public boolean offer(E e) {
  // #1 如果元素为 null,抛出空指针异常
  checkNotNull(e);

  final ReentrantLock lock = this.lock;
  // #2 获取独占锁
  lock.lock();
  try {
      // #3 如果队列元素已满,直接返回 false,表示本次插入失败
      if (count == items.length)
          return false;
      else {
          // #4 否则将元素入队
          enqueue(e);
          return true;
      }
  } finally {
      // #5 释放锁
      lock.unlock();
  }
}
我们看到,在队列元素已满的情况下,这个方法会立即返回 false,并不会阻塞当前的写线程。
将元素写入数组中:enqueue
// java.util.concurrent.ArrayBlockingQueue#enqueue
private void enqueue(E x) {
  // assert lock.getHoldCount() == 1;
  // assert items[putIndex] == null;
  final Object[] items = this.items;
  items[putIndex] = x;
  if (++putIndex == items.length)
      putIndex = 0;
  count++;
  notEmpty.signal();
}
贴这个函数的源码主要是想说
notEmpty.signal(),每次入队一个元素,就会调用notEmpty.signal(),避免死锁,重复调用并不会出现任何问题,这里会将阻塞在notEmpty等待队列的线程全部唤醒。阻塞的写操作:put
// java.util.concurrent.ArrayBlockingQueue#put public void put(E e) throws InterruptedException { checkNotNull(e); final ReentrantLock lock = this.lock; // #1 获取全局锁,这一步是可中断的 lock.lockInterruptibly(); try { // #2 使用 while 操作避免虚假唤醒(spurious wakeup) while (count == items.length) // #3 队列满了,当前线程的写操作继续阻塞 notFull.await(); // #4 队列不满,可以将元素写入数组中 enqueue(e); } finally { lock.unlock(); } }put操作是阻塞操作,当队列满的时候,它会调用notFull.await()方法阻塞当前写操作线程。等待消费者消费队列中的数据,此时队列腾出空闲位置,它们会调用notFull.signal()唤醒等待队列中的所有线程。
另一个值得注意的是源码中使用while避免虚假唤醒操作。虚假唤醒(spurious wakeup):是不想唤醒它或者说不确定是否应该唤醒,但是被唤醒了。使用
while而非if判断,可以避免虚假唤醒。因为操作系统的通知不可信,自己再较验一次。
返回特定值的读操作:poll
// java.util.concurrent.ArrayBlockingQueue#poll()
public E poll() {
    final ReentrantLock lock = this.lock;
    lock.lock();
    try {
        // 如果队列为空,返回 null,否则元素出队
        return (count == 0) ? null : dequeue();
    } finally {
        lock.unlock();
    }
}
其实 poll 操作也会被阻塞,当获取不到锁的时候,它会加入 AQS 的阻塞队列中,直到前驱节点唤醒它,重新尝试获得锁操作。
元素出队:dequeue
// java.util.concurrent.ArrayBlockingQueue#dequeue
private E dequeue() {
    // assert lock.getHoldCount() == 1;
    // assert items[takeIndex] != null;
    final Object[] items = this.items;
    // 强转
    @SuppressWarnings("unchecked")
    E x = (E) items[takeIndex];
    items[takeIndex] = null;
    if (++takeIndex == items.length)
        takeIndex = 0;
    count--;
    if (itrs != null)
        itrs.elementDequeued();

    // 唤醒 notFull
    notFull.signal();
    return x;
}
这里操作也十分简单,主要是 notFull.signal 操作,队列中已经腾出一个空位,意味着满足 notFull 这个条件,那么就可以调用 notFull.signal 唤醒所有阻塞的写操作线程,它们就可以继续生产元素了。
阻塞的读操作:take
// java.util.concurrent.ArrayBlockingQueue#take
public E take() throws InterruptedException {
    final ReentrantLock lock = this.lock;
    lock.lockInterruptibly();
    try {
        while (count == 0)
            notEmpty.await();
        return dequeue();
    } finally {
        lock.unlock();
    }
}
while 避免虚假唤醒,前面已经讲过。take 阻塞操作体现在当队列元素为 0 时,调用 notEmpty.await() 方法阻塞当前线程。当生产者生产元素后,就会调用 notEmpty.signal() 方法唤醒线程。
LinkedBlockingQueue
单向链表 无界队列 FIFOLinkedBlockingQueue 底层基于单向链表实现的并发阻塞队列,可以指定队列容量,如果不指定,默认为 Integer.MAX_VALUE。队列按照 FIFO 排列,队头是在队列中停留时间最长的元素,队尾是队列中停留时间最短的元素。新的元素会被插入队列尾部。遍历操作从队头开始,一直遍历到队尾。LinkedBlockingQueue 通常比 ArrayBlockingQueue 有更高的吞吐量,但在多数并发应用程序中的可预测性能较差(less predictable performance)。
构造函数
public LinkedBlockingQueue() {
    this(Integer.MAX_VALUE);
}

public LinkedBlockingQueue(int capacity) {
    if (capacity <= 0) throw new IllegalArgumentException();
    this.capacity = capacity;
    last = head = new Node<E>(null);
}
可以指定队列容量,如果不指定,默认为 Integer.MAX_VALUE。
属性
// 队列容量
private final int capacity;

// 队列中元素数量
private final AtomicInteger count = new AtomicInteger();

/**
     * Head of linked list.
     * Invariant: head.item == null
     */
// 队头指针
transient Node<E> head;

// 队尾指针
private transient Node<E> last;

// take、poll、peek 等「读操作」需要获取这把锁
private final ReentrantLock takeLock = new ReentrantLock();

// 如果队列为空,读线程将会被阻塞在 notEmpty Condition 中
private final Condition notEmpty = takeLock.newCondition();

// put、offer、add 等「写操作」需要获取这把锁
private final ReentrantLock putLock = new ReentrantLock();

// 如果队列已满,写线程将会被阻塞在 notFull Condition 中
private final Condition notFull = putLock.newCondition();
我们先看一下 LinkedBlockingQueue 的并发读写控制: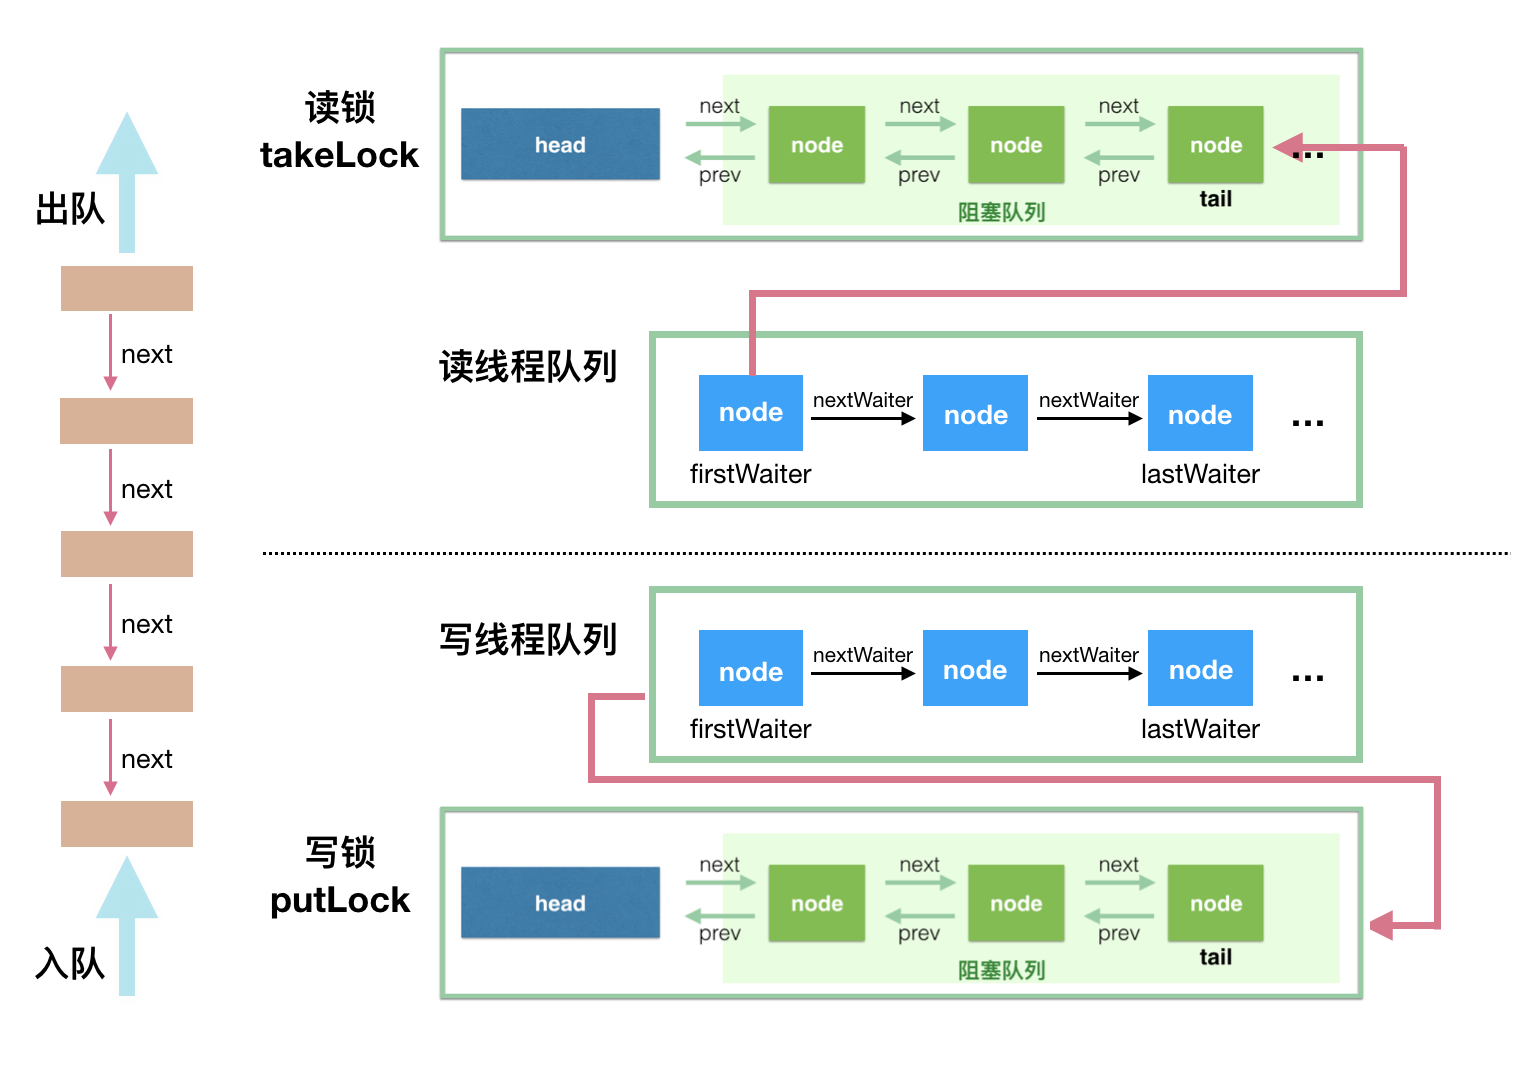
读锁和写锁是分开的,自己内部里面的并发问题分别通过读锁和写锁可以解决。唯一存在的问题是一个写操作和一个读操作同时进行,该如何控制,下面我们一步步通过探索源码来找到解决之路。
阻塞的写操作:put
// java.util.concurrent.LinkedBlockingQueue#put
/**
 * 向队列写入元素,如果队列已满,阻塞线程
 */
public void put(E e) throws InterruptedException {
    if (e == null) throw new NullPointerException();

    // 这个是操作是否成功标识位
    int c = -1;
    Node<E> node = new Node<E>(e);

    // #1 写操作必须要获得 putLock 的锁
    final ReentrantLock putLock = this.putLock;
    final AtomicInteger count = this.count;

    // #2 可中断的获取锁操作
    putLock.lockInterruptibly();
    try {
        // 虽然 count 没有被锁住,但是对它的操作是有效的,因为此时,count 只能执行减操作(消费者消费数据),
        // 并且,我们在容量发生变化时收到信号

        // #3 队列已满,等待「notFull」条件满足后才会唤醒当前线程
        while (count.get() == capacity) {
            notFull.await();
        }

        // #4 队列中有空闲,将元素入队
        enqueue(node);

        // #5 count ++
        c = count.getAndIncrement();

        // #6 队列中有空闲位置,符合「notFull」条件,那么唤醒阻塞在「notFull」的所有线程
        if (c + 1 < capacity)
            notFull.signal();
    } finally {
        // #7 释放写锁
        putLock.unlock();
    }

    // #8 c=0 意味着元素入队前队列是空的,这里符合「notEmpty」条件,需要唤醒所有的读线程
    if (c == 0)
        signalNotEmpty();
}
元素入队:enqueue
LinkedBlockingQueue 元素入队十分简单,仅仅修改尾部指针即可。
private void enqueue(Node<E> node) {
    // assert putLock.isHeldByCurrentThread();
    // assert last.next == null;
    last = last.next = node;
}
唤醒读线程:signalNotEmpty
// java.util.concurrent.LinkedBlockingQueue#signalNotEmpty
private void signalNotEmpty() {
    // #1 首先,需要获得读锁。
    final ReentrantLock takeLock = this.takeLock;

    // #2 对于 c=0 场景来说,通常比较容易获得读锁
    takeLock.lock();
    try {
        // #3 唤醒阻塞在「notEmpty」条件的线程
        notEmpty.signal();
    } finally {

        // #4 释放读锁
        takeLock.unlock();
    }
}
总的来说,LinkedBlockingQueue 的 put 操作需要处理队列满和队列空这一种 Condition :
- 队列满:阻塞当前线程。
队列空:当写入线程发现在插入元素之前队列已经为空了,则调用
signalNotEmpty()唤醒阻塞在notEmpty上的线程。阻塞的读操作:take
// java.util.concurrent.LinkedBlockingQueue#take
public E take() throws InterruptedException {
 E x;
 int c = -1;
 final AtomicInteger count = this.count;

 // #1 首先,需要获得读锁才允许读
 final ReentrantLock takeLock = this.takeLock;

 // #2 可中断的获取读锁
 takeLock.lockInterruptibly();
 try {

     // #3 当队列为空,阻塞当前线程
     while (count.get() == 0) {
         notEmpty.await();
     }

     // #4 队列非空,队头元素出队
     x = dequeue();

     // #5 count--
     c = count.getAndDecrement();

     // #6 如果队列还有非空元素,唤醒其它读线程。有意思
     if (c > 1)
         notEmpty.signal();
 } finally {
     // #7 释放读锁
     takeLock.unlock();
 }

 // #8 如果前面队列是满的,此时队列非满,虽然可能只留一个空位,但是也可以唤醒写线程继续写数据
 if (c == capacity)
     signalNotFull();
 return x;
}
唤醒写线程:signalNotFull
// java.util.concurrent.LinkedBlockingQueue#signalNotFull
private void signalNotFull() {
 final ReentrantLock putLock = this.putLock;
 putLock.lock();
 try {
     notFull.signal();
 } finally {
     putLock.unlock();
 }
}
可以看出,put 和 take 的行为有点镜像的感觉:
- 对写操作来说,它会关注队列是否为空。如果队列之前为空,可能有读线程被阻塞,现在写操作已经写入一条数据,所以可以调用
signalNotEmpty唤醒被阻塞读线程。 - 对读操作来说,它会关注队列是否已满。如果队列之前是否已经满了。如果之前队列满了,可能有写线程被阻塞,现在读操作已经消费一条数据,所以可以调用
signalNotFull唤醒被阻塞的写线程。这里讲的读并非真正意义上的读,真正的含义是获取、消费队列中的数据。
关于 LinkedBlockingQueue 源码讲到这里就结束了,其实里面还有很多细节没有讲到,比如 fullyLock() 操作,当需要从队列中移除元素时,需要同时获得读锁和写锁。
SynchronousQueue
这个队列非常特殊:有两个线程,分别叫做写线程和读线程。写线程往 SynchronousQueue 写入一个元素,写操作不会立即返回,需要等待读线程将这个元素取走后,写操作才会返回。同时,如果读操作过程中 SynchronousQueue 没有元素,那么它也会被阻塞。相当于传输一条消息需要两人见面并对接案号后,各自才会返回。否则,其中一人到达交接处会一直等待目标人员到达。
平时,我们比较少使用到这个类,但是在 Executors 方法中,我们会使用到:
// 线程池从0开始增长,数量可能会到达 MAX_VALUE,
// 线程池将会删除闲置一分钟的线程
// 而 SynchronousQueue 队列为 0,因此,如果有空闲线程,交给空闲线程处理,否则,创建一个新的线程
// 来处理该任务
public static ExecutorService newCachedThreadPool() {
    return new ThreadPoolExecutor(0,
                                  Integer.MAX_VALUE,
                                  60L,
                                  TimeUnit.SECONDS,
                                  new SynchronousQueue<Runnable>());
}
newCachedThreadPool 类型的线程池的创建就用到了 SynchronousQueue 队列。SynchronousQueue 队列中没有容量, 我们无法使用 peek 方法,当然也不支持迭代操作。SynchronousQueue 类似于 CAP 和 Ada 中使用的集合通道,它们非常适合手递手传递设计。在这种设计中,在一个线程中运行的对象必须忹另一个线程中运行的对象同步,以便将某些信息、事件或任务交给它。
构造函数
public SynchronousQueue() {
    this(false);
}

public SynchronousQueue(boolean fair) {
    transferer = fair ? new TransferQueue<E>() : new TransferStack<E>();
}
构造时,我们可以指定公平锁还是非公平锁实现。默认是非公平锁。从构造函数中我们发现需要创建不同的内部类,我们来了解一下。
Transferer
Transferer 是一个抽象类,它只定义一个抽象接口:
abstract static class Transferer<E> {
    abstract E transfer(E e, boolean timed, long nanos);
}
这个方法用于转移元素。我们知道,写线程需要亲手将元素交到读线程手中,这个方法就是定义这个交接的过程。
其实交接过程也有两种:
- 写线程主动将元素转交到读线程手中。
- 读线程主动从写线程手中获取元素。
那 Transfer#transfer 接口是如何体现的呢? 答案在入参 e 是否为 null:
- 如果
e == null,意味着读线程等待生产者提供元素,该返回值就是相应的写线程提供的元素。 - 如果
e != null,意味着写线程等待读线程取出元素。
返回值也是有讲究的,如果为 null ,可能超时或线程被中断。Transferer 是有两个实现类的,分别是 TransferStack 和 TransferQueue。
| 实现类 | 数据结构 | 是否公平 |
|---|---|---|
| TransferStack | 栈 | 否 |
| TransferQueue | 队列 | 是 |
阻塞的写操作:put
// java.util.concurrent.SynchronousQueue#put
public void put(E e) throws InterruptedException {
    if (e == null) throw new NullPointerException();

    // #1 将元素转换到消费者
    if (transferer.transfer(e, false, 0) == null) {
        // #2
        Thread.interrupted();
        throw new InterruptedException();
    }
}
阻塞的读操作:take
// java.util.concurrent.SynchronousQueue#take
public E take() throws InterruptedException {
    E e = transferer.transfer(null, false, 0);
    if (e != null)
        return e;
    Thread.interrupted();
    throw new InterruptedException();
}
两个方法都调用了 Transferer#transfer 方法,区别在于入参参数不一样:变量 e 是否为 null。Transferer 设计思想:
- 当调用这个方法时,如果 ① 队列为空 ② 队列中的节点和当前的线程操作一致(即也是 put 操作或 take 操作),这种情况会将当前线程加入到等待队列中。
- 如果队列中有其它的等待节点,而且与当前操作可以匹配(读-写配对,读-读或写-写不匹配)。这种情况会将等待队列的队头节点出队,它们配对成功,返回相应数据。
这题让我想到了括号匹配算法,也相当于消消乐。其实,存在等待队列中的操作都是一致的,这要看到底是读线程积压,还是写线程积压。
等待节点:QNode
static final class QNode {
    // 构成单向链表
    volatile QNode next;          // next node in queue

    // 对于写线程,这是它的元素,对于读线程,则为 null
    volatile Object item;         // CAS'ed to or from null

    // 持有线程的引用,用于挂起和唤醒操作
    volatile Thread waiter;       // to control park/unpark

    // 标识位,写线程节点(true) 读线程节点(false)
    final boolean isData;

    ...
}
交接元素:TransferQueue#transfer
E transfer(E e, boolean timed, long nanos) {
    /* Basic algorithm is to loop trying to take either of
     * two actions:
     *
     * 1. If queue apparently empty or holding same-mode nodes,
     *    try to add node to queue of waiters, wait to be
     *    fulfilled (or cancelled) and return matching item.
     *
     * 2. If queue apparently contains waiting items, and this
     *    call is of complementary mode, try to fulfill by CAS'ing
     *    item field of waiting node and dequeuing it, and then
     *    returning matching item.
     *
     * In each case, along the way, check for and try to help
     * advance head and tail on behalf of other stalled/slow
     * threads.
     *
     * The loop starts off with a null check guarding against
     * seeing uninitialized head or tail values. This never
     * happens in current SynchronousQueue, but could if
     * callers held non-volatile/final ref to the
     * transferer. The check is here anyway because it places
     * null checks at top of loop, which is usually faster
     * than having them implicitly interspersed.
     */

    QNode s = null; // constructed/reused as needed

    // 如果 e != null,则为写线程,否则为读线程
    boolean isData = (e != null);

    for (;;) {
        // 获取队列的头指针和尾指针
        QNode t = tail;
        QNode h = head;

        // 未初始化链表,自旋
        if (t == null || h == null)         // saw uninitialized value
            continue;                       // spin

        // #1 队列为空(h == t)或相同操作模式(读-读、写-写)
        if (h == t || t.isData == isData) {
            // 获取链表头节点(不包含 head,即 head.next)
            QNode tn = t.next;

            // #2 说明刚才有其它节点入队,重新判断
            if (t != tail)                  // inconsistent read
                continue;

            // #3 有其它节点入队,但是 tail 没有改变,此时设置 tail 即可
            if (tn != null) {               // lagging tail
                //
                advanceTail(t, tn);
                continue;
            }

            // #4 等待超时,直接返回 null
            if (timed && nanos <= 0)        // can't wait
                return null;

            // #5 初始化 QNode 节点
            if (s == null)
                s = new QNode(e, isData);

            // #6 CAS 将 QNode 插到 tail 后面
            if (!t.casNext(null, s))        // failed to link in
                // #7 CAS 失败,重新来过
                continue;

            // #8 将当前节点设置为新的 tail
            advanceTail(t, s);              // swing tail and wait

            // #9 自旋+阻塞,直到满足条件后返回
            Object x = awaitFulfill(s, e, timed, nanos);

            // #10 线程被唤醒,如果 x=s,说明当前线程被取消执行
            if (x == s) {                   // wait was cancelled
                clean(t, s);
                return null;
            }

            if (!s.isOffList()) {           // not already unlinked
                advanceHead(t, s);          // unlink if head
                if (x != null)              // and forget fields
                    s.item = s;
                s.waiter = null;
            }
            return (x != null) ? (E)x : e;

        } else {                            // complementary-mode
            // #11 走到这里,说明队列中有匹配的节点
            QNode m = h.next;               // node to fulfill
            if (t != tail || m == null || h != head)
                continue;                   // inconsistent read

            Object x = m.item;
            if (isData == (x != null) ||    // m already fulfilled
                x == m ||                   // m cancelled
                !m.casItem(x, e)) {         // lost CAS
                advanceHead(h, m);          // dequeue and retry
                continue;
            }

            advanceHead(h, m);              // successfully fulfilled
            LockSupport.unpark(m.waiter);
            return (x != null) ? (E)x : e;
        }
    }
}
awaitFulfill
// java.util.concurrent.SynchronousQueue.TransferQueue#awaitFulfill
Object awaitFulfill(QNode s, E e, boolean timed, long nanos) {
    /* Same idea as TransferStack.awaitFulfill */
    // #1 计算最终截止时间
    final long deadline = timed ? System.nanoTime() + nanos : 0L;
    Thread w = Thread.currentThread();

    // #2 计算自旋次数
    int spins = ((head.next == s) ?
                 (timed ? maxTimedSpins : maxUntimedSpins) : 0);

    // 死循环
    for (;;) {
        // #3 当前线程被中断了,执行取消操作
        if (w.isInterrupted())
            // #4 将当前节点的 item 设置为 this
            s.tryCancel(e);

        // #5 获取节点的 item
        Object x = s.item;

        // #6 方法的唯一出口,如果 item != e,说明元素 e 已被取走
        if (x != e)
            // 可以直接返回
            return x;

        // #7 检查超时时间
        if (timed) {
            nanos = deadline - System.nanoTime();
            if (nanos <= 0L) {
                // #8 预设的超时时间已到,取消
                s.tryCancel(e);
                continue;
            }
        }

        // 自旋
        if (spins > 0)
            --spins;

        // #8 超过自旋次数
        else if (s.waiter == null)
            // ① 更新waiter指向当前线程
            s.waiter = w;
        else if (!timed)
            // ② 阻塞线程,直到被其它线程唤醒
            LockSupport.park(this);
        else if (nanos > spinForTimeoutThreshold)
            // ③ 带超时时间的阻塞调用
            LockSupport.parkNanos(this, nanos);
    }
}

void tryCancel(Object cmp) {
    UNSAFE.compareAndSwapObject(this, itemOffset, cmp, this);
}
PriorityBlockingQueue
带排序功能的阻塞并发队列,底层使用 ReentrantLock 锁,无界队列。它也不允许插入 null 值,同时,插入队列的对象必须是可比较的,通常我们会实现 Comparable 接口。put 方法永远不会阻塞,因为底层是无界队列,如果容量不够,会自动执行扩容操作。
属性
// 数组默认的初始大小
private static final int DEFAULT_INITIAL_CAPACITY = 11;
// 数组的最大容量
private static final int MAX_ARRAY_SIZE = Integer.MAX_VALUE - 8;

// 存放元素的数组
private transient Object[] queue;

// 队列当前大小
private transient int size;

// 比较器,用户根据实际需要传入
private transient Comparator<? super E> comparator;

// PriorityBlockingQueue 全局锁
private final ReentrantLock lock;

// 等待条件:当队列不为空时调用 notEmpty.signal() 唤醒被阻塞的线程
private final Condition notEmpty;

// 用于数组扩容的自旋锁。当需要扩容数量时,首先要获得这把锁
private transient volatile int allocationSpinLock;

// 用于序列化和反序列化的时候用,对于 PriorityBlockingQueue 我们应该比较少使用到序列化
private PriorityQueue q;
PriorityBlockingQueue 底层基于数组实现二叉堆,所有的 public 采用一个 lock 进行并发控制。
自动扩容:tryGrow
private void tryGrow(Object[] array, int oldCap) {
    // #0 先释放锁,因为只有持有 lock 锁的线程才能调用这个方法
    lock.unlock(); // must release and then re-acquire main lock
    Object[] newArray = null;

    // #1 再获取自旋锁,这里主要是扩容过程可能很慢,为了不要降低性能系统,
    // 这里使用一个单独的锁进行扩容操作。其它线程就可以获取lock用来进行读操作。
    // 如果此时有写线程持有锁,那么它会进入扩容阶段。但是无法获得 allocationSpinLock 锁
    if (allocationSpinLock == 0 &&
        UNSAFE.compareAndSwapInt(this, allocationSpinLockOffset, 0, 1)) {
        try {
            // #2 节点数小,增长快,节点数大,增长慢
            int newCap = oldCap + ((oldCap < 64) ?
                                   (oldCap + 2) : // grow faster if small
                                   (oldCap >> 1));

            // #3 溢出处理
            if (newCap - MAX_ARRAY_SIZE > 0) {    // possible overflow
                int minCap = oldCap + 1;
                if (minCap < 0 || minCap > MAX_ARRAY_SIZE)
                    throw new OutOfMemoryError();
                newCap = MAX_ARRAY_SIZE;
            }

            // #4 分配数组,如果 queue != array,说明已经有其它线程分配了新的空间
            if (newCap > oldCap && queue == array)
                newArray = new Object[newCap];
        } finally {
            // #5 释放锁
            allocationSpinLock = 0;
        }
    }

    // #6 如果有其它也在做扩容操作,当前线程交出 CPU 时间片,等待其它线程操作,主动让出,避免竞争
    // 这里是对 #4 的补充
    if (newArray == null) // back off if another thread is allocating
        Thread.yield();

    // #7 重新获得锁
    lock.lock();

    // #8 判断是否是自己的创建的,如果是,则执行复制操作
    if (newArray != null && queue == array) {
        queue = newArray;
        System.arraycopy(array, 0, newArray, 0, oldCap);
    }
}
这里的并发设计的也十分有意思,普通人真的很难会考虑到如此细致的地方。
写操作:put
public void put(E e) {
    offer(e); // never need to block
}

public boolean offer(E e) {
    if (e == null)
        throw new NullPointerException();

    // #1 首先获得锁
    final ReentrantLock lock = this.lock;
    lock.lock();
    int n, cap;
    Object[] array;

    // #2 判断数组长度是否满足,如果不满足,扩容
    while ((n = size) >= (cap = (array = queue).length))
        tryGrow(array, cap);
    try {
        Comparator<? super E> cmp = comparator;

        // #3 根据有无比较器调用不同的方法
        if (cmp == null)
            siftUpComparable(n, e, array);
        else
            siftUpUsingComparator(n, e, array, cmp);

        // #4 更新 size
        size = n + 1;

        // #5 唤醒等待的读线程
        notEmpty.signal();
    } finally {

        // #6 释放锁
        lock.unlock();
    }

    // #7 永远能添加成功,并且不会被阻塞
    return true;
}
二叉堆上浮:siftUpComparable
// 上浮操作就是寻找索引传下小于 k 的位置
private static <T> void siftUpComparable(int k, T x, Object[] array) {
    Comparable<? super T> key = (Comparable<? super T>) x;
    while (k > 0) {
        // #1 获取父节点索引传下
        int parent = (k - 1) >>> 1;
        Object e = array[parent];

        // #2 和父节点比较,如果大于父节点,退出
        if (key.compareTo((T) e) >= 0)
            break;

        // #3 和父节点交换位置,继续上浮
        array[k] = e;
        k = parent;
    }
    array[k] = key;
}

若有收获,就点个赞吧
0 人点赞


