If you want to take advantage of a Nvidia GPU, then you need to install CUDA.
- Ubuntu Anaconda
Windows Native
Not suggested.Windows Subsystem for Linux (WSL)
Windows Subsystem for Linux is a Windows feature that enables users to run native Linux applications, containers and command-line tools directly on Windows 11 and later OS builds.
Step 1 - Install NVIDIA Driver for GPU Support
Download and install NVIDIA display driver on your Windows 11 system from the link:
- https://developer.nvidia.com/cuda/wsl/download
:::info
This is the only display driver you need to install. However, you still need to install the CUDA toolkit in WSL.
:::
Step 2 - Install WSL 2 and then restart
You can install everything you need to run Windows Subsystem for Linux (WSL) by entering the following command in an administrator PowerShell or Windows Command Prompt:
This command will enable the required optional components, download the latest Linux kernel, set WSL 2 as your default, and install a Linux distribution for you.wsl --install
You then restart your machine. :::info By default, WSL 2 comes installed with Ubuntu. Other distros are available from the Microsoft Store. :::Step 3 - Install CUDA Toolkit in WSL 2
In order to compile a CUDA application on WSL 2, you will have to install the CUDA toolkit for Linux from the WSL prompt.
Launch WSL 2, then download the CUDA toolkit from the following link:
For example, CUDA toolkit 11.3.0 WSL-Ubuntu could be installed with the following commands:
wget https://developer.download.nvidia.com/compute/cuda/repos/wsl-ubuntu/x86_64/cuda-wsl-ubuntu.pinsudo mv cuda-wsl-ubuntu.pin /etc/apt/preferences.d/cuda-repository-pin-600wget https://developer.download.nvidia.com/compute/cuda/11.3.0/local_installers/cuda-repo-wsl-ubuntu-11-3-local_11.3.0-1_amd64.debsudo dpkg -i cuda-repo-wsl-ubuntu-11-3-local_11.3.0-1_amd64.debsudo apt-key add /var/cuda-repo-wsl-ubuntu-11-3-local/7fa2af80.pubsudo apt-get updatesudo apt-get -y install cuda
Alternatively, you can install CUDA toolkit using the anaconda package manager:
conda install cudatoolkit=<version>
We suggest you install the CUDA toolkit using anaconda, as it enables you to have multiple environments, also anaconda will take care of dependencies issues within each environment. :::info According to CUDA on WSL documentation, OpenGL is not available on WSL at the moment. :::
Linux
We only cover Ubuntu here, however the steps should be similar for other Linux distributions.
First of all, you need to uninstall existing CUDA or cuDNN (if any):
sudo apt-get remove --purge nvidia*
Switch to Nvidia graphics driver
In Ubuntu’ user interface, open Software & Updates, under the Additional Driverslabel, select a Nvidia official driver (i.e. Using NVIDIA driver metapackage from nvidia-driver-<version_number>), then restart the computer.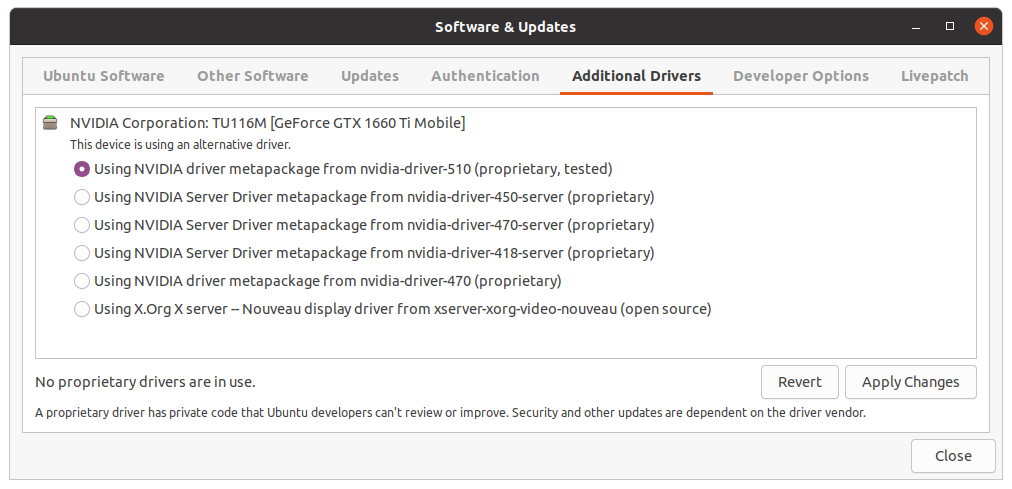
Update software list
sudo apt updatesudo apt upgrade
Install CUDA
Install CUDA from the Official website.
If you see Existing package manager installation of the driver found., you should select continue, because the old driver has been uninstalled in the previous step.
At the CUDA installerwindow, you should unselect Driveroption.
Configure environmental variable (for cuda 10.2)
nano ~/.bashrc
Append the following command to that file:
export PATH=$PATH:/usr/local/cuda-10.2/binexport LD_LIBRARY_PATH=$LD_LIBRARY_PATH:/usr/local/cuda-10.2/lib64export CUDADIR=/usr/local/cuda-10.2
Then make it take effect:
source ~/.bashrc
You should now be able to check the CUDA toolkit info using the command: nvcc -V.
配置国内镜像软件源(Mainland China only)
“Across the Great Wall we can reach every corner in the world”
首先,安装vim编辑器:
sudo apt install vim
:::info 一键设置国内源 与 手动更改国内源 二选一即可。 :::
一键设置国内源
清华大学提供的切换国内源脚本:
wget https://tuna.moe/oh-my-tuna/oh-my-tuna.py# For yourselfpython oh-my-tuna.py# ...or for everyone!sudo python oh-my-tuna.py --global# Get some helppython oh-my-tuna.py -h
手动更改国内源
备份原来的源
sudo cp /etc/apt/sources.list /etc/apt/sources.list.bak
更改源
sudo vim /etc/apt/sources.list
内容为:
deb http://mirrors.aliyun.com/ubuntu/ focal main restricted universe multiversedeb-src http://mirrors.aliyun.com/ubuntu/ focal main restricted universe multiversedeb http://mirrors.aliyun.com/ubuntu/ focal-security main restricted universe multiversedeb-src http://mirrors.aliyun.com/ubuntu/ focal-security main restricted universe multiversedeb http://mirrors.aliyun.com/ubuntu/ focal-updates main restricted universe multiversedeb-src http://mirrors.aliyun.com/ubuntu/ focal-updates main restricted universe multiversedeb http://mirrors.aliyun.com/ubuntu/ focal-proposed main restricted universe multiversedeb-src http://mirrors.aliyun.com/ubuntu/ focal-proposed main restricted universe multiversedeb http://mirrors.aliyun.com/ubuntu/ focal-backports main restricted universe multiversedeb-src http://mirrors.aliyun.com/ubuntu/ focal-backports main restricted universe multiverse
:::tips
注:按esc->:->wq退出
:::
完成以上步骤后记得更新软件列表:
sudo apt updatesudp apt upgrade
References

若有收获,就点个赞吧
0 人点赞
