在 JUC 包下面,提供了一系列具备原子操作的类。所谓原子操作,就是在一个不可中断的操作,即在多线程环境下,一个操作一旦开始,就不会被其他线程中断。
Atomic 原子类概述
JUC 并发包下的原子类都存放在 java.util.concurrent.atomic 包路径下,具体如下图所示: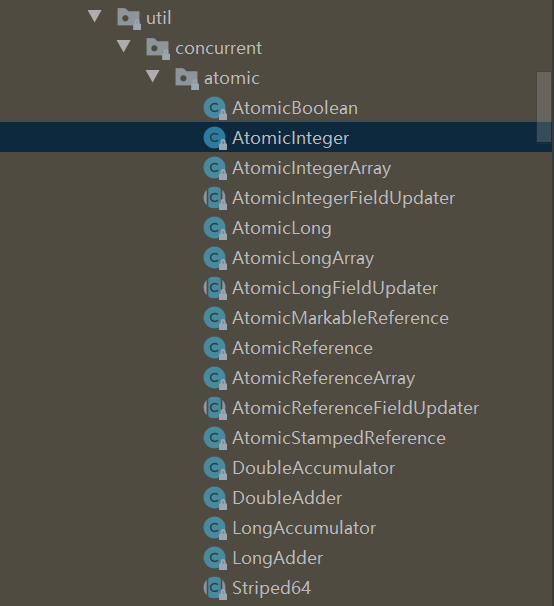
- 操作数据类型为基本类型的有
AtomicInteger、AtomicLong和AtomicBoolean - 操作数据类型为为数组的有
AtomicIntegerArray、AtomicLongArray和AtomicReferenceArray - 操作数据类型为为引用类型的有
AtomicReference、AtomicMarkableReference(带更新标记位) 、和AtomicStampedReference(带更新版本号)AtomicMarkableReference 类将 boolean 标记与引用关联起来,可以解决使用 AtomicBoolean 进行原子更新时可能出现的 ABA 问题AtomicStampedReference类将整数值与引用关联起来,可以解决使用 AtomicInteger 进行原子更新时可能出现的 ABA 问题
- 操作字段更新的原子类有
AtomicIntegerFieldUpdater、AtomicLongFieldUpdater和AtomicReferenceFieldUpdater
AtomicInteger 常用方法
// 获取当前值public final int get() {return value;}// 设置变量的值,但是不保证更新结果立即对其他线程可见。保证写入操作不会与之前的写入操作重排序,但是不保证与后续的操作发生重排序public final void lazySet(int newValue) {unsafe.putOrderedInt(this, valueOffset, newValue);}// 设置新值且返回旧值public final int getAndSet(int newValue) {return unsafe.getAndSetInt(this, valueOffset, newValue);}// 如果原子变量中value的值与expect一直,则替换称为update。替换成功则返回truepublic final boolean compareAndSet(int expect, int update) {return unsafe.compareAndSwapInt(this, valueOffset, expect, update);}// 获取当前值,然后自增public final int getAndIncrement() {return unsafe.getAndAddInt(this, valueOffset, 1);}// 获取当前值,然后自减public final int getAndDecrement() {return unsafe.getAndAddInt(this, valueOffset, -1);}public final int getAndAdd(int delta) {return unsafe.getAndAddInt(this, valueOffset, delta);}// 原子性设置value的值为原始值+1,返回值为递增后的值public final int incrementAndGet() {// 因为getAndAddInt返回的是之前的值,因此后面+1得到新值return unsafe.getAndAddInt(this, valueOffset, 1) + 1;}public final int addAndGet(int delta) {return unsafe.getAndAddInt(this, valueOffset, delta) + delta;}// 原子性设置value的值为原始值-+1,返回值为递减后的值public final int decrementAndGet() {return unsafe.getAndAddInt(this, valueOffset, -1) - 1;}// 通过updateFunction钩子函数对旧值进行操作之后提供结果,更新到对应字段// 返回原字段的旧值// @since 1.8public final int getAndUpdate(IntUnaryOperator updateFunction) {int prev, next;do {prev = get();next = updateFunction.applyAsInt(prev);} while (!compareAndSet(prev, next));return prev;}// 通过updateFunction钩子函数对旧值进行操作之后提供结果,更新到对应字段// 返回更新之后的新值// @since 1.8public final int updateAndGet(IntUnaryOperator updateFunction) {int prev, next;// 自旋do {prev = get();next = updateFunction.applyAsInt(prev);} while (!compareAndSet(prev, next));return next;}// 通过updateFunction钩子函数对旧值以及参数x进行操作之后提供结果,更新到对应字段// 返回原字段的旧值// @since 1.8public final int getAndAccumulate(int x, IntBinaryOperator accumulatorFunction) {int prev, next;do {prev = get();next = accumulatorFunction.applyAsInt(prev, x);} while (!compareAndSet(prev, next));return prev;}// 通过updateFunction钩子函数对旧值以及参数x进行操作之后提供结果,更新到对应字段// 返回更新之后的新值// @since 1.8public final int accumulateAndGet(int x, IntBinaryOperator accumulatorFunction) {int prev, next;do {prev = get();next = accumulatorFunction.applyAsInt(prev, x);} while (!compareAndSet(prev, next));return next;}public int intValue() {return get();}public long longValue() {return (long)get();}public long floatValue() {return (float)get();}public long doubleValue() {return (double)get();}
AtomicInteger 使用示例
AtomicInteger 是一个将整形数据操作封装为原子操作的类。如果我们的并发环境下操作的临界资源是整型数据,为了线程安全,可以使用该类进行替换。例如:
public class AtomicIntegerTest {private static int value;private static AtomicInteger atomicInteger = new AtomicInteger();public static void main(String[] args) throws Exception {CountDownLatch countDownLatch = new CountDownLatch(1000);AtomicIntegerTest atomicIntegerTest = new AtomicIntegerTest();for (int i = 0; i < 1000; i++) {new Thread(() -> {atomicIntegerTest.addIncrement();countDownLatch.countDown();}, "这是第" + i + "个线程").start();}countDownLatch.await();System.out.println("1000个子线程已经全部执行结束");System.out.println(value);System.out.println(atomicInteger.get());}private void addIncrement() {try {Thread.sleep(200);value++;atomicInteger.getAndIncrement();} catch (InterruptedException e) {e.printStackTrace();}}}
输出结果如下:
1000个子线程已经全部执行结束9991000
因此可以看到:并发环境下,一般的 int 自增会导致线程安全问题,而 AtomicInteger 则会得到正确的结果。
AtomicInteger 源码分析
public class AtomicInteger extends Number implements java.io.Serializable {private static final long serialVersionUID = 6214790243416807050L;private static final Unsafe unsafe = Unsafe.getUnsafe();private static final long valueOffset;static {try {valueOffset = unsafe.objectFieldOffset(AtomicInteger.class.getDeclaredField("value"));} catch (Exception ex) { throw new Error(ex); }}private volatile int value;......}
- unsafe 是一个提供了直接操作内存的工具,有 AtomicInteger 是在 rt.jar 之下,是通过启动类加载器进行加载的,因此可以直接通过
getUnsafe()获取到 Unsafe 实例 - valueOffset 字段是 value 字段在整个 AtomicInteger 实例之中的内存地址偏移量,可以通过这个偏移量直接定位到需要修改的字段的内存地址
- value 字段是被
volatile关键字所修饰,表明其具备可见性和禁止重排序的功能 - CAS 是一条 CPU 的原子指令(cmpxchg),故而对 value 的操作的原子性直接由硬件指令来支持。因此,对于一个通过具备了可见性,禁止重排序以及原子性的类来说,对其的操作肯定是线程安全的。
AtomicInteger 主要通过 **CAS 自旋 + volatile** 的方案实现,既保障了变量操作的线程安全性,又避免了 synchronized 重量级锁的高开销,使得 Java 程序的执行效率大为提升。在高并发下,大量线程竞争同一资源,但同一时间只会有一个线程的 CAS 操作会成功,其他线程都会进入无限循环尝试 CAS 操作,这就会浪费 CPU 资源。
ABA 问题简述
假设内存中存在一个数据V1,现在有两个线程 A 和 B 同时对其进行操作,A 线程读出 V1 并对其使用,B 线程也读出 V1。首先,B 线程先将 V1 更新为 V2,然后经过一些操作之后又将 V2 变为了 V1,此时 A 线程进行 CAS 操作,发现数据仍然是 V1,最终 A 线程也执行成功了。但是 A 线程并不知道 B 线程已经对这个数据进行了多次操作,里面的数据 V1 并不是它读取之时的 V1,而是经过 B 线程修改之后的 V1。这就是 ABA 问题。
使用 AtomicStampedReference 解决 ABA 问题
AtomicStampReference 在 CAS 的基础上增加了一个 Stamp 标记,使用这个标记可以用来觉察数据是否发生变化,给数据带上了一种实效性的检验。
AtomicStampReference 的 compareAndSet() 方法首先检查当前的对象引用值是否等于预期引用,并且当前 Stamp 标志是否等于预期标志,如果全部相等,就以原子方式将引用值和 Stamp 标志的值更新为给定的更新值。
AtomicStampedReference 的构造器有两个参数:
// initialRef 表示要引用的原始数据// initialStamp 表示最初的版本号public AtomicStampedReference(V initialRef, int initialStamp) {pair = Pair.of(initialRef, initialStamp);}
AtomicStampedReference 的 CAS 操作的定义如下:
/*** 如果当前引用等于(==)预期引用并且当前标记等于预期标记,则原子地将引用和标记的值设置为给定的更新值。** @param expectedReference 预期引用值,原来的CAS中的参数* @param newReference 更新后的引用值,替换后的新参数* @param expectedStamp 预期 stamp 标记,原来 CAS 数据旧的版本号* @param newStamp 更新后的 stamp 标记,替换后的新参数版本号* @return {@code true} if successful*/public boolean compareAndSet(V expectedReference,V newReference,int expectedStamp,int newStamp) {Pair<V> current = pair;returnexpectedReference == current.reference && expectedStamp == current.stamp &&((newReference == current.reference && newStamp == current.stamp) ||casPair(current, Pair.of(newReference, newStamp)));}private boolean casPair(Pair<V> cmp, Pair<V> val) {return UNSAFE.compareAndSwapObject(this, pairOffset, cmp, val);}
Pair 是 AtomicStampedReference 的一个内部类,持有需要修改的引用对象和版本号,该原子类持有的对象就是 Pair 对象。Pair 的定义如下:
public class AtomicStampedReference<V> {private static class Pair<T> {final T reference;final int stamp;private Pair(T reference, int stamp) {this.reference = reference;this.stamp = stamp;}static <T> Pair<T> of(T reference, int stamp) {return new Pair<T>(reference, stamp);}}private volatile Pair<V> pair;......}
使用 AtomicMarkableReference 解决 ABA 问题
AtomicMarkableReference 标记属性 mark 是 boolean 类型,而不是数字类型,因此标记属性 mark 仅记录值是否修改过,而不能被用来记录期间被修改了多少次。AtomicMarkableReference 适用于只要知道对象是否被修改过,而不适用于对象被反复修改的场景。
AtomicMarkableReference 的 CAS 操作的定义如下:
/*** 如果当前引用等于(==)预期引用并且当前标记等于预期标记,则原子地将引用和标记的值设置为给定的更新值。** @param expectedReference 预期引用值,原来的CAS中的参数* @param newReference 更新后的引用值,替换后的新参数* @param expectedMark 预期 mark 标记,原来 CAS 数据旧的版本号* @param newMark 更新后的 mark 标记,替换后的新参数版本号* @return {@code true} if successful*/public boolean compareAndSet(V expectedReference, V newReference, boolean expectedMark, boolean newMark) {Pair<V> current = pair;return expectedReference == current.reference && expectedMark == current.mark &&((newReference == current.reference && newMark == current.mark) ||casPair(current, Pair.of(newReference, newMark)));}
AtomicIntergerFieldUpdater/AtomicLongFieldUpdater/AtomicReferenceFieldUpdater
为什么需要AtomicXxxFieldUpdater
如果一个类是我们自己编写的,那么可以在定义的时候将成员变量定义成为 Atomic 类型。但是如果此类已经存在且不能更改其源码,那么想要实现其成员变量的原子操作,就需要 AtomicIntergerFieldUpdater、AtomicLongFieldUpdater 和 AtomicReferenceFieldUpdater。
AtomicLongFieldUpdater 的构造函数是 protected 的,也就意味着不能通过 new 关键字进行实例化。AtomicLongFieldUpdater 提供了一个静态方法用来创建实例:
/*** 为具有给定字段的对象创建并返回一个 updater。 需要 Class 参数来检查反射类型和泛型类型是否匹配。** @param tclass 给定字段的对象对应的 class 对象* @param fieldName 需要更新的字段的名称* @param <U> tclass实例的具体类型* @return the updater*/@CallerSensitivepublic static <U> AtomicIntegerFieldUpdater<U> newUpdater(Class<U> tclass, String fieldName) {return new AtomicIntegerFieldUpdaterImpl<U>(tclass, fieldName, Reflection.getCallerClass());}protected AtomicIntegerFieldUpdater() {}private static final class AtomicIntegerFieldUpdaterImpl<T> extends AtomicIntegerFieldUpdater<T> {private static final sun.misc.Unsafe U = sun.misc.Unsafe.getUnsafe();private final long offset;/*** 如果要修改的字段(Field)是protected,那么子类需要自己构建updater。否则的话使用* updater同tclass使用的一样*/private final Class<?> cclass;/** class holding the field */private final Class<T> tclass;AtomicIntegerFieldUpdaterImpl(final Class<T> tclass, final String fieldName, final Class<?> caller) {final Field field;final int modifiers;try {field = AccessController.doPrivileged(new PrivilegedExceptionAction<Field>() {public Field run() throws NoSuchFieldException {// 通过反射获取fieldName对应的Fieldreturn tclass.getDeclaredField(fieldName);}});modifiers = field.getModifiers();sun.reflect.misc.ReflectUtil.ensureMemberAccess(caller, tclass, null, modifiers);ClassLoader cl = tclass.getClassLoader();ClassLoader ccl = caller.getClassLoader();if ((ccl != null) && (ccl != cl) &&((cl == null) || !isAncestor(cl, ccl))) {sun.reflect.misc.ReflectUtil.checkPackageAccess(tclass);}} catch (PrivilegedActionException pae) {throw new RuntimeException(pae.getException());} catch (Exception ex) {throw new RuntimeException(ex);}// 字段必须是int类型,Integer类型都不行if (field.getType() != int.class)throw new IllegalArgumentException("Must be integer type");// 字段必须是volatile变量if (!Modifier.isVolatile(modifiers))throw new IllegalArgumentException("Must be volatile type");// 对受保护字段成员的访问仅限于访问类或其子类之一的接收者,并且访问类必须反过来// 是受保护成员定义类的子类(或包兄弟)。 如果updater引用当前包之外的声明类的受保护字段,// 则接收者参数将缩小为访问类的类型。this.cclass = (Modifier.isProtected(modifiers) && tclass.isAssignableFrom(caller)&& !isSamePackage(tclass, caller)) ? caller : tclass;this.tclass = tclass;this.offset = U.objectFieldOffset(field);}
newUpdater(Class<U> tclass, String fieldName)静态方法要修改的 class(不是 object)和其对应的字段名称,内部通过 filedName 反射获取对应的 Field,然后包装成为 AtomicIntegerFieldUpdater。因此,这个对象表示的是每个类的成员变量,而不是对象的成员变量- 成员变量必须是 volatile 的 int 类型
若要修改某个实例的成员变量的值,在传入相应的对象:
public int getAndIncrement(T obj) {int prev, next;do {prev = get(obj);next = prev + 1;} while (!compareAndSet(obj, prev, next));return prev;}public final boolean compareAndSet(T obj, int expect, int update) {accessCheck(obj);return U.compareAndSwapInt(obj, offset, expect, update);}// 检查该 obj 是不是 tclass 类型private final void accessCheck(T obj) {if (!cclass.isInstance(obj))throwAccessCheckException(obj);}
LongAdder
LongAdder 原理介绍
LongAdder 是 JDK1.8 新增的原子操作类。前面说了,AtomicInteger 在高并发下大量线程会同时去竞争更新同一个原子变量,但是由于同时只有一个线程的 CAS 操作会成功,这就造成了大量线程竞争失败后,会通过无限循环不断进行自旋尝试 CAS 的操作,而这会白白浪费 CPU 资源。同样,AtomicLong 也具有同样的问题。那么,把一个变量分解为多个变量,让同样多的线程去竞争多个资源,这样就解决了这个性能问题。LongAdder 就是这个思路的实现者。
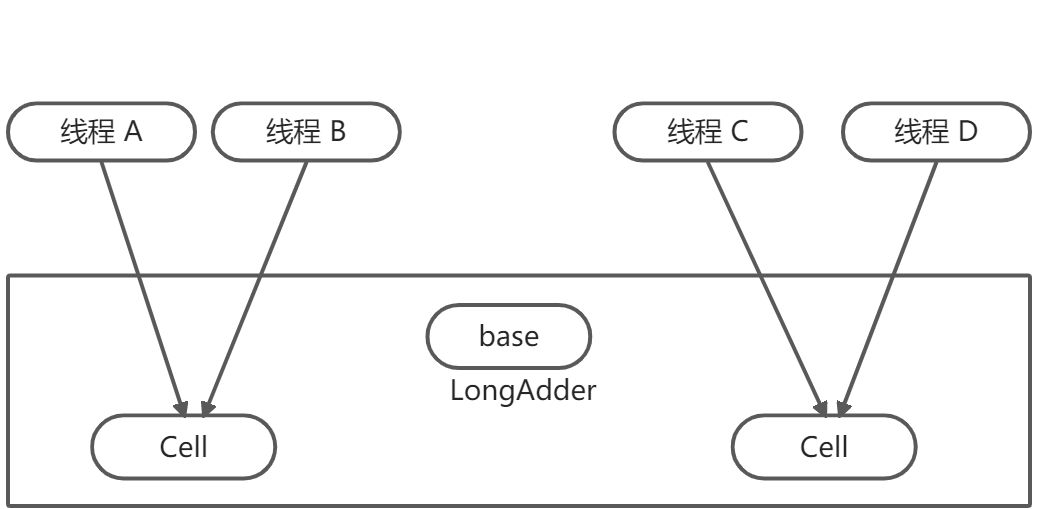
LongAdder 的核心思想是热点分离。与 ConcurrentHashMap 类似:将 value 值分离为一个数组,当多线程访问时,通过 hash 函数将线程映射到数组的一个元素进行操作,而获取最终的 value 结果时,则将数组的元素求和。
LongAdder 维护了一个延迟初始化的原子性更新数组(默认情况下 Cell 数组为 null)和一个基值变量 base。由于 Cells 占用内存较大,因此只有在需要时才会被创建,也就是惰性加载。
当 Cells 为 null 且并发线程较少时,所有的累加操作都是对 base 变量进行的。保持 Cells 的长度为 2n ,在初始化时 Cells 的元素个数为 2。Cell 是 AtomicLong 的一个改进,用来减少缓存的征用,解决伪共享的问题。
对于大多数孤立的多个原子操作进行字节填充是浪费的,因为原子性操作都是无规律地分散在内存中的(也就是说多个原子性变量的内存地址是不连续的),多个原子变量被放入同一个缓存行的可能性很小。但是原子性数组元素的内存地址是连续的,所以数组内的多个元素能经常共享缓存行,因此这里使用 @sun.misc.Contended 注解对 Cell 类进行字节填充,这防止了数组中多个元素共享一个缓存行,在性能上是一个提升。
LongAdder 源码分析
LongAdder 的类图结构如下:
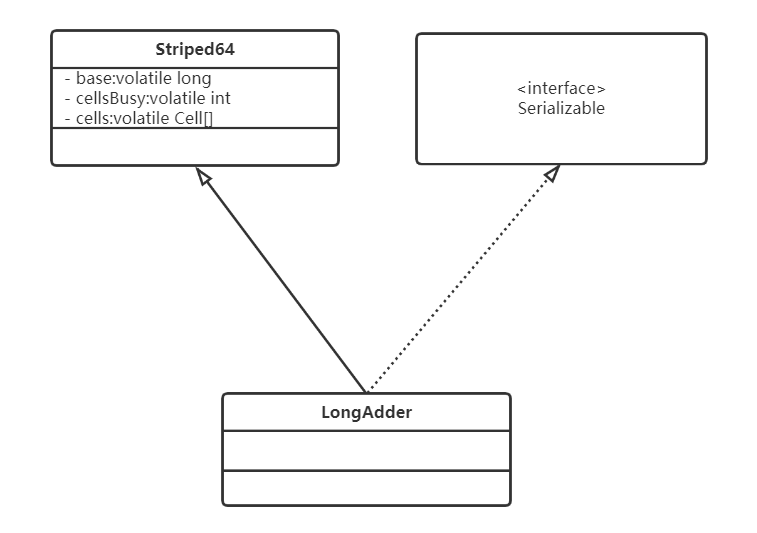
图 - LongAdder 类图
LongAdder 继承至 Striped64,在 Striped64 内部维护了三个变量:
- base:基础值,默认为 0
- cells:原子性数组
- cellsBusy:用来实现自旋锁,状态值只有 0 和 1,当创建 Cell 元素,扩容 Cells 或者初始化 Cells 时,使用 CAS 操作该变量来保证同时只有一个线程可以进行其中之一的操作
- LongAdder 的真实值等于 base 的值与 Cells 中所有元素的值的累加
Cell 结构
Cell 是定义在 Striped64 中的内部类,其结构如下:
@sun.misc.Contendedstatic final class Cell {volatile long value;Cell(long x) { value = x; }final boolean cas(long cmp, long val) {return UNSAFE.compareAndSwapLong(this, valueOffset, cmp, val);}// Unsafe mechanicsprivate static final sun.misc.Unsafe UNSAFE;private static final long valueOffset;static {try {UNSAFE = sun.misc.Unsafe.getUnsafe();Class<?> ak = Cell.class;valueOffset = UNSAFE.objectFieldOffset(ak.getDeclaredField("value"));} catch (Exception e) {throw new Error(e);}}}
@sun.misc.Contended注解可以避免伪共享- value 使用 volatile 修饰是因为线程操作 value 时没有使用锁,这里可以保证可见性
final boolean cas(long cmp, long val)使用 CAS 操作实现,可以保证 value 的原子性
long sum()
public long sum() {Cell[] as = cells;long sum = base;Cell a;if (as != null) {for (int i = 0; i < as.length; ++i) {if ((a = as[i]) != null)sum += a.value;}}return sum;}
返回当前的值,内部操作是累加所有 Cell 内部的 value 值后再累加 base。由于计算总和时没有对 Cell 数组进行加锁,所以在累加过程中可能有其他线程对 Cell 中的值进行了修改,也有可能对数组进行了扩容,所以 sum 返回的值并不是非常精确的,其返回值并不是一个调用 sum 方法时的原子快照值。
void reset()
public void reset() {Cell[] as = cells;base = 0L;Cell a;if (as != null) {for (int i = 0; i < as.length; ++i) {if ((a = as[i]) != null)a.value = 0L;}}}
重置操作,把 base 置为 0,如果 Cell 数组有元素,则元素值被重置为 0。
long sumThenReset()
public long sumThenReset() {Cell[] as = cells;long sum = base;base = 0L;Cell a;if (as != null) {for (int i = 0; i < as.length; ++i) {if ((a = as[i]) != null) {sum += a.value;a.value = 0L;}}}return sum;}
sum() 的改造版本,在使用 sum 累加对应的 Cell 值后,把当前 Cell 的值重置为 0, base 重置为 0。这样,当多线程调用该方法时会有问题,比如考虑第一个调用线程清空 Cell 的值,则后一个线程调用时累加的都是 0 值。
void add(long x)
public void add(long x) {Cell[] as;long b;long v;Cell a;int m;// CAS 失败说明竞争激烈,可以启动cells参与计算// 步骤1if ((as = cells) != null || !casBase(b = base, b + x)) {boolean uncontended = true;if (as null || (m = as.length - 1) < 0 || (a = as[getProbe() & m]) == null|| !(uncontended = a.cas(v = a.value, v + x))) // 步骤2longAccumulate(x, null, uncontended);}}final boolean casBase(long cmp, long val) {return UNSAFE.compareAndSwapLong(this, BASE, cmp, val);}final boolean cas(long cmp, long val) {return UNSAFE.compareAndSwapLong(this, valueOffset, cmp, val);}
- 如果 cells 为 null 则当前在基础变量 base 上进行累加,这时候就类似 AtomicLong 的操作
- 如果 cells 不为 null 或者执行 AtomicLong 的 CAS 操作失败了,就会执行接下来的操作:
as[getProbe() & m])根据当前线程映射到数组元素。getProbe()则用于获取当前线程中变量threadLocalRandomProbe 的值,这个值一开始为 0,在longAccumulate里面会对其进行初始化- 用 CAS 操作去更新分配的 Cell 元素的 value 值
- 注意步骤1,有两个条件会将对 LongAdder 的操作分散到 cells 数组中:
- 对 base 的 CAS 操作首次失败时,会创建 cells 数组
- 在 a 之后,后续的所有
add(long x)操作都会变成操作 cells 数组,这是逻辑或运算符(||)的特性
- 步骤2中,如果已经根据线程找到了其在 cells 中的索引且索引位置对应的元素不为 null,那么就对对应位置的 Cell 元素进行 CAS 操作。该 CAS 失败则会将 uncontended 置为 false,并且作为参数传递到
longAccumulate(...)方法中
final void longAccumulate(long, LongBinaryOperator, boolean)
/*** 处理涉及初始化、扩容、创建Cell元素和或竞争的更新情况。这种方法会遇到乐观重试代码的常见* 非模块化问题,依赖于重新检查的读取集。** @param x the value* @param fn 更新函数,或null* @param wasUncontended 如果CAS在调用之前失败,则为 false*/final void longAccumulate(long x, LongBinaryOperator fn, boolean wasUncontended) {int h;// 步骤1 初始化当前线程的变量 threadLocalRandomProbe 的值if ((h = getProbe()) == 0) {ThreadLocalRandom.current(); // force initializationh = getProbe();// 线程首次绑定,wasUncontended置为truewasUncontended = true;}boolean collide = false; // True if last slot nonemptyfor (;;) {Cell[] as;Cell a;int n; // cells数组长度long v;// 步骤2 cells数组不为null且已经存在元素if ((as = cells) != null && (n = as.length) > 0) {// 步骤2.1 获取当前线程对应的Cell元素if ((a = as[(n - 1) & h]) == null) {if (cellsBusy == 0) { // Try to attach new Cell// 创建一个Cell数据Cell r = new Cell(x); // Optimistically create// 步骤2.1.1 将cellsBusy的值通过CAS操作设置为1,表示当前线程正在对cellsBusy进行操作if (cellsBusy == 0 && casCellsBusy()) {boolean created = false;try { // Recheck under lockCell[] rs;int m; // cells数组长度int j; // 当前线程映射到cells数组中得到的索引if ((rs = cells) != null && (m = rs.length) > 0 &&rs[j = (m - 1) & h] == null) {// 将新创建的Cell加入数组rs[j] = r;created = true;}} finally {// CAS退出cellsBusy = 0;}if (created)break;// 步骤2.1.2 继续for循环continue; // Slot is now non-empty}}// 数组最后一个slot不为nullcollide = false;}// 步骤2.2else if (!wasUncontended) // CAS already known to failwasUncontended = true; // Continue after rehash// 步骤2.3 通过CAS操作替换值else if (a.cas(v = a.value, ((fn == null) ? v + x : fn.applyAsLong(v, x))))break;// 步骤2.4else if (n >= NCPU || cells != as)collide = false; // At max size or stale// 步骤2.5else if (!collide)collide = true;// 步骤2.6 自旋else if (cellsBusy == 0 && casCellsBusy()) {try {if (cells == as) { // Expand table unless stale// 步骤2.6.1 两倍扩容Cell[] rs = new Cell[n << 1];for (int i = 0; i < n; ++i)rs[i] = as[i];cells = rs;}} finally {// 步骤2.6.2 取消自旋,让其他线程可以进入cellsBusy = 0;}// 步骤2.6.3collide = false;continue; // Retry with expanded table}// 步骤2.7h = advanceProbe(h);}// 步骤3else if (cellsBusy == 0 && cells == as && casCellsBusy()) {boolean init = false;try { // Initialize tableif (cells == as) {// 步骤3.1 首次创建长度为 2 的数组Cell[] rs = new Cell[2];// 步骤3.2 将当前线程映射到数组中,得到一个合适的数组下标,并且将数值放置其中rs[h & 1] = new Cell(x);cells = rs;init = true;}} finally {// 步骤3.3 放开自旋锁cellsBusy = 0;}if (init)break;}// 步骤4else if (casBase(v = base, ((fn == null) ? v + x : fn.applyAsLong(v, x))))break; // Fall back on using base}}
- 步骤1 - 首先初始化当前线程的变量 threadLocalRandomProbe 的值,这个变量用来计算当前线程应该被分配到 Cells 数组的哪一个 Cell 元素上
- 步骤2 - cells 不为 null 且已经存在了元素:
- 步骤2.1 - 如果当前线程对应的 Cell 元素为 null,则创建一个 Cell 元素
- 步骤2.1.1 - 如果该线程通过自旋将 cellsBusy 的值设置为1,则将步骤2.1中创建的 Cell 元素设置到线程在 cells 数组中对应的位置
- 步骤2.1.2 - 调用 continue 语句,继续 for 循环
- 步骤2.2 - wasUncontended 表示线程对应的 Cell 在 cells 中已经存在且通过 CAS 操作更新值失败了,这里将 wasUncontended 的值置为 true,因为在这个 for 循环中,一定会成功更新新值
- 步骤2.3 - 通过 CAS 操作更新值
- 步骤2.4 - 由于步骤2.6中会进行扩容,但是这个扩容操作必须在步骤2.4和步骤2.5都不满足的情况下才会进行。首先是2.4中,如果当前 cells 中的元素数量大于 CPU 个数,则将 collide 设置为 false,在不步骤2.5中才会将 collide 重置为 true。那么为什么需要 cells 的元素数量小于等于 CPU 的数量才会进行扩容呢?原因是只有当每个 CPU 都运行一个线程时才会使多线程的效果最佳,也就是当 cells 数组元素个数与 CPU 个数一致时,每个 Cell 都使用一个 CPU 进行处理,这时性能才是最佳的
- 步骤2.6 - cellsBusy 置为1进入自旋,然后对 cells 进行双倍扩容,然后重新进入循环,获取新的 index 进行 CAS 操作重试
- 步骤2.7 - 如果以上的步骤还是冲突导致 CAS 设置失败,那么这里就会对线程的 hash 值进行 rehash,然后又进入 for 循环继续寻找新的位置
- 步骤2.1 - 如果当前线程对应的 Cell 元素为 null,则创建一个 Cell 元素
- 步骤3 - cells 为 null 并且进入自旋成功
- 步骤3.1 - 创建长度为 2 的数组并赋值给 cells 数组
- 步骤3.2 - 将当前线程映射到数组中,得到一个合适的数组下标,并且将数值放置其中
- 步骤3.3 - 放开自旋锁
- 步骤4 - 将 x 增加到 base 上
小结
LongAdder 通过内部 cells 数组分担了高并发下多线程同时对一个原子变量进行更新时的竞争量,让多个线程可以同时对 cells 数组里面的元素进行并行的更新操作。另外,数组元素 Cell 使用 @sun.misc.Contended 注解进行修饰,这避免了 cells 数组内多个原子变量被放入同一个缓存行,也就是避免了伪共享,这对性能也是一个提升。
参考
JDK-6275329 : Add lazySet methods to atomic classes

若有收获,就点个赞吧
0 人点赞
