django
发布于 2019-05-18 https://github.com/django-notifications/django-notifications
凭借你勤奋的写作,拜读你文章的用户越来越多,他们的评论也分散在众多的文章之中。作为博主,读者的留言肯定是要都看的;而读者给你留言,自然也希望得到回复。
怎么将未读的留言呈现给正确的用户呢?总不能用户自己去茫茫文章中寻找吧,那也太蠢了。给评论增加通知功能就是很流行的解决方案:比如微信朋友圈留言的通知、新浪微博留言的通知、以及各种社交平台的“小红点”。
本篇将以django-notifications为基础,非常高效的搭建一个简易的通知系统。
发送通知
前面的步骤我们已经很熟悉了。
首先安装django-notifications:
(env) > pip install django-notifications-hq
注册app:
my_blog/settings.py...INSTALLED_APPS = [...'notifications',...]...
在根路由中安装路径:
my_blog/urls.py...import notifications.urlsurlpatterns = [...path('inbox/notifications/', include(notifications.urls, namespace='notifications')),...]...
注意这里的notifications.urls没有像之前一样用字符串,是为了确保模块安装到正确的命名空间中。
数据迁移:
(env) > python manage.py migrate
app就安装好了。
接下来你就可以在项目的任何地方发送通知了!像这样:
from notifications.signals import notifynotify.send(actor, recipient, verb, target, action_object)
其中的参数释义:
actor:发送通知的对象recipient:接收通知的对象verb:动词短语target:链接到动作的对象(可选)action_object:执行通知的对象(可选)
有点绕,举个栗子:杜赛 (actor) 在 Django搭建个人博客 (target) 中对 你 (recipient) 发表了 (verb) 评论 (action_object)。
因为我们想要在用户发表评论的时候发送通知,因此修改一下发表评论的视图:
comments/views.py...from notifications.signals import notifyfrom django.contrib.auth.models import User...def post_comment(...):...# 已有代码,创建新回复if comment_form.is_valid():...# 已有代码,二级回复if parent_comment_id:...# 新增代码,给其他用户发送通知if not parent_comment.user.is_superuser:notify.send(request.user,recipient=parent_comment.user,verb='回复了你',target=article,action_object=new_comment,)return HttpResponse('200 OK')new_comment.save()# 新增代码,给管理员发送通知if not request.user.is_superuser:notify.send(request.user,recipient=User.objects.filter(is_superuser=1),verb='回复了你',target=article,action_object=new_comment,)return redirect(article)...
2019/6/4 修正此代码。旧代码错误的将发送给管理员的> notify放在了> new_comment.save()的前面,导致> action_object存储为> NULL。
增加了两条notify的语句,分别位于两个if语句中:
- 第一个
notify:用户之间可以互相评论,因此需要发送通知。if语句是为了防止管理员收到重复的通知。 - 第二个
notify:所有的评论都会给管理员(也就是博主)发送通知,除了管理员自己。
其他的代码没有变化,注意位置不要错就行了。你可以试着发送几条评论,然后打开SQLiteStudio,查看notifications_notification表中的数据变化。
有效代码实际上只有4行,我们就完成了创建、发送通知的功能!相信你已经逐渐体会到运用第三方库带来的便利了。这就是站在了“巨人们”的肩膀上。
小红点
后台创建通知的逻辑已经写好了,但是如果不能在前端显示出来,那也没起到作用。
而前端显示消息通知比较流行的是“小红点”,流行得都已经泛滥了,尽管很多软件其实根本就不需要。另一种形式是消息徽章,即一个红色方框中带有消息条目的计数。这两种方式都会用到博客页面中。
在位置的选择上,header是很合适的,因为它在博客的所有位置都会显示,很符合通知本身的定位。
因此修改header.html:
templates/header.html<!-- 引入notifications的模板标签 -->{% load notifications_tags %}{% notifications_unread as unread_count %}...<!-- 已有代码,用户下拉框 --><li class="nav-item dropdown"><a class="nav-link dropdown-toggle" ...><!-- 新增代码,小红点 -->{% if unread_count %}<svg viewBox="0 0 8 8"width="8px"height="8px"><circle cx="4"cy="4"r="4"fill="#ff6b6b"></circle></svg>{% endif %}{{ user.username }}</a><!-- 已有代码,下拉框中的链接 --><div class="dropdown-menu" ...><!-- 新增代码,通知计数 --><a class="dropdown-item" href="#">通知{% if unread_count %}<span class="badge badge-danger">{{ unread_count }}</span>{% endif %}</a>...<a ...>退出登录</a></div></li>...
django-notifications自带简易的模板标签,可以在前台模板中调用重要的通知相关的对象,在顶部引入就可以使用了。比如unread_count是当前用户的未读通知的计数。Bootstrap自带有徽章的样式,但是却没有小红点的样式(至少我没有找到),所以就只能用svg自己画了,好在也不难。
svg是绘制矢量图形的标签,这里就不展开讲了,感兴趣请自行搜索相关文章。 随便评论几条,刷新页面看一看:
效果不错。但是链接的href是空的,接下来就处理。未读与已读
既然是通知,那么肯定能够分成”未读的“和”已读的“两种。在适当的时候,未读通知又需要转换为已读的。现在我们来开发功能集中处理它。
通知是一个独立的功能,以后有可能在任何地方用到,放到评论app中似乎并不合适。
所以新建一个app:
(env) > python manage.py startapp notice注册:
my_blog/settings.py...INSTALLED_APPS = [...'notice',]...根路由:
my_blog/urls.py...urlpatterns = [...# noticepath('notice/', include('notice.urls', namespace='notice')),]...接下来就是视图了。之前所有的视图都是用的视图函数,这次我们更进一步,用类视图来完成。忘记什么是类视图的,回忆一下前面类的视图章节。
编写视图:
notice/views.pyfrom django.shortcuts import render, redirectfrom django.views import Viewfrom django.views.generic import ListViewfrom django.contrib.auth.mixins import LoginRequiredMixinfrom article.models import ArticlePostclass CommentNoticeListView(LoginRequiredMixin, ListView):"""通知列表"""# 上下文的名称context_object_name = 'notices'# 模板位置template_name = 'notice/list.html'# 登录重定向login_url = '/userprofile/login/'# 未读通知的查询集def get_queryset(self):return self.request.user.notifications.unread()class CommentNoticeUpdateView(View):"""更新通知状态"""# 处理 get 请求def get(self, request):# 获取未读消息notice_id = request.GET.get('notice_id')# 更新单条通知if notice_id:article = ArticlePost.objects.get(id=request.GET.get('article_id'))request.user.notifications.get(id=notice_id).mark_as_read()return redirect(article)# 更新全部通知else:request.user.notifications.mark_all_as_read()return redirect('notice:list')视图共两个。
CommentNoticeListView:继承自ListView,用于展示所有的未读通知。get_queryset方法返回了传递给模板的上下文对象,unread()方法是django-notifications提供的,用于获取所有未读通知的集合。另外视图还继承了“混入类”LoginRequiredMixin,要求调用此视图必须先登录。CommentNoticeUpdateView:继承自View,获得了如get、post等基础的方法。mark_as_read()、mark_all_as_read都是模块提供的方法,用于将未读通知转换为已读。if语句用来判断转换单条还是所有未读通知。 重复:阅读有困难的同学,请重新阅读> 类的视图查阅。 接下来就是新建urls.py了,写入:
notice/urls.pyfrom django.urls import pathfrom . import viewsapp_name = 'notice'urlpatterns = [# 通知列表path('list/', views.CommentNoticeListView.as_view(), name='list'),# 更新通知状态path('update/', views.CommentNoticeUpdateView.as_view(), name='update'),]
path()的第二个参数只能接收函数,因此别忘了要调用类视图的as_view()方法。
集中处理通知需要一个单独的页面。新建templates/notice/list.html模板文件:
templates/notice/list.html{% extends "base.html" %}{% load staticfiles %}{% block title %}通知{% endblock title %}{% block content %}<div class="container"><div class="row mt-4 ml-4"><a href="{% url "notice:update" %}" class="btn btn-warning" role="button">清空所有通知</a></div><!-- 未读通知列表 --><div class="row mt-2 ml-4"><ul class="list-group">{% for notice in notices %}<li class="list-group-item" id="notice_link"><a href="{% url "notice:update" %}?article_id={{ notice.target.id }}¬ice_id={{ notice.id }}"target="_blank"<span style="color: #5897fb;">{{ notice.actor }}</span>在 <span style="color: #01a252;">{{ notice.target }}</span> {{ notice.verb }}。</a> {{ notice.timestamp|date:"Y/m/d H:i" }}</li>{% endfor %}</ul></div></div><style>#notice_link a:link {color: black;}#notice_link a:visited {color: lightgrey;}</style>{% endblock content %}模板中主要提供了两个功能:

- 点击
button按钮清空所有未读通知 - 点击单个通知,将其转换为已读通知,并前往此评论所在的文章
末尾<style>标签中的伪类选择器,作用是将已经点击过的通知字体颜色转换为浅灰色,优化用户体验。
最后就是补上入口:
templates/header.html...<a ... href="{% url "notice:list" %}">通知...</a>...
这样就完成了。
打开服务器,用一个普通账号评论几条,再登录管理员账号并进入通知页面: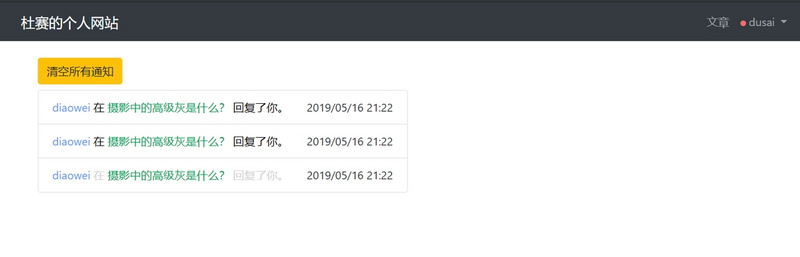
就能看到不错的效果了。实现的效果是仅展示未读通知,当然也可以在下边展示已读通知,方便用户追溯。
总结
通知功能非常的重要,特别是在你的博客成长壮大了之后。你还可以把它用在别的地方,比如每新发表一篇文章,就给你所有的“粉丝”推送一条通知,提醒他们可以来拜读了。具体如何扩展运用,就靠你脑洞大开了。
课后作业:前面的代码中,如果用户自己评论自己,同样也会收到通知。这种通知并没有必要,请修正它。

若有收获,就点个赞吧
0 人点赞
