1、什么LCN
基于LCN框架解决分布式事务;LCN并不生产事务,LCN只是本地事务的搬运工;兼容dubbo,springcloud,motan框架,支持各种关系型数据库;
2、LCN原理
LCN原理模型有三个重要组成部分发起方、参与方,事务协调者TxManager,当我们调用方法的前判断是否加上了@TxTransaction注解,如果加上了,那么此方法应用了LCN分布式事务,如果属性isStart值为true,则为服务发起者,如果为false则为参与者;在调用方法前发起方与参与方都会这测到事务协调者中,建立一个长连接,
然后发起者会向事务协调者中创建一个分组id;当调用参与者的时候,会将在分组id存放在请求头中,发送给参与者;
如果参与者获取到请求头中的事务分组id,如果参与者代码正常运行完毕,由于lcn框架重写了DataSource中的close方法,采用了假关闭的形式,并不会提交事务,然后将操作结果返回给发起者,当发起者在之后执行过程中出现了异常,发起者会将事务分组id通知给事务协调者,事务协调者接收到发起者的事务分组id,会向相同的事务分组id的参与者服务发起通知让其进行事务回滚;如果发起者后续执行顺利,也会以相同的方式提交事务;这样就实现了分布式事务;
3、在SpringCloud项目中如何应用
第一步:肯定先先启动tx-manage服务,不过要注意它的事务分组id存放在redis里,所以注意redis的连接,还有就是发起者调用参与者的超时时间设置,因为一旦超过这个阈值,则会让参与者事务自动回滚;
启动tx-manage服务需要先下载tx-lcn项目代码,下载地址:https://gitee.com/wangliang1991/tx-lcn,tx-lcn.zip txlcn-tm是其中的一个模块,也是我们项目需要集成的,所以我们要将该模块下载下来启动成功;在resources文件夹下有个tx-manager.sql数据库初始化脚本;在我们数据库中执行;该数据脚本如下
CREATE DATABASE IF NOT EXISTS `tx-manager` DEFAULT CHARSET utf8 COLLATE utf8_general_ci;USE `tx-manager`;SET NAMES utf8mb4;SET FOREIGN_KEY_CHECKS = 0;-- ------------------------------ Table structure for t_tx_exception-- ----------------------------DROP TABLE IF EXISTS `t_tx_exception`;CREATE TABLE `t_tx_exception` (`id` bigint(20) NOT NULL AUTO_INCREMENT,`group_id` varchar(64) CHARACTER SET utf8mb4 COLLATE utf8mb4_general_ci NULL DEFAULT NULL,`unit_id` varchar(32) CHARACTER SET utf8mb4 COLLATE utf8mb4_general_ci NULL DEFAULT NULL,`mod_id` varchar(128) CHARACTER SET utf8mb4 COLLATE utf8mb4_general_ci NULL DEFAULT NULL,`transaction_state` tinyint(4) NULL DEFAULT NULL,`registrar` tinyint(4) NULL DEFAULT NULL,`ex_state` tinyint(4) NULL DEFAULT NULL COMMENT '0 待处理 1已处理',`remark` varchar(10240) NULL DEFAULT NULL COMMENT '备注',`create_time` datetime(0) NULL DEFAULT NULL,PRIMARY KEY (`id`) USING BTREE) ENGINE = InnoDB AUTO_INCREMENT = 967 CHARACTER SET = utf8mb4 COLLATE = utf8mb4_general_ci ROW_FORMAT = Dynamic;SET FOREIGN_KEY_CHECKS = 1;
我们需要注意修改 create_time datetime(0) NULL DEFAULT NULL 为 create_time datetime NULL DEFAULT NULL;
然后我们就可以启动成功了,下边我们就开是在我们项目中集成
<parent>
   <groupId>org.springframework.boot</groupId>
   <artifactId>spring-boot-starter-parent</artifactId>
   <version>2.0.0.RELEASE</version>
</parent>

    <dependencies>
        <dependency>
            <groupId>org.springframework.cloud</groupId>
            <artifactId>spring-cloud-starter-alibaba-nacos-discovery</artifactId>
            <version>0.2.2.RELEASE</version>
        </dependency>
        <dependency>
            <groupId>org.springframework.cloud</groupId>
            <artifactId>spring-cloud-starter-openfeign</artifactId>
            <version>2.0.0.RELEASE</version>
        </dependency>
        <dependency>
            <groupId>org.projectlombok</groupId>
            <artifactId>lombok</artifactId>
            <version>1.18.8</version>
        </dependency>
        <dependency>
            <groupId>com.codingapi.txlcn</groupId>
            <artifactId>txlcn-tc</artifactId>
            <version>5.0.2.RELEASE</version>
        </dependency>
        <dependency>
            <groupId>com.codingapi.txlcn</groupId>
            <artifactId>txlcn-txmsg-netty</artifactId>
            <version>5.0.2.RELEASE</version>
        </dependency>
    </dependencies>
spring:
  application:
    ###服务的名称
    name: meitemayikt-order
  datasource:
    url: jdbc:mysql://localhost:3306/order?useUnicode=true&characterEncoding=UTF-8
    username: root
    password: root
    driver-class-name: com.mysql.jdbc.Driver
  cloud:
    nacos:
      discovery:
        ###nacos注册地址
        server-addr: 127.0.0.1:8848
    refresh:
      refreshable: none
server:
  port: 8090
  tomcat:
    max-threads: 20

##8080 8081 8082---会员相关 8090 8091 8092 订单相关
tx-lcn:
  client:
    manager-address: 127.0.0.1:8070
  logger:
    enabled: true
spring:
  application:
    ###服务的名称
    name: meitemayikt-distribute
  datasource:
    url: jdbc:mysql://localhost:3306/distribute_order?useUnicode=true&characterEncoding=UTF-8
    username: root
    password: root
    driver-class-name: com.mysql.jdbc.Driver
  cloud:
    nacos:
      discovery:
        ###nacos注册地址
        server-addr: 127.0.0.1:8848
    refresh:
      refreshable: none
server:
  port: 8030

tx-lcn:
  client:
    manager-address: 127.0.0.1:8070
  logger:
    enabled: true
@SpringBootApplication
@EnableFeignClients
@MapperScan("com.mayikt.mapper")
@EnableDistributedTransaction
public class AppOrder {
    public static void main(String[] args) {
        SpringApplication.run(AppOrder.class);
    }
}
@SpringBootApplication
@MapperScan("com.mayikt.distribute.api.impl.mapper")
@EnableDistributedTransaction
public class AppDistribute {
    public static void main(String[] args)
    {
        SpringApplication.run(AppDistribute.class);
    }
}
@RequestMapping("/insertOrder")
@LcnTransaction
@Transactional
public String insertOrder(int age) {
    String orderId = System.currentTimeMillis() + "";
    OrderEntity newOrder = createOrder(orderId);
    // 1.向订单数据库表插入数据
    int result = orderMapper.addOrder(newOrder);
    if (result < 0) {
        return "插入订单失败";
    }

    // 2.调用派单服务,实现对该笔订单派单 远程调用派单接口
    String resultDistribute = distributeServiceFeign.distributeOrder(orderId);
    // 判断调用接口失败的代码...
    int j = 1 / age;
    return resultDistribute;
}
参与方与发起方都要加上该注解
@LcnTransaction
@Transactional
4、3中应用的方法是lcn模式
5、下边这种是tx模式
@Service
public class TxManagerTxUrlServiceImpl implements TxManagerTxUrlService {

    @Value("${tm.manager.url}")
    private String url;

    @Override
    public String getTxUrl() {
        System.out.println("load tm.manager.url ");
        return url;
    }
}
@Service
public class TxManagerHttpRequestServiceImpl implements TxManagerHttpRequestService {

    @Override
    public String httpGet(String url) {
        System.out.println("httpGet-start");
        String res = HttpUtils.get(url);
        System.out.println("httpGet-end");
        return res;
    }

    @Override
    public String httpPost(String url, String params) {
        System.out.println("httpPost-start");
        String res = HttpUtils.post(url, params);
        System.out.println("httpPost-end");
        return res;
    }
}
// 下单扣库存
    @TxTransaction(isStart = true)
    @Transactional
    @GetMapping(value = "/addOrderAndStock")
    public ResponseBase addOrderAndStock(int i) {
        OrderEntity orderEntity = new OrderEntity();
        orderEntity.setName("蚂蚁课堂永久会员充值");
        orderEntity.setOrderCreatetime(new Date());
        // 价格是300元
        orderEntity.setOrderMoney(300d);
        // 状态为 未支付
        orderEntity.setOrderState(0);
        Long commodityId = 30l;
        // 商品id
        orderEntity.setCommodityId(commodityId);
        // 1.先下单,创建订单
        int orderResult = orderMapper.addOrder(orderEntity);
        System.out.println("orderResult:" + orderResult);
        // 2.下单成功后,调用库存服务
        ResponseBase inventoryReduction = stockFeign.inventoryReduction(commodityId);
        // if (inventoryReduction.getRtnCode() != 200) {
        // // 手动回滚事务
        // }
        int reuslt = 1 / i;
        return setResultSuccess("下单成功!");
    }
@TxTransaction(isStart=false)
@Transactional
@RequestMapping("/inventoryReduction")
public ResponseBase inventoryReduction(@RequestParam("commodityId") Long commodityId) {
    if (commodityId == null) {
        return setResultError("商品id不能为空!");
    }
    // 1.查询该商品id 是否存在
    StockEntity stockEntity = stockMapper.selectStock(commodityId);
    if (stockEntity == null) {
        return setResultError("商品id不存在!");
    }
    // 2.判断商品是否有超卖
    if (stockEntity.getStock() <= 0) {
        return setResultError("当前商品已经买完啦!");
    }
    // 3.减去库存1
    int updateStockResult = stockMapper.updateStock(commodityId);
    if (updateStockResult <= 0) {
        return setResultError("修改库存失败!");
    }
    return setResultSuccess("修改库存成功!");
}
参与方与发起方都要加上该注解
@TxTransaction(isStart=ture or false)
@Transactional
6、本来想看下LCN的三种模式区别,但是官网也许都不维护了,打不开
http://www.txlcn.org/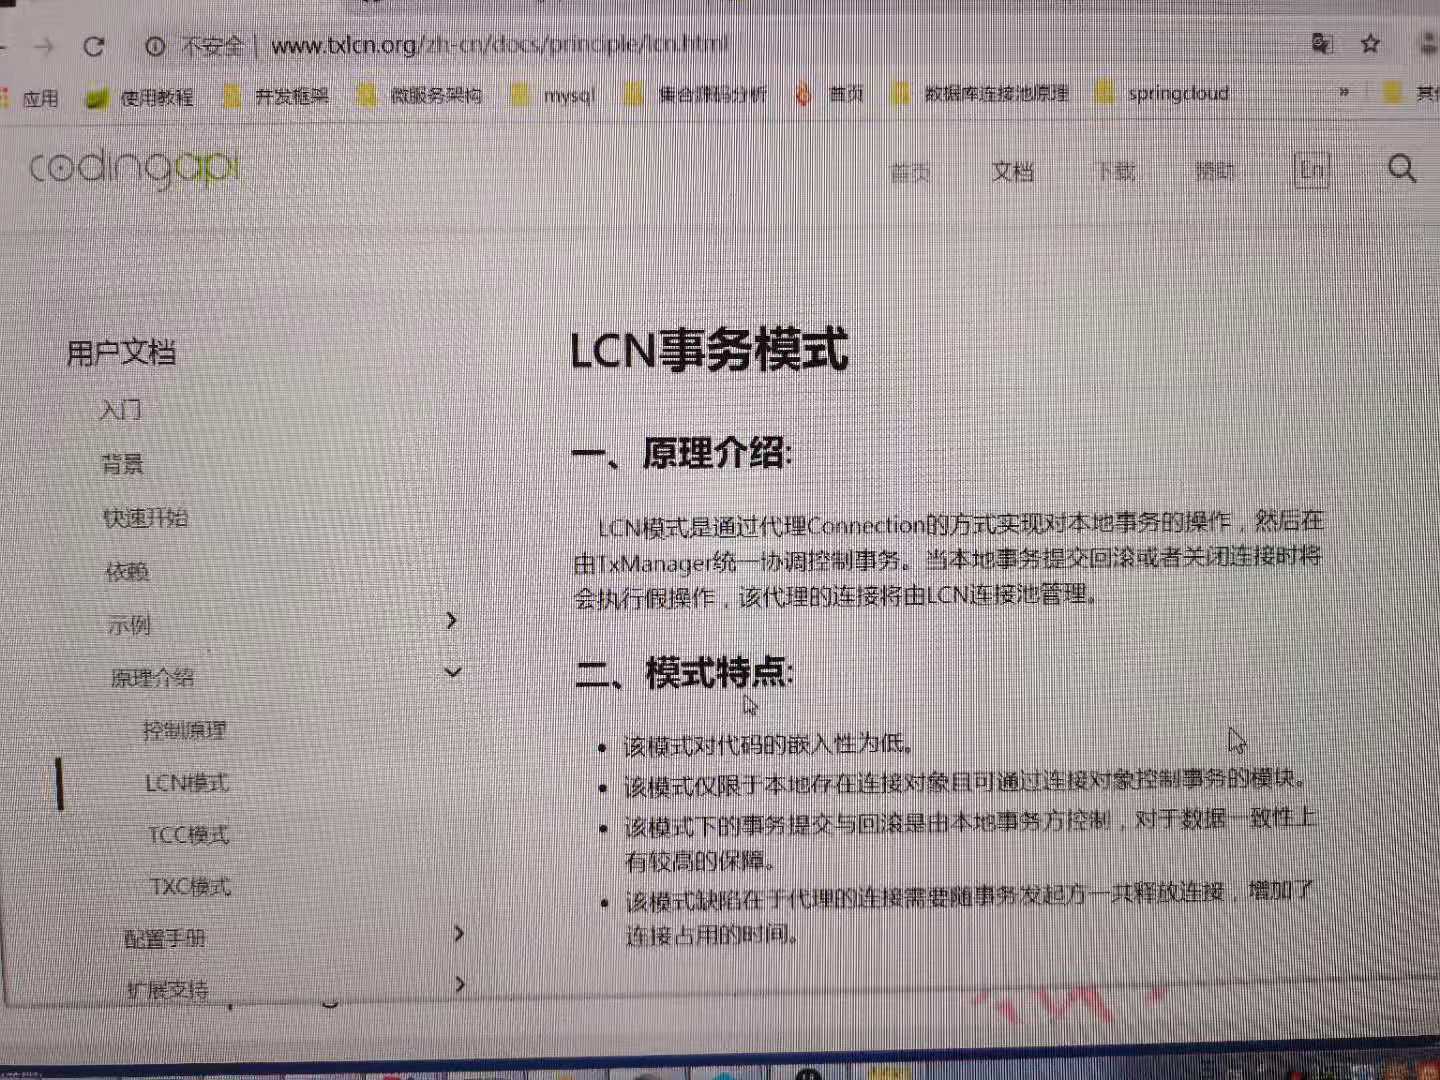
tx-lcn-2.0兼容版.zip 分布式事务解决方案.docx meite-shop-parent.zip
LCN集群
原理:其实实质就是LCN如果在集群中国获取协调者的注册地址
1、LCN客户端在项目启动的时候,通过实现ApplicationContextAware接口,在项目初始化的事就运行;读取我们配置文件配置的事务协调者的地址;
2、向该事务协调者注册地址发送一个http请求,获取对应的lcn底层协议的ip和端口号,
3、应用netty向对应的ip和端口号建立一个长连接,保持会话信息;
彻底解决分布式事务.pptx分布式事务解决方案.docx

若有收获,就点个赞吧
0 人点赞
