Spring注入集合
注入list集合
<bean id="" class=""><property name=""><list><value>1</value><value>1</value><value>1</value></list></bean><bean id="" class=""><property name=""><list><!-- 当list的值是引用类型时 --><ref bean="对象的引用"><bean class=""><constructor-arg name="" value=""/></bean></list></bean>
注入set集合
<bean id="" class="">
    <property name="">
    <set>
      <value>1</value>
      <value>1</value>
      <value>1</value>
    </set>
</bean>
<bean id="" class="">
    <property name="">
    <set>
      <!-- 当set的值是引用类型时 -->
      <ref bean="对象的引用">
      <bean class="">
        <constructor-arg name="" value=""/>
      </bean>
    </set>
</bean>
注入Map集合
<bean id="" class="">
    <property name="">
    <map>
      <entry key="" value=""></entry>
      <entry key="" value=""></entry>
    </map>
</bean>
<bean id="" class="">
    <property name="">
    <map>
      <!-- 当map的值是引用类型时 -->
      <entry key=""><ref bean="对象引用" /></entry>
      <entry key="" value-ref="对象引用" />
      <entry key="">
        <bean class=""></bean>
      </entry>
    </map>
</bean>
注入properties
props标签是用来注入java中的Properties类型的。我们知道Properties其实是继承了Hashtable,所以它也是双列集合,所以注入方式和map几乎相同,只是key和value的类型都是String,所以注入方式略有不同。
<bean id="" class="">
    <property name="">
    <props>
      <prop key="">value</prop>
      <prop key="">value2</prop>
    </props>
  </property>
</bean>
Spring的自动注入
通过property的autowire属性配置实现自动注入
自动注入的方式有两种:
autowire="byType"//通过类型自动注入- 需要注入的属性类型与待注入的bean类型一致,class=中的类类型。
- 注意:如果配置文件中有两个类型匹配的bean,那么自动注入会报错,分不清该注入哪个。
- 设置bean的属性:
primary="true",表示自动注入该bean是首选,默认false。
autowire="byName"//通过属性名自动注入- spring会寻找符合属性名要求的类型。
- 其实使用的是set注入,将set方法名截取set,然后首字母小写,再去bean中匹配相应的引用
- 比如:属性名user,set方法名setUser,截取后user,去找bean id=”user”的bean,注入。
SpringBean的创建过程
java对象和SpringBean的区别?
java对象是通过类的构造方法直接创建。SpringBean是一个java对象经过层层加工之后得到的对象。
SpringBean加载过程
解析注册、实例化。
Spring中有一个类型:BeanDefiniation,用于描述bean的全部配置信息。(有点像java中的Class,了解对象的所有信息,并可以通过它来创建对象—利用反射技术)。
Spring先解析xml文件或注解配置,读取所有要加载的类信息,根据类信息创建对应的BeanDefinition对象,再根据BeanDefinition对象创建实例对象,并且放在一个BeanDefiniationMap中。
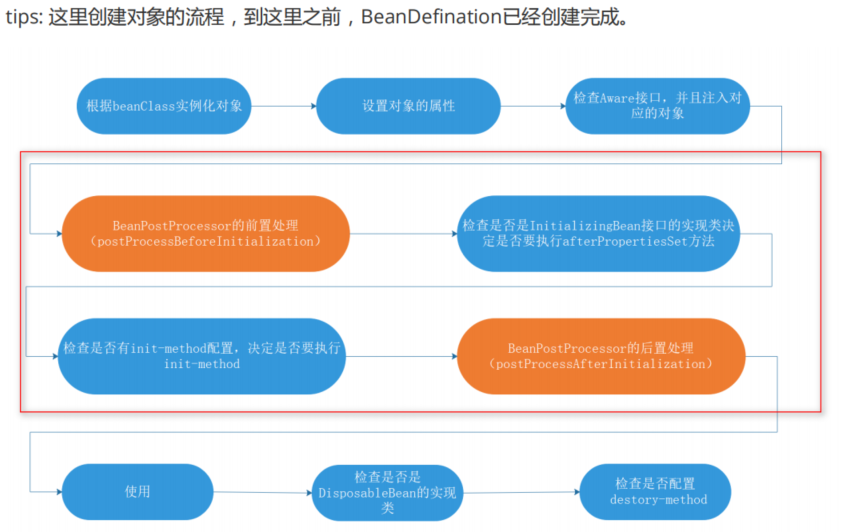
SpringBean的创建过程

在实例化对象之前,会先执行所有的BeanFactoryPostProcessor,BeanFactoryPostProcessor的主要作用是处理BeanDefiniationMap。
- 根据BeanDefiniation中的属性beanClassName实例化java对象。
- 设置对象的属性。
- 检查对象是否实现了Aware接口,并完成Aware接口的需求。
- Aware是感知接口,spring提供很多Aware接口,这些接口可以让我们获取工厂本身的一些对象
- 执行BeanPostProcessor的前置处理
- 判断当前的类是否实现了接口InitializingBean接口的afterPropertiesSet方法,会在init-method之前执行
- 执行init-method方法,进行初始化
- 执行BeanPostProcessor的后置处理,到此为止Bean才算创建完成
- 正常使用
- 检查是否实现接口DisposableBean,如果实现了就会调用其中的destroy方法释放资源
- 执行destroy-method方法,销毁
其他标签及属性介绍
延迟加载
bean标签中有一个属性:lazy-init,默认值是false。
所谓延迟加载,就是容器初始化的时候不创建这个bean对象。当第一次使用这个对象的时候才创建,创建完成之后不会创建第二次。<bean id="" class="" lazy-init="true" init-method="init"/>
别名
一个bean的别名,其实我们可以通过name属性指定,但spring提供了专门指定别名的标签。<alias name="原名" alias="别名"/>//与bean标签同级
beans便签中的一些属性
default-autowire:配置beans下所有的bean标签的自动装配模式default-init-method:配置所有的bean的默认初始化方法default-destroy-method:配置所有的bean的默认销毁方法default-lazy-init:配置所有的bean延迟加载
profile:配置多环境
开发会有开发环境,测试会有测试环境,生产有生产环境。
<?xml version="1.0" encoding="UTF-8"?>
<beans xmlns="http://www.springframework.org/schema/beans"
       xmlns:xsi="http://www.w3.org/2001/XMLSchema-instance"
       xsi:schemaLocation="http://www.springframework.org/schema/beans
       https://www.springframework.org/schema/beans/spring-beans.xsd">

  <!-- 开发环境 -->
  <beans profile="dec">
      <bean id="" class="">
      <property name="">
        <props>
          <prop key="DRIVER">com.mysql.jdbc.Driver</prop>
          <prop key="URL">jdbc:mysql://localhost:3306/web</prop>
          <prop key="USERNAME">root</prop>
        </props>
      </property>
    </bean>
  </beans>
   <!-- 测试环境 -->
  <beans profile="test">
      <bean id="" class="">
      <property name="">
        <props>
          <prop key="DRIVER">com.mysql.jdbc.Driver</prop>
          <prop key="URL">jdbc:mysql://localhost:3307/web</prop>
          <prop key="USERNAME">root</prop>
        </props>
      </property>
    </bean>
  </beans>
</beans>
激活对应的环境:
@Test
public void test(){
    ClassPathXmlApplicationContext context = new ClassPathXmlApplicationContext("applicationContext.xml");
    // 激活环境
    ConfigurableEnvironment config = context.getEnvironment();
    // 设置环境
    config.setActiveProfiles("pro");
    // 重新加载容器
    context.refresh();
    // 开始测试
    context.getBean("");
}
spring 为我们提供了大量的激活 profile 的方法,可以通过代码来激活,也可以通过系统环境变量、
JVM参数、servlet上下文参数来定义 spring.profiles.active 参数激活 profile。
ENV方式:ConfigurableEnvironment.setActiveProfiles(“test”)
JVM参数方式:set JAVA_OPTS=”-Dspring.profiles.active=test”
web.xml方式:
<init-param>
  <param-name>spring.profiles.active</param-name>
  <param-value>production</param-value>
</init-param>
标注方式(junit单元测试非常实用):@ActiveProfiles({"unittest","productprofile"})
bean标签的parent和abstract属性
abstract属性为true表示该类是抽象类,当前实际上可以不是抽象类。但是spring不会创建该类的对象。
parent属性可以让当前的bean继承指定目标的bean的属性值。还可以覆盖。

