概述
Spring Bean的生命周期是一个比较复杂的过程,从创建到销毁,包含了一些列的过程,本章重点讲解下Spring Bean的afterPropertiesSet()。
InitializingBean介绍
执行阶段�
首先我们来回顾下Spring Bean整个生命周期。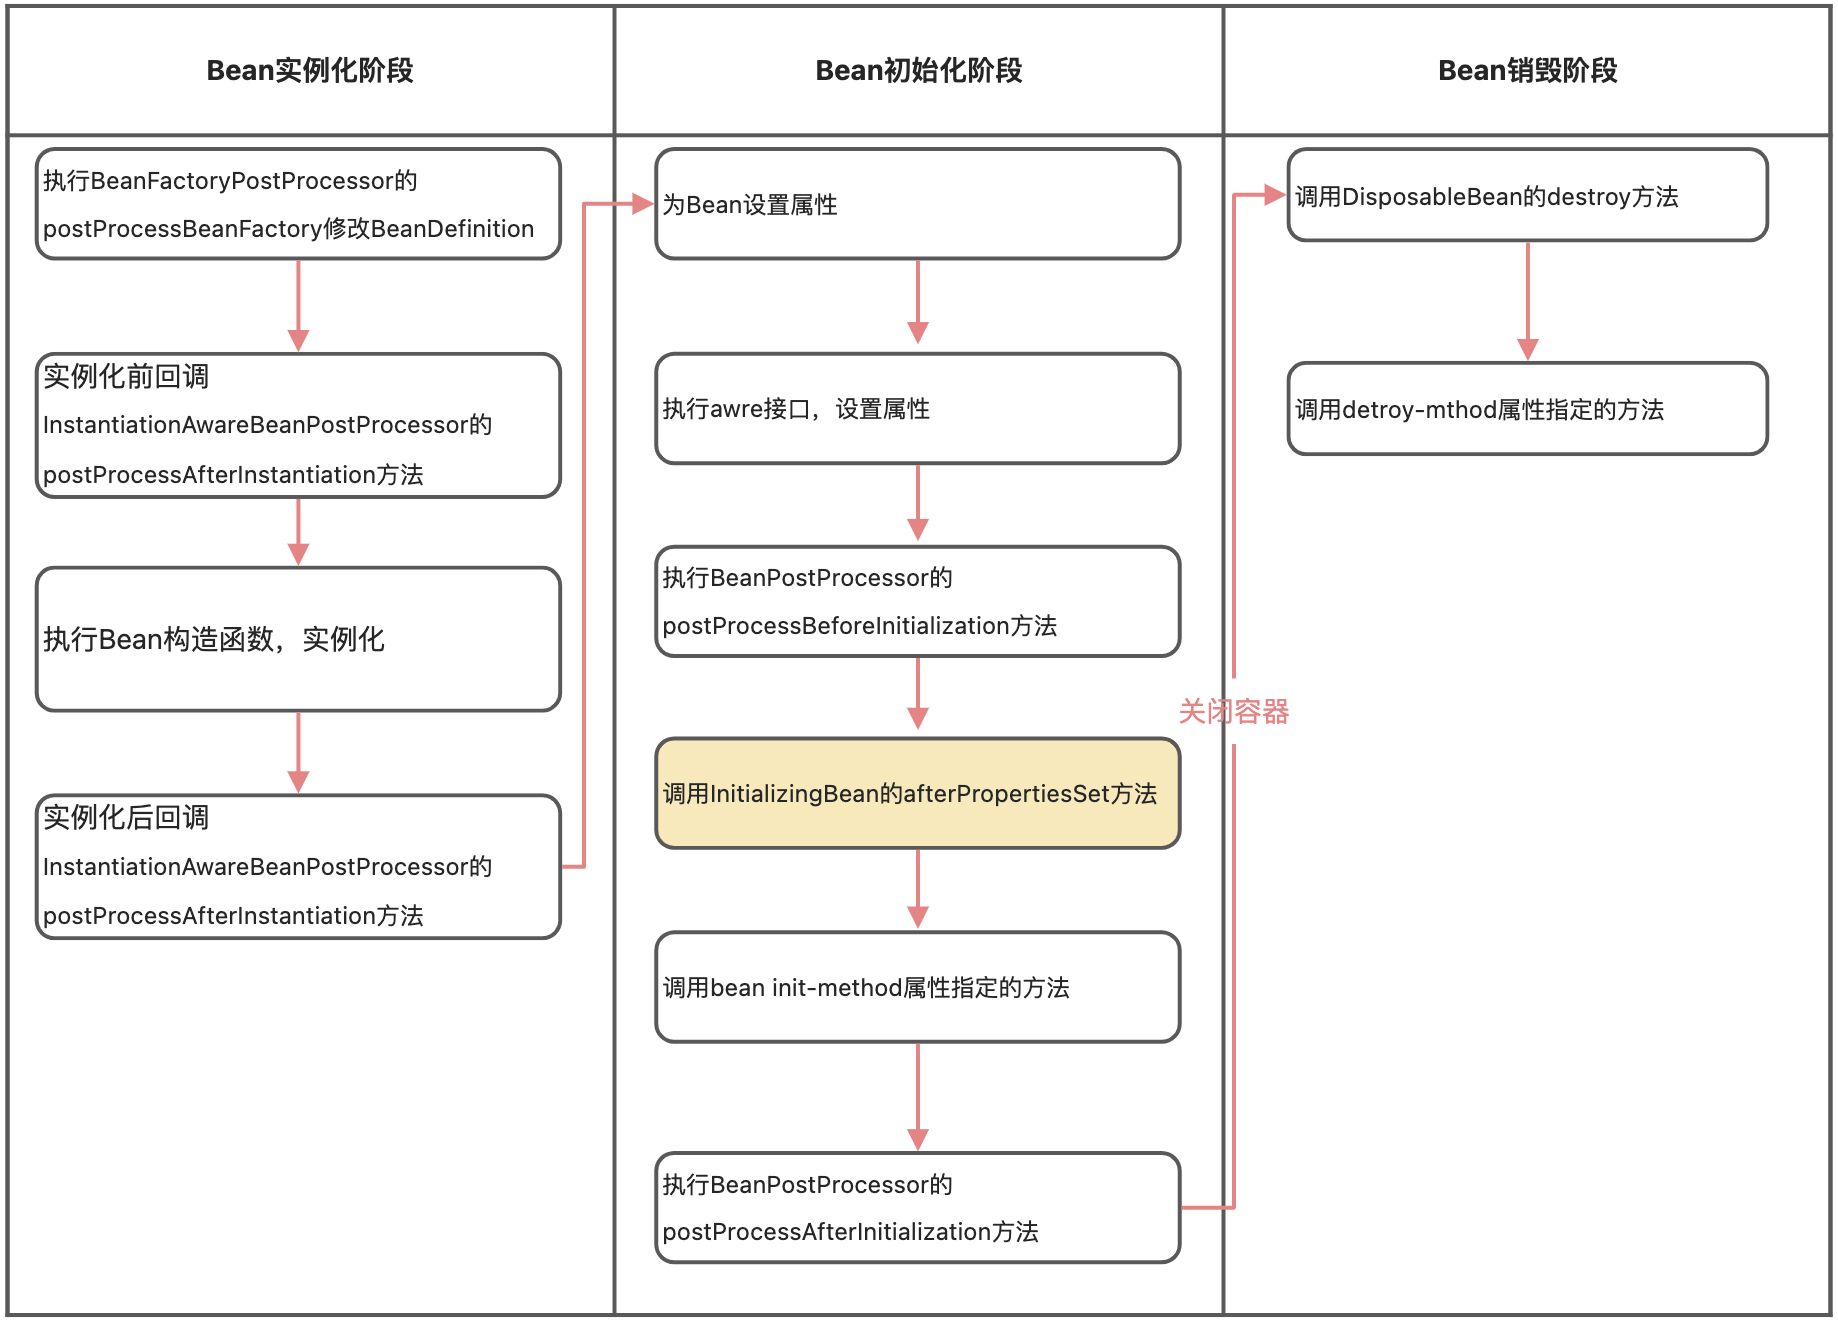
执行阶段:其中标记黄色部分的就是我们本文的主角,它是在bean的属性被设置值之后,调用bean init-method属性指定的方法之前执行的。
作用
public interface InitializingBean {/*** Invoked by the containing {@code BeanFactory} after it has set all bean properties* and satisfied {@link BeanFactoryAware}, {@code ApplicationContextAware} etc.* <p>This method allows the bean instance to perform validation of its overall* configuration and final initialization when all bean properties have been set.* @throws Exception in the event of misconfiguration (such as failure to set an* essential property) or if initialization fails for any other reason*/void afterPropertiesSet() throws Exception;}
InitializingBean只有一个方法afterPropertiesSet,见名知意,这个方法是在bean的属性值被设置以后执行。 Spring给我们提供了这么一个扩展点,可以用来做很多的事情, 比如可以修改默认设置的属性,添加补充额外的属性值或者针对关键属性做一个校验。
Spring本身也有很多的Bean实现了InitializingBean接口, 比如Spring MVC中的RequestMappingHandlerMapping就实现了InitializingBean接口,在afterPropertiesSet中完成了一些初始化工作,比如url和controller方法的映射。
实战案例
定义bean ```java @Data @Slf4j @ToString @Accessors(chain = true) public class BeanLifeCycle implements InitializingBean {
@Value(“${prop:hello}”) private String prop ;
public BeanLifeCycle() {
log.info("#################BeanLifeCycle 实例化");
}
public void init() {
log.info("#################BeanLifeCycle 调用init-mthod 初始化");
}
public void destroy() {
log.info("#################BeanLifeCycle 销毁");
}
@Override public void afterPropertiesSet() throws Exception {
log.info("#################BeanLifeCycle 调用afterPropertiesSet方法, 查看属性值prop:[{}],已经被赋值", prop);log.info("#################BeanLifeCycle 调用afterPropertiesSet 初始化");
} }
@Configuration public class LifeCycleConfig {
@Bean(name = "beanLifeCycle", initMethod = "init", destroyMethod = "destroy")public BeanLifeCycle createBeanLifeCycle() {BeanLifeCycle beanLifeCycle = new BeanLifeCycle();return beanLifeCycle;}
}
2. 查看执行结果<br />执行结果验证了我们的结论,执行`afterPropertiesSet()`时bean属性已经被初始化,同时它也是在init-method方法前执行。<br />代码地址:[https://github.com/alvinlkk/springboot-demo/tree/master/springboot-bean-lifecycle](https://github.com/alvinlkk/springboot-demo/tree/master/springboot-bean-lifecycle)<a name="aoi6J"></a># 源码解析上面我们已经了解了`InitializingBean`的作用和执行时机,现在我们从源码的角度分析下。<br />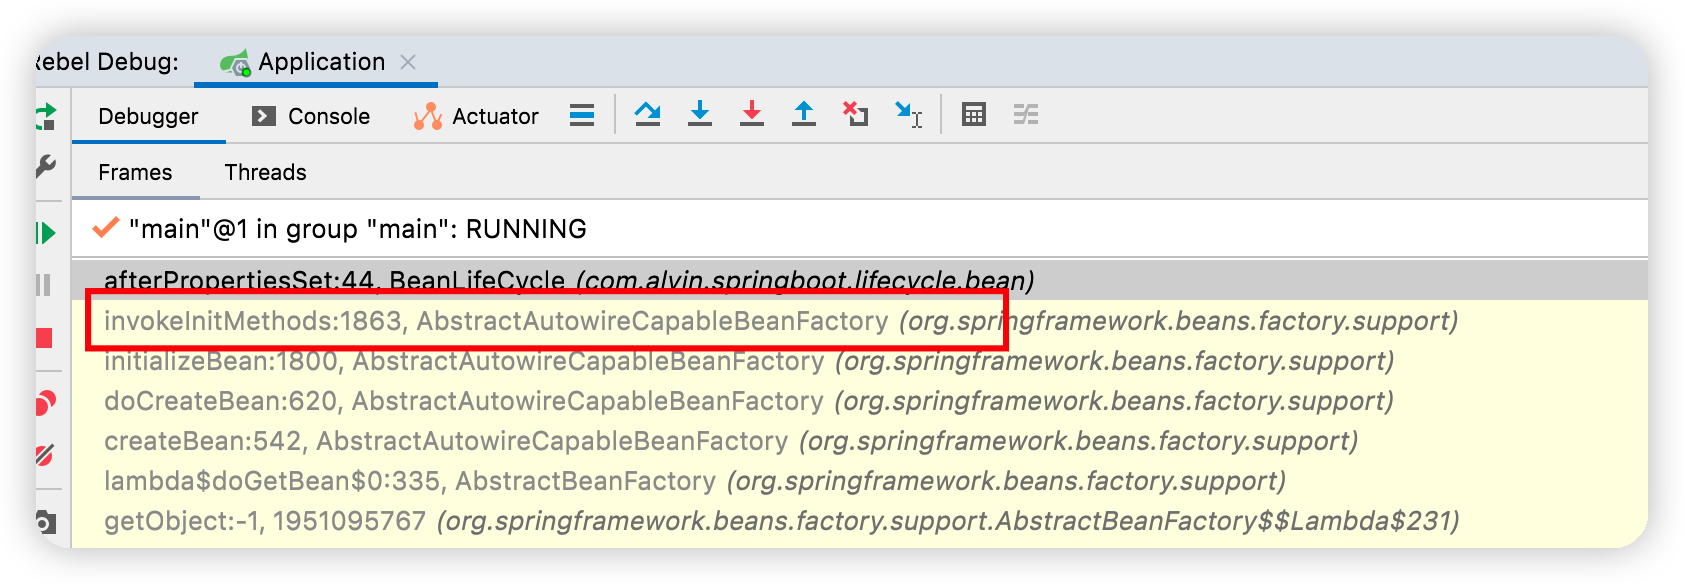<br />通过debug我们看到,Bean的创建的入口`AbstractAutowireCapableBeanFactory`的`createBean`方法,`createBean`最终调用的是`doCreateBean`方法。```javaprotected Object doCreateBean(String beanName, RootBeanDefinition mbd, @Nullable Object[] args)throws BeanCreationException {........try {// 为bean设置属性值populateBean(beanName, mbd, instanceWrapper);// 初始化beanexposedObject = initializeBean(beanName, exposedObject, mbd);}........}
�doCreateBean方法中相关的就是populateBean方法和initializeBean方法,populateBean方法主要为bean设置属性值,我们重点关注初始化Bean方法initializeBean。
protected Object initializeBean(String beanName, Object bean, @Nullable RootBeanDefinition mbd) {........try {// 执行初始化方法invokeInitMethods(beanName, wrappedBean, mbd);}......return wrappedBean;}
initializeBean中关键的是执行invokeInitMethods方法,在这里面调用afterPropertiesSet方法。
protected void invokeInitMethods(String beanName, Object bean, @Nullable RootBeanDefinition mbd)throws Throwable {// 判断当前bean是否实现了InitializingBean接口boolean isInitializingBean = (bean instanceof InitializingBean);// 如果当前bean是一个InitializingBeanif (isInitializingBean && (mbd == null || !mbd.hasAnyExternallyManagedInitMethod("afterPropertiesSet"))) {if (logger.isTraceEnabled()) {logger.trace("Invoking afterPropertiesSet() on bean with name '" + beanName + "'");}if (System.getSecurityManager() != null) {try {AccessController.doPrivileged((PrivilegedExceptionAction<Object>) () -> {((InitializingBean) bean).afterPropertiesSet();return null;}, getAccessControlContext());}catch (PrivilegedActionException pae) {throw pae.getException();}}else {// 真正调用当前bean的afterPropertiesSet方法((InitializingBean) bean).afterPropertiesSet();}}if (mbd != null && bean.getClass() != NullBean.class) {String initMethodName = mbd.getInitMethodName();if (StringUtils.hasLength(initMethodName) &&!(isInitializingBean && "afterPropertiesSet".equals(initMethodName)) &&!mbd.hasAnyExternallyManagedInitMethod(initMethodName)) {// 最后通过反射的方式执行init-method属性对应的方法invokeCustomInitMethod(beanName, bean, mbd);}}}
以上就是从源码层面理解InitializingBean的调用时机。
总结
InitializingBean是Spring中很关键的一个扩展接口,其实它和bean中init-method属性对应的方法功能是一致的,都是初始化bean,我们可以二选一实现即可,当然同时使用也没有问题。init-method是通过反射实现的,性能相对差一点点。另外,如果调用afterPropertiesSet方法时出错,则不会调用init-method指定的方法。
参考
http://www.cnblogs.com/zrtqsk/p/3735273.htm
https://juejin.cn/post/6964604073223913509

若有收获,就点个赞吧
0 人点赞
