一、前言
由于我们个人使用的音频和视频数据都是从各个地方获取的,因此其中的音频音量大小不一。而互联网音乐平台如网易云音乐、qq音乐等,几乎所有的音乐音量大小都一致,可能就是使用了音量标准化的方式。
https://blog.csdn.net/weixin_35804181/article/details/123701972
二、正文
1.查看音频分贝
1.1.查看指令
ffmpeg -i 11025.mp3 -filter_complex volumedetect -c:v copy -f null /dev/null 1
1.2.指令结果
[Parsed_volumedetect_0 @ 0x55ef0a332740] n_samples: 5551838 [Parsed_volumedetect_0 @ 0x55ef0a332740] mean_volume: -17.5 dB [Parsed_volumedetect_0 @ 0x55ef0a332740] max_volume: 0.0 dB [Parsed_volumedetect_0 @ 0x55ef0a332740] histogram_0db: 92 [Parsed_volumedetect_0 @ 0x55ef0a332740] histogram_1db: 427 [Parsed_volumedetect_0 @ 0x55ef0a332740] histogram_2db: 1213 [Parsed_volumedetect_0 @ 0x55ef0a332740] histogram_3db: 3159 [Parsed_volumedetect_0 @ 0x55ef0a332740] histogram_4db: 7153 12345678
1.3.结果分析
最高分贝(max_volume)为0.0 b,平均分贝(max_volume)为-17.5db
2.音量调整
2.1.基于当前音量倍数处理
<1>将当前音量降低一半:
ffmpeg -i input.mp3-filter:“volume=0.5” output.mp3 1
<2>将当前音量提升一倍。这种处理相对粗暴,会使音频出现失真现象:
ffmpeg -i input.mp3 -filter:“volume=2” output.mp3 1
2.2.基于分贝数值的处理
上面基于倍数的处理可能会导致音频失真,而基于分贝数值的处理则相对会保留音频的原声效果。
<1>音量提升5分贝(db):
ffmpeg -i input.mp3 -filter:“volume=5dB” output.mp3 1
<2>音量降低5分贝(db):
ffmpeg -i input.mp3 -filter:“volume=-5dB” output.mp3 1
3.音量的标准化
ffmpeg具备对音量标准化的处理功能,即削峰填谷,使整个音频的音量变得平滑
ffmpeg -i input.mp3 -filter:a “loudnorm=i=-14:tp=0.0” output.mp3 1
4.调用FFMPEG代码API实现问题记录
4.1.报错“Changing audio frame properties on the fly is not supported”的问题
[in @ 0x7f06f00b0b40] Changing audio frame properties on the fly is not supported. [in @ 0x7f06f00b0b40] filter context - fmt: s32p r: 8000 layout: 3 ch: 2, incoming frame - fmt: s32p r: 48000 layout: 3 ch: 2 pts_time: NOPTS 12
问题原因出现在于音频转码时参数被修改了,包括sample_rate,sample_fmt,channel_layout,channels等,我的环境为将采样率由8khz修改为48khz。再看看打印信息“filter context - fmt: s32p r: 8000 layout: 3 ch: 2, incoming frame - fmt: s32p r: 48000 layout: 3 ch: 2 pts_time: NOPTS”,说明设置的filter上下文参数为“fmt: s32p r: 8000 layout: 3 ch: 2”,但实际进来的帧参数为“fmt: s32p r: 48000 layout: 3 ch: 2 pts_time: NOPTS”,可见是filter上下文的采样率®设置错误。
参考FFMPEG源码transcoding.c中设置filter上下文的源码如下:
snprintf(args, sizeof(args), “time_base=%d/%d:sample_rate=%d:sample_fmt=%s:channel_layout=0x%”PRIx64, dec_ctx->time_base.num, dec_ctx->time_base.den, dec_ctx->sample_rate, av_get_sample_fmt_name(dec_ctx->sample_fmt), dec_ctx->channel_layout); 12345
什么意思呢?也就是说filter上下文参数和解码参数保持一致,因此将dec_ctx->sample_rate修改为enc_ctx->sample_rate即可解决,其他参数也是一样以此类推。
滤镜信息: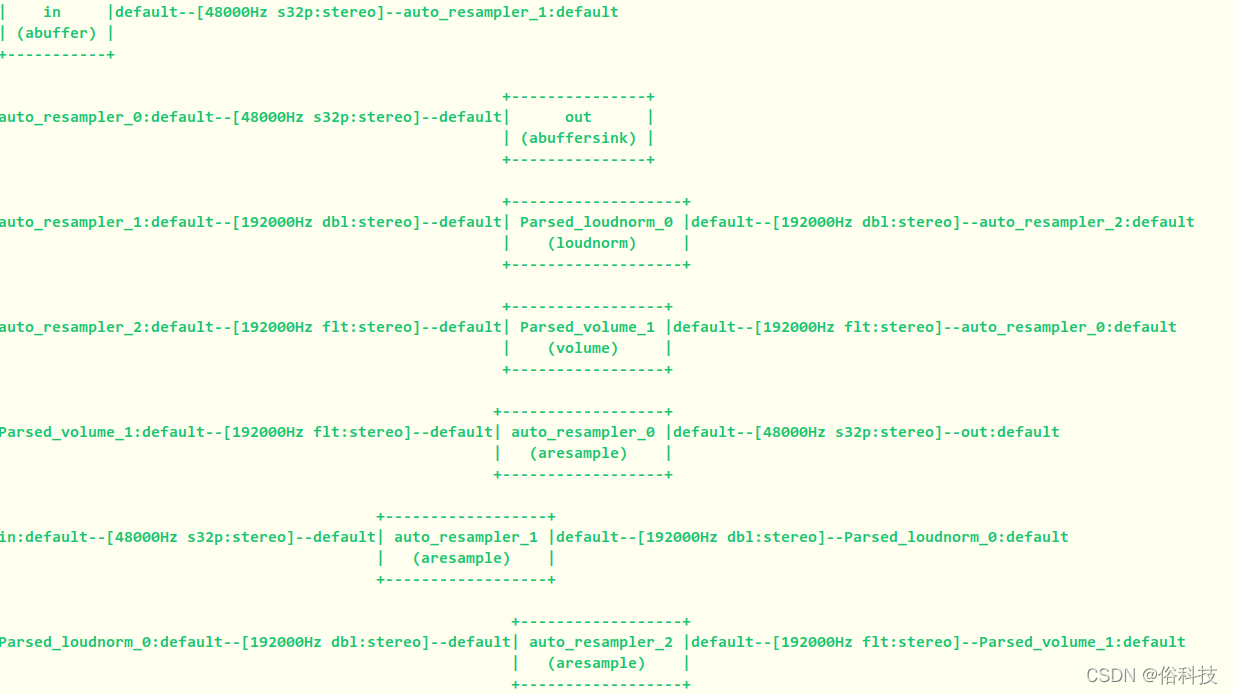
4.2.报错“more samples than frame size (avcodec_encode_audio2)”
这个问题我遇见过两次,分别为<1>音频mp3转码acc时;<2>使用loudnorm滤镜时。意思是给的采样数量和实际需要的数量不匹配。
4.2.1.音频mp3转码acc时报错
参考文件transcode_aac.c里面的程序,应该很容易能提取出增加fifo来处理的程序,此处不详细展开;
4.2.2.使用loudnorm滤镜时
该问题可以采用av_buffersink_set_frame_size来重新设置frame_size来解决,参考ffmpeg.c源码后,写出了以下代码:
AVFilterGraph graph=(filter_ctx)[i].graph; if (graph &&AVMEDIA_TYPE_AUDIO==(filter_ctx)[i].codec_type) { ms_debug(“nb_filters:%d”, graph->nb_filters); int filters_index=0; for(filters_index=0;filters_index

若有收获,就点个赞吧
0 人点赞
