第七章 - 跨程序共享数据
内容提供器简介
内容提供器主要用于在不同的应用程序之间实现数据共享的功能,它提供了一套完整的机制,允许一个程序访问另一个程序中的数据,同时还能保证被访数据的安全行。
不同于文件存储和SharedPreferences存储中的两种全局可读写操作模式,内容提供器可以选择只对哪一部分数据进行共享,从而保证我们程序中的隐式数据不会有泄露的风险。
运行时权限
Android权限机制详解
Android中所有的危险权限:
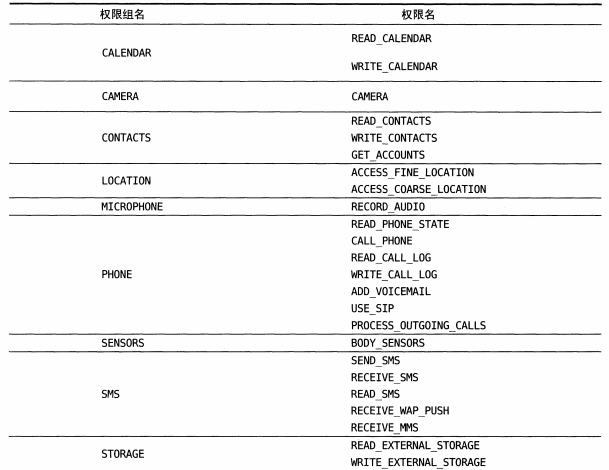
在程序运行时申请权限
demo:在程序运行时申请一个打电话的权限
对activity_main.xml文件进行修改
<?xml version="1.0" encoding="utf-8"?><androidx.constraintlayout.widget.ConstraintLayout xmlns:android="http://schemas.android.com/apk/res/android"xmlns:app="http://schemas.android.com/apk/res-auto"xmlns:tools="http://schemas.android.com/tools"android:layout_width="match_parent"android:layout_height="match_parent"tools:context=".MainActivity"><LinearLayoutandroid:layout_width="match_parent"android:layout_height="match_parent"><Buttonandroid:id="@+id/make_call"android:layout_width="match_parent"android:layout_height="wrap_content"android:text="Make Call"/></LinearLayout></androidx.constraintlayout.widget.ConstraintLayout>
代码分析:在布局中增加了一个按钮。
对MainACtivity.java文件进行修改
package com.example.runtimepermissiontest;import androidx.appcompat.app.AppCompatActivity;import androidx.core.app.ActivityCompat;import androidx.core.content.ContextCompat;import android.Manifest;import android.content.Intent;import android.content.pm.PackageManager;import android.net.Uri;import android.os.Bundle;import android.view.View;import android.widget.Button;import android.widget.Toast;public class MainActivity extends AppCompatActivity {@Overrideprotected void onCreate(Bundle savedInstanceState) {super.onCreate(savedInstanceState);setContentView(R.layout.activity_main);Button makeCall = (Button) findViewById(R.id.make_call);makeCall.setOnClickListener(new View.OnClickListener() {@Overridepublic void onClick(View v) {if (ContextCompat.checkSelfPermission(MainActivity.this, Manifest.permission.CALL_PHONE)!= PackageManager.PERMISSION_GRANTED){ActivityCompat.requestPermissions(MainActivity.this,new String[]{Manifest.permission.CALL_PHONE},1);}elsecall();}});}private void call() {try {Intent intent = new Intent(Intent.ACTION_CALL);intent.setData(Uri.parse("tel:15279715064"));startActivity(intent);}catch (SecurityException e){e.printStackTrace();}}@Overridepublic void onRequestPermissionsResult(int requestCode, String[] permissions, int[] grantResults) {switch (requestCode){case 1:if (grantResults.length>0 && grantResults[0] == PackageManager.PERMISSION_GRANTED){call();}else {Toast.makeText(this,"You denied the permission",Toast.LENGTH_SHORT).show();}break;default:}}}
代码分析:
第一步通过if (ContextCompat.checkSelfPermission()!= PackageManager.PERMISSION_GRANTED)判断用户有无授权过。checkSelfPermission()接收两个参数,参数1是Context,参数2是具体的权限名。
如果已经授权直接执行拨打电话的逻辑,如果没有授权就调用ActivityCompat.requestPermissions()向用户申请授权。requestPermissions()接收3个参数,参数1 是活动的实例,参数2是一个String数组,我们要把申请的权限名放在数组中,参数3是请求码,只要是唯一值就可以。
申请后的结果会回调到 onRequestPermissionsResult(int requestCode, String[] permissions, int[] grantResults),授权的结果会封装在grantResults参数当中。
对AndroidManifest.xml文件进行修改
<?xml version="1.0" encoding="utf-8"?><manifest xmlns:android="http://schemas.android.com/apk/res/android"package="com.example.runtimepermissiontest"><uses-permission android:name="android.permission.CALL_PHONE"/><applicationandroid:allowBackup="true"android:icon="@mipmap/ic_launcher"android:label="@string/app_name"android:roundIcon="@mipmap/ic_launcher_round"android:supportsRtl="true"android:theme="@style/Theme.RuntimePermissionTest"><activity android:name=".MainActivity"><intent-filter><action android:name="android.intent.action.MAIN" /><category android:name="android.intent.category.LAUNCHER" /></intent-filter></activity></application></manifest>
代码分析:进行授权。
访问其他程序中的数据
内容提供器的用法一般有两种,一种是使用现有的内容提供器来读取和操作相应程序中的数据,另一个是创建自己的内容提供器给我们的程序的数据提供外部访问接口。
ContentResolver的基本用法
对数据进行CURD操作:
- insert():添加数据。
- update():更新数据。
- delete():删除数据。
- query():查询数据。
内容URI给内容提供器中的数据建立了唯一标识符,它主要由两部分组成:authority和path。
authority是用于对不同的应用程序做区分的,一般为了避免冲突,都会采用程序包名的方式来进行命名。
path则是用于对同一应用程序中不同的表做区分的。
在得到内容URI字符串之后,还需要通过Uri.parse()方法将内容字符串解析成Uri对象,作为参数传入。
demo:读取手机联系人
activity_main.xml文件分析:
<?xml version="1.0" encoding="utf-8"?><androidx.constraintlayout.widget.ConstraintLayout xmlns:android="http://schemas.android.com/apk/res/android"xmlns:app="http://schemas.android.com/apk/res-auto"xmlns:tools="http://schemas.android.com/tools"android:layout_width="match_parent"android:layout_height="match_parent"tools:context=".MainActivity"><LinearLayoutandroid:layout_width="match_parent"android:layout_height="match_parent"><ListViewandroid:id="@+id/contacts_view"android:layout_width="match_parent"android:layout_height="match_parent"></ListView></LinearLayout></androidx.constraintlayout.widget.ConstraintLayout>
引入线性布局、列表视图
MainActivity.java文件分析
package com.example.contactstest;import androidx.annotation.NonNull;import androidx.appcompat.app.AppCompatActivity;import androidx.core.app.ActivityCompat;import androidx.core.content.ContextCompat;import android.Manifest;import android.content.pm.PackageManager;import android.database.Cursor;import android.os.Bundle;import android.provider.ContactsContract;import android.widget.ArrayAdapter;import android.widget.ListView;import android.widget.Toast;import java.util.ArrayList;import java.util.List;public class MainActivity extends AppCompatActivity {ArrayAdapter<String> adapter;List<String> contactsList = new ArrayList<>();@Overrideprotected void onCreate(Bundle savedInstanceState) {super.onCreate(savedInstanceState);setContentView(R.layout.activity_main);ListView contactsView = (ListView) findViewById(R.id.contacts_view);adapter = new ArrayAdapter<String>(this, android.R.layout.simple_list_item_1,contactsList);contactsView.setAdapter(adapter);if (ContextCompat.checkSelfPermission(this, Manifest.permission.READ_CONTACTS)!= PackageManager.PERMISSION_GRANTED){ActivityCompat.requestPermissions(this,new String[]{Manifest.permission.READ_CONTACTS},1);}else{readContacts();}}private void readContacts() {Cursor cursor = null;try {cursor = getContentResolver().query(ContactsContract.CommonDataKinds.Phone.CONTENT_URI,null,null,null,null);if (cursor != null){while (cursor.moveToNext()){String displayName = cursor.getString(cursor.getColumnIndex(ContactsContract.CommonDataKinds.Phone.DISPLAY_NAME));String number = cursor.getString(cursor.getColumnIndex(ContactsContract.CommonDataKinds.Phone.NUMBER));contactsList.add(displayName+"\n"+number);}adapter.notifyDataSetChanged();}}catch (Exception e){e.printStackTrace();}finally {if (cursor != null){cursor.close();}}}@Overridepublic void onRequestPermissionsResult(int requestCode, String[] permissions, int[] grantResults) {switch (requestCode){case 1:if (grantResults.length > 0 && grantResults[0] == PackageManager.PERMISSION_GRANTED){readContacts();}else {Toast.makeText(this,"You denied the permission",Toast.LENGTH_SHORT).show();}break;default:}}}
首先在onCreate()方法中获取了ListView控件的实例,并给他设置好了适配器,然后调用运行时权限的处理逻辑。
然后在readContacts()方法中使用了ContentResolver的query()方法查询系统的联系人数据。接着对Cursor对象进行遍历,将联系人姓名和手机号这些数据逐个取出,进行拼接添加到ListView的数据源里。
注意:要在AndroidManifest.xml文件中声明权限。
创建自己的内容提供器
创建内容提供器的步骤
通过新建一个类去继承ContentProvider的方式来创建一个自己的内容提供器。
需要重写六个方法。
- onCreate():初始化内容提供器的时候调用。通常会在这里完成对数据库的创建和升级等操作,返回true表示内容提供器初始化成功。
- query():从内容提供器中查询数据。使用uri参数来确定查询哪张表,projection参数用于确定查询哪些列,selection和selectionArgs参数用于约束查询哪些行,sortOrder参数用于对结果进行排序,查询的结果存放在Cursor对象中返回。
- insert():向内容提供器中添加一条数据。使用uri参数来确定要添加到的表,待添加的数据保存在values参数中。添加完成后,返回一个用于表示这条新纪录的URI。
- update():更新内容提供器中已有的苏韩剧。使用uri参数来确定更新哪一张表中的数据,新数据保存在values参数中,selection和selectionArgs参数用于约束更新哪些行,受影响的行数将作为返回值返回。
- delete():从内容提供器中删除数据。使用uri参数来确定删除哪一张表中的数据,selection和selectionArgs参数用于约束删除哪些行,被删除的行数将作为返回值返回。
- getType():根据传入的内容URI来返回相应的MIME类型。
URI
- 以路径结尾就表示希望访问该表中所有的数据。
- 以id结尾就表示期望访问该表中拥有相应id的数据。

若有收获,就点个赞吧
0 人点赞
