同步集合介绍
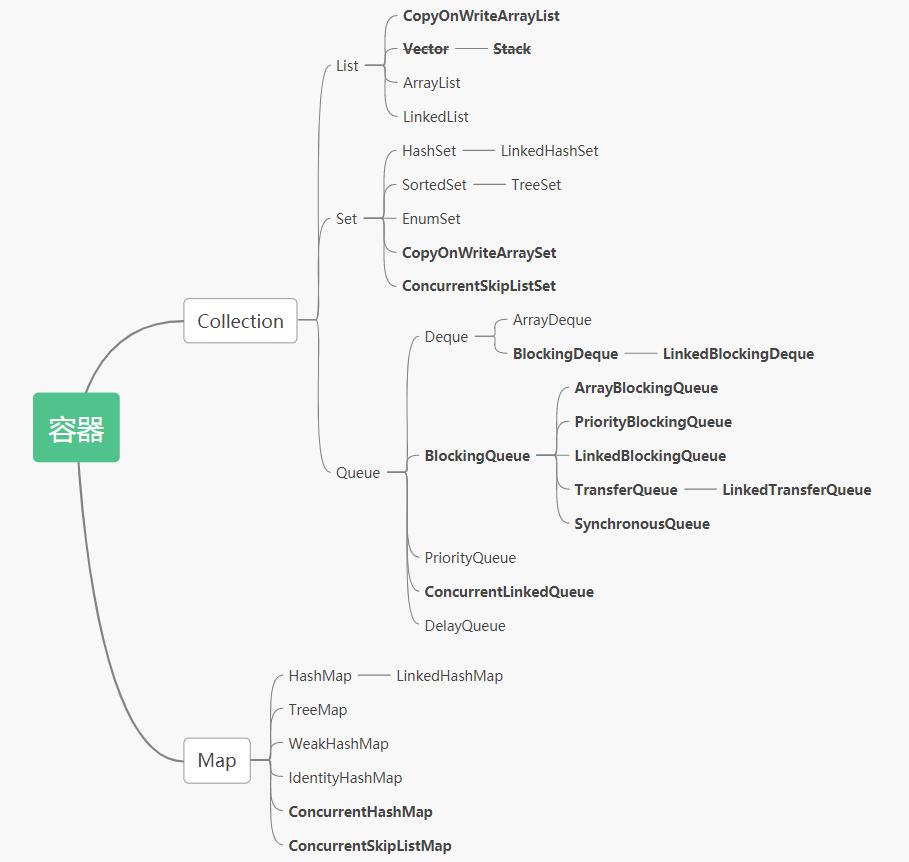
Java 的集合分为两部分,以 Collection 为根接口的线性集合和以 Map 为根接口的双列集合。在不考虑到线程安全问题的情况下,我们会将 Collection 集合分为两类,有序的 List 和无序的 Set,这两类都是在 JDK2 由 Josh Bloch 和 Neal Gafter 主导开发的工具类。但是 JDK5 中 又加入了由 Doug Lea 主导开发的 FIFO 集合。
Queue 的一大作用就是它提供了很多线程安全的集合,而且在并发场景下 Queue 的实现类在提供了同种功能的情况下性能比传统使用 synchronized 更加的出色。
Wikipedia” In systems design, a fail-fast system is one which immediately reports at its interface any condition that is likely to indicate a failure. Fail-fast systems are usually designed to stop normal operation rather than attempt to continue a possibly flawed process. Such designs often check the system’s state at several points in an operation, so any failures can be detected early. The responsibility of a fail-fast module is detecting errors, then letting the next-highest level of the system handle them.
Fail-Fast 是一种错误检查机制,旨在于能够早期发现可能造成错误的操作。它的目的是让错误早期的暴露出来以至于能在早期被解决。
集合的 Fail-Fast 主要是使用在迭代器中。当迭代器被创建后,除了迭代器本身的方法可以改变集合的结构外,其他的因素如若改变了集合的结构,都被抛出 ConcurrentModificationException 异常。这不只是限于多线程环境,单线程环境也是可以造成 Fail-Fast 的。
单线程 Fail-Fast
public class Test1 {public static void main(String[] args) {List<Integer> list = new ArrayList<>();for (int i = 0; i < 20; i++) {list.add(i);}Iterator<Integer> it = list.iterator();int temp = 0;while (it.hasNext()) {if (temp == 3) {temp++;list.remove(3);} else {temp++;System.out.print(temp + " ");System.out.println(it.next());}}}}// 1 0// 2 1// 3 2// 5 Exception in thread "main" java.util.ConcurrentModificationException// at java.util.ArrayList$Itr.checkForComodification(ArrayList.java:909)// at java.util.ArrayList$Itr.next(ArrayList.java:859)// at juc.c_025.Test1.main(Test1.java:24)
多线程 Fail-Fast
public class FastFailTest {private static List<String> list = new ArrayList<>();public static void main(String[] args) {// 同时启动两个线程对list进行操作!new ThreadOne().start();new ThreadTwo().start();}private static void printAll() {Iterator iter = list.iterator();while (iter.hasNext()) {System.out.print(iter.next() + ", ");}System.out.println();}// 向list中依次添加 0,1,2,3,4,5,每添加一个数之后,就通过printAll() 遍历整个listprivate static class ThreadOne extends Thread {public void run() {int i = 0;while (i < 6) {list.add(String.valueOf(i));printAll();i++;}}}// 向list中依次添加 10,11,12,13,14,15,每添加一个数之后,就通过 printAll() 遍历整个listprivate static class ThreadTwo extends Thread {public void run() {int i = 10;while (i < 16) {list.add(String.valueOf(i));printAll();i++;}}}}
Fail-Fast 基本原理
public abstract class AbstractList<E> extends AbstractCollection<E> implements List<E>{// 这个标识着此集合被修改多少次protected transient int modCount = 0;private class Itr implements Iterator<E> {int cursor = 0;int lastRet = -1;// 初始化对象的时候将 modCount 赋值给 expectedModCountint expectedModCount = modCount;public boolean hasNext() {return cursor != size();}public E next() {checkForComodification();try {int i = cursor;E next = get(i);lastRet = i;cursor = i + 1;return next;} catch (IndexOutOfBoundsException e) {checkForComodification();throw new NoSuchElementException();}}final void checkForComodification() {// 如果迭代器里记录的 expectedModCount 和当前集合的 modCount 不一致,抛出异常if (modCount != expectedModCount)throw new ConcurrentModificationException();}}}
modCount 增加
public boolean add(E e) {ensureCapacityInternal(size + 1); // Increments modCount!!elementData[size++] = e;return true;}private void ensureCapacityInternal(int minCapacity) {ensureExplicitCapacity(calculateCapacity(elementData, minCapacity));}private void ensureExplicitCapacity(int minCapacity) {modCount++;// overflow-conscious codeif (minCapacity - elementData.length > 0)grow(minCapacity);}public E remove(int index) {rangeCheck(index);modCount++;E oldValue = elementData(index);int numMoved = size - index - 1;if (numMoved > 0)System.arraycopy(elementData, index+1, elementData, index, numMoved);elementData[--size] = null; // clear to let GC do its workreturn oldValue;}
CopyOnWriteArrayList
在很多应用场景中,读操作可能会远远大于写操作。由于读操作根本不会修改原有的数据,因此对于每次读取都进行加锁其实是一种资源浪费。我们应该允许多个线程同时访问List的内部数据,毕竟读取操作是安全的。
CopyOnWriteArrayList 类的所有可变操作(add,set等等)都是通过创建底层数组的新副本来实现的。当 List 需要被修改的时候,我并不修改原有内容,而是对原有数据进行一次复制,将修改的内容写入副本。写完之后,再将修改完的副本替换原来的数据,这样就可以保证写操作不会影响读操作了。
从 CopyOnWriteArrayList 的名字就能看出 CopyOnWriteArrayList 是满足 CopyOnWrite 的 ArrayList,所谓CopyOnWrite 也就是说:在计算机,如果你想要对一块内存进行修改时,我们不在原有内存块中进行写操作,而是将内存拷贝一份,在新的内存中进行写操作,写完之后呢,就将指向原来内存指针指向新的内存,原来的内存就可以被回收掉了。
读取操作没有任何同步控制和锁操作,理由就是内部数组 array 不会发生修改,只会被另外一个 array 替换,因此可以保证数据安全。
private transient volatile Object[] array;public E get(int index) {return get(getArray(), index);}private E get(Object[] a, int index) {return (E) a[index];}final Object[] getArray() {return array;}
CopyOnWriteArrayList 写入操作 add() 方法在添加集合的时候加了锁,保证了同步,避免了多线程写的时候会 copy 出多个副本出来。
private transient volatile Object[] array;public boolean add(E e) {final ReentrantLock lock = this.lock;lock.lock(); // 加锁try {Object[] elements = getArray();int len = elements.length;Object[] newElements = Arrays.copyOf(elements, len + 1);// 拷贝新数组newElements[len] = e;setArray(newElements);return true;} finally {lock.unlock(); // 释放锁}}final void setArray(Object[] a) {array = a;}
CopyOnWriteArrayList 测试
// CopyOnWriteArrayList 写入速度很慢,适用于 读远大于写的情况public class T02_CopyOnWriteList {public static void main(String[] args) {List<String> lists =new CopyOnWriteArrayList<>();//new Vector<>();Random r = new Random();Thread[] ths = new Thread[100];for (int i = 0; i < ths.length; i++) {Runnable task = () -> {for (int i1 = 0; i1 < 1000; i1++)lists.add("a" + r.nextInt(10000));};ths[i] = new Thread(task);}runAndComputeTime(ths);System.out.println(lists.size());}static void runAndComputeTime(Thread[] ths) {long s1 = System.currentTimeMillis();Arrays.asList(ths).forEach(t -> t.start());Arrays.asList(ths).forEach(t -> {try {t.join();} catch (InterruptedException e) {e.printStackTrace();}});long s2 = System.currentTimeMillis();System.out.println(s2 - s1);}}
ConcurrentSkipListXXX
跳表
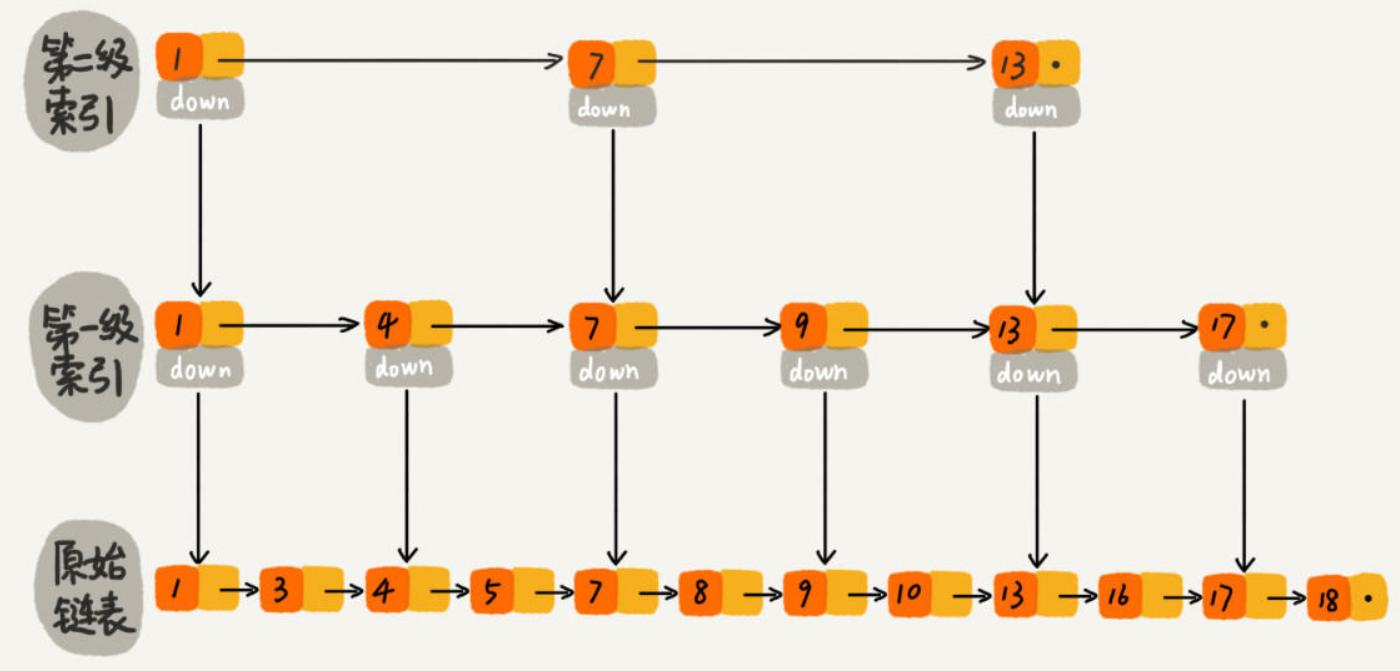
对于一个单链表,即使链表是有序的,如果我们想要在其中查找某个数据,也只能从头到尾遍历链表,这样效率自然就会很低。跳表是一种采用空间换时间策略的能进行快速查找的数据结构。它们都可以对元素进行快速的查找。和平衡树相比,平衡树的插入和删除往往很可能导致平衡树进行一次全局的调整。而对跳表的插入和删除只需要对整个数据结构的局部进行操作即可。这样带来的好处是:在高并发的情况下,你会需要一个全局锁来保证整个平衡树的线程安全。而对于跳表,你只需要部分锁即可。这样,在高并发环境下,你就可以拥有更好的性能。而就查询的性能而言,跳表的时间复杂度也是 O(logn) 所以在并发数据结构中,JDK 使用跳表来实现一个 Map。
跳表的本质是同时维护了多个链表,并且链表是分层的,
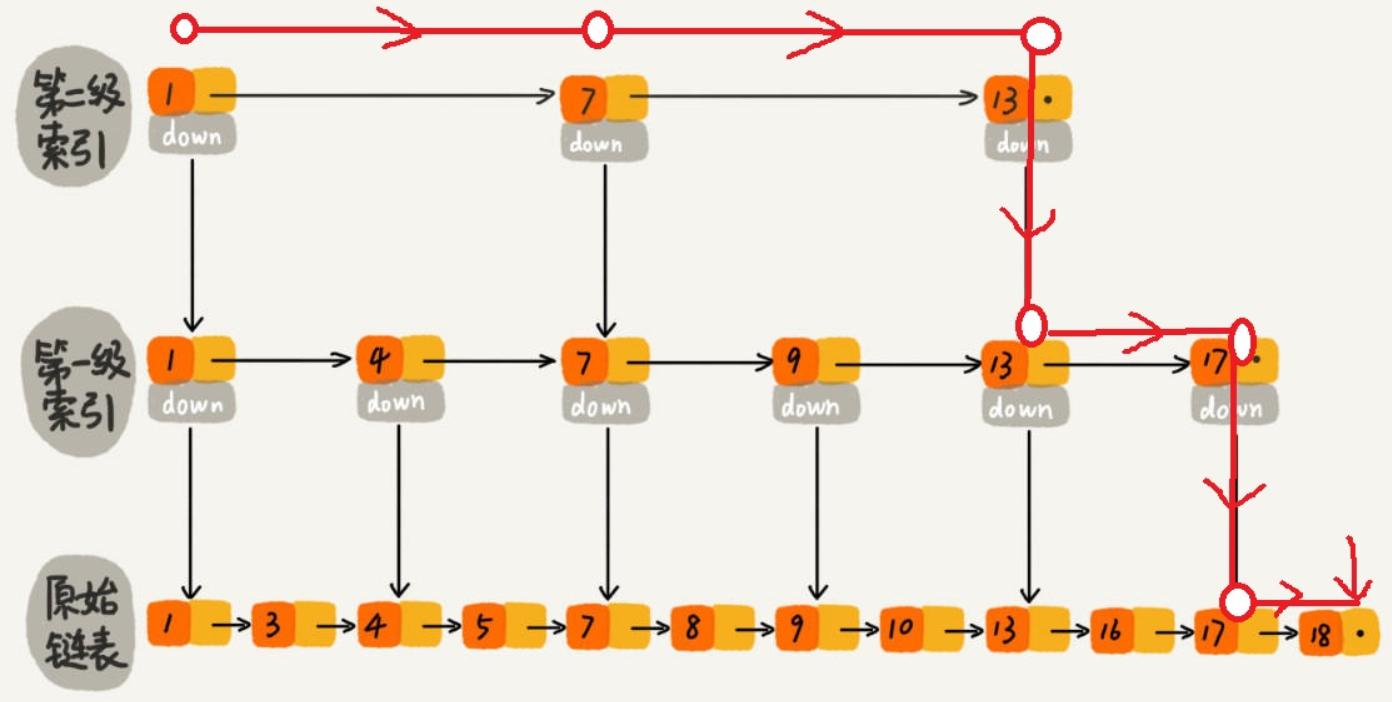
使用跳表实现 Map 和使用哈希算法实现 Map 的另外一个不同之处是:哈希并不会保存元素的顺序,而跳表内所有的元素都是排序的。因此在对跳表进行遍历时,你会得到一个有序的结果。所以,如果你的应用需要有序性,那么跳表就是你不二的选择。JDK 中实现这一数据结构的类是 ConcurrentSkipListXXX。
JDK 实现
JDK 一共提供了两类跳表:ConcurrentSkipListMap和ConcurrentSkipListSet。我们使用 Map 进行测试。
public class TestConcurrentSkipListMap {static final Random r = new Random(System.currentTimeMillis());public static void main(String[] args) {ConcurrentSkipListMap map =new ConcurrentSkipListMap(Comparator.comparingInt(o -> (int) o));// ConcurrentSkipListMap map =// new ConcurrentSkipListMap(Comparator.comparingInt(o -> (int) o).reversed());Thread []threads = new Thread[100];for (int j = 0; j < 100; j++) {threads[j] = new Thread(() -> {for (int i = 0; i < 1000; i++)map.put(r.nextInt(100000),"");});threads[j].start();}Arrays.stream(threads).forEach(item -> {try {item.join();} catch (InterruptedException e) {e.printStackTrace();}});map.forEach((o, o2) -> System.out.print(o + ", "));}}
BlockingQueue
ArrayBlockingQueue
ArrayBlockingQueue 是 BlockingQueue 接口的有界队列实现类,底层采用数组来实现。ArrayBlockingQueue 一旦创建,容量不能改变。其并发控制采用可重入锁来控制,不管是插入操作还是读取操作,都需要获取到锁才能进行操作。当队列容量满时,尝试将元素放入队列将导致操作阻塞;当队列为空时,尝试获取取一个元素也会阻塞。ArrayBlockingQueue 默认情况下不保证线程访问队列的公平性,但可以指定。
public class T06_ArrayBlockingQueue {static BlockingQueue<String> strs = new ArrayBlockingQueue<>(10);static Random r = new Random();public static void main(String[] args) throws InterruptedException {for (int i = 0; i < 10; i++) {strs.put("a" + i);}strs.put("aaa"); // 满了就会等待,程序阻塞strs.add("aaa"); // 满了就抛异常strs.offer("aaa"); // 满了就返回 falsestrs.offer("aaa", 1, TimeUnit.SECONDS); // 指定时间内成功返回 true,否则返回 falseSystem.out.println(strs);}}
LinkedBlockingQueue
LinkedBlockingQueue 底层基于单向链表实现的阻塞队列,可以当做无界队列也可以当做有界队列来使用,具有 FIFO 的特性,与 ArrayBlockingQueue 相比起来具有更高的吞吐量,为了防止 LinkedBlockingQueue 容量迅速增,损耗大量内存。通常在创建 LinkedBlockingQueue 时,会指定其大小。默认大小为 Integer.MAX_VALUE。LinkedBlockingQueue 只能是不公平状态。
相关构造方法:
public LinkedBlockingQueue() {this(Integer.MAX_VALUE);}public LinkedBlockingQueue(int capacity) {if (capacity <= 0) throw new IllegalArgumentException();this.capacity = capacity;last = head = new Node<E>(null);}
测试:
public class T05_LinkedBlockingQueue {static BlockingQueue<String> strs = new LinkedBlockingQueue<>(10);static Random r = new Random();public static void main(String[] args) {new Thread(() -> {for (int i = 0; i < 100; i++) {try {strs.put("a" + i); // 如果满了,就会等待TimeUnit.MILLISECONDS.sleep(r.nextInt(1000));} catch (InterruptedException e) {e.printStackTrace();}}}, "p1").start();for (int i = 0; i < 5; i++) {new Thread(() -> {for (;;) {try {System.out.println(Thread.currentThread().getName() +" take -" + strs.take()); // 如果空了,就会等待TimeUnit.MILLISECONDS.sleep(r.nextInt(1000));} catch (InterruptedException e) {e.printStackTrace();}}}, "c" + i).start();}}}
PriorityBlockingQueue
PriorityBlockingQueue 是一个支持优先级的无界阻塞队列。默认情况下元素采用自然顺序进行排序,所以自定义类可以通过实现 Comparable 方法来指定元素排序规则。初始化时也可以通过构造器参数 Comparator 来指定排序规则。(很明显,不是 FIFO 了)
PriorityBlockingQueue 并发控制采用的是 ReentrantLock,队列为无界队列(ArrayBlockingQueue 是有界队列,LinkedBlockingQueue 也可以通过在构造函数中传入 capacity 指定队列最大的容量,但是 PriorityBlockingQueue 只能指定初始的队列大小,后面插入元素的时候,如果空间不够的话会自动扩容)。
简单地说,它就是 PriorityQueue 的线程安全版本。不可以插入 null 值它的插入操作 put 方法不会 block,因为它是无界队列(take 方法在队列为空的时候会阻塞)。
public class T10_PriorityBlockingQueue {static BlockingQueue<String> strs = new PriorityBlockingQueue<>(10);static Random r = new Random();public static void main(String[] args) {new Thread(() -> {for (int i = 0; i < 100; i++) {try {strs.put("a" + i);} catch (InterruptedException e) {e.printStackTrace();}}}, "p1").start();for (int i = 0; i < 5; i++) {new Thread(() -> {for (;;) {try {System.out.println(Thread.currentThread().getName() +" take -" + strs.take()); // 如果空了,就会等待TimeUnit.MILLISECONDS.sleep(r.nextInt(1000));} catch (InterruptedException e) {e.printStackTrace();}}}, "c" + i).start();}}}// 和 LinkedBlockingQueue 的区别就是,输出是自然排序的
SynchronousQueue
SynchronousQueue是一个比较特殊的阻塞队列,它具有以下几个特点:
- 一个调用插入方法的线程必须等待另一个线程调用取出方法;
- 队列没有容量Capacity(或者说容量为0),事实上队列中并不存储元素,它只是提供两个线程进行信息交换的场所;
- 于以上原因,队列在很多场合表现的像一个空队列。不能对元素进行迭代,不能peek元素,poll会返回null;
- 队列中不允许存入null元素。
- SynchronousQueue如同ArrayedBlockingQueue一样,支持“公平”策略,在构造函数中可以传入false或true表示是否支持该策略。
public class T08_SynchronusQueue {public static void main(String[] args) throws InterruptedException {BlockingQueue<String> strs = new SynchronousQueue<>();new Thread(() -> {try {TimeUnit.SECONDS.sleep(10);System.out.println(strs.take());} catch (InterruptedException e) {e.printStackTrace();}}).start();strs.put("aaa"); // 阻塞,等待消费者消费System.out.println(strs.size());}}
TransferQueue
TransferQueue提供了一个场所,生产者线程使用transfer方法传入一些对象并阻塞,直至这些对象被消费者线程全部取出。前面介绍的SynchronousQueue很像一个容量为0的TransferQueue。
public class TransferQueueExam {public static void main(String[] args) {TransferQueue<String> queue = new LinkedTransferQueue<>();new Thread(new Producer("Producer1", queue)).start();new Thread(new Producer("Producer2", queue)).start();new Thread(new Consumer("Consumer1", queue)).start();new Thread(new Consumer("Consumer2", queue)).start();}static class Producer implements Runnable {private final String name;private final TransferQueue<String> queue;Producer(String name, TransferQueue<String> queue) {this.name = name;this.queue = queue;}@Overridepublic void run() {System.out.println(name + " begin transfer objects");try {for (int i = 0; i < 10; i++) {queue.transfer(name + ": Product" + i);System.out.println(name + " transfer " + " Product" + i);}System.out.println("after transformation");} catch (InterruptedException e) {e.printStackTrace();}System.out.println(name + " is over");}}static class Consumer implements Runnable {private final String name;private final TransferQueue<String> queue;private static Random rand = new Random(System.currentTimeMillis());Consumer(String name, TransferQueue<String> queue) {this.name = name;this.queue = queue;}@Overridepublic void run() {try {for (int i = 0; i < 5; i++) {String str = queue.take();System.out.println(name + " take " + str);TimeUnit.SECONDS.sleep(100);}System.out.println(name + " is over");} catch (InterruptedException e) {e.printStackTrace();}}}}
和SynchronizedQueue的区别
SynchronizedQueue 可以认为是一个一对一的模型,TransferQueue 是一个多对多的模型。
public class T09_SynchronusQueue { // 容量为0public static void main(String[] args) throws InterruptedException {BlockingQueue<String> strs = new SynchronousQueue<>();new Thread(() -> {try {TimeUnit.SECONDS.sleep(1);System.out.println(strs.take());} catch (InterruptedException e) {e.printStackTrace();}}).start();new Thread(() -> {try {strs.put("bbb");} catch (InterruptedException e) {e.printStackTrace();}}).start();new Thread(() -> {try {strs.put("aaa");} catch (InterruptedException e) {e.printStackTrace();}}).start();System.out.println(strs.size());}}// 只会输出aaa,bbb会被覆盖。对换两个提供者线程,只会输出bbb,aaa会被覆盖。
ConcurrentLinkedQueue
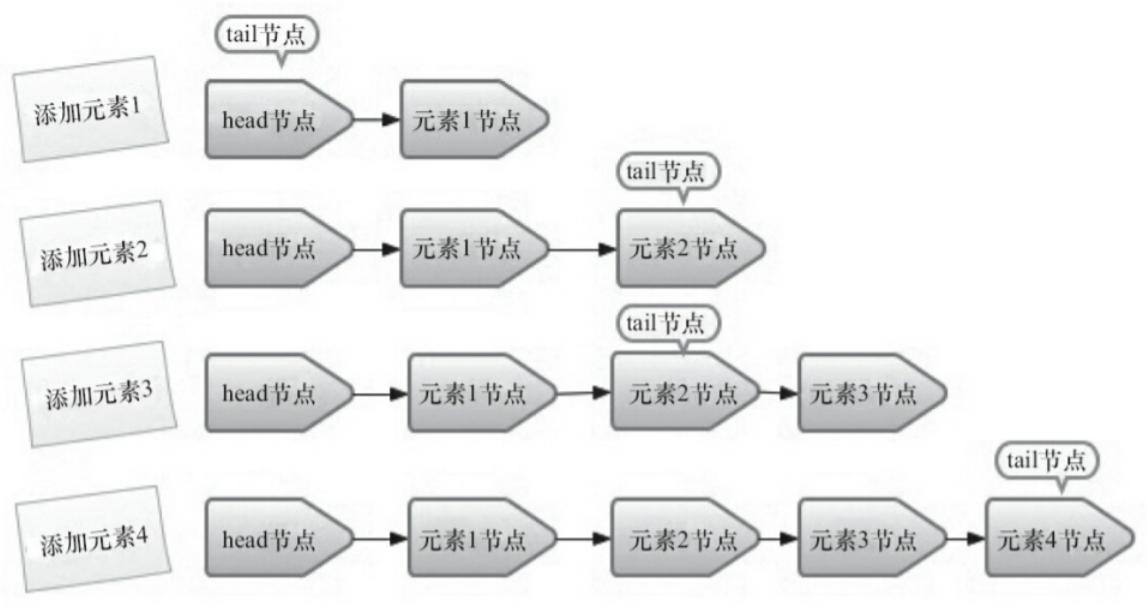
ConcurrentLinkedQueue 是一个基于链接节点的无界线程安全队列,它采用先进先出的规则对节点进行排序,当我们添加一个元素的时候,它会添加到队列的尾部,当我们获取一个元素时,它会返回队列头部的元素。
ConcurrentLinkedQueue 由 head 节点和 tail 节点组成,每个节点(Node)由节点元素(item)和指向下一个节点的引用(next)组成,节点与节点之间就是通过这个 next 关联起来,从而组成一张链表结构的队列。
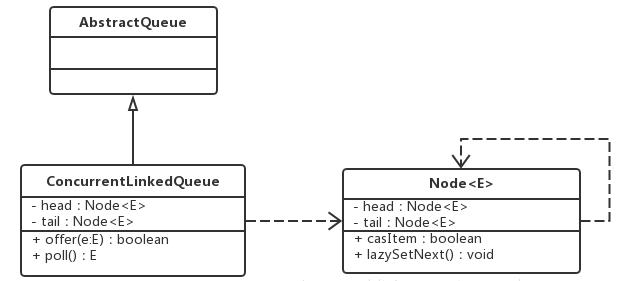
private static class Node<E> {volatile E item;volatile Node<E> next;// 设置Node中的数据域itemNode(E item) {UNSAFE.putObject(this, itemOffset, item);}// 更改Node中的指针域nextboolean casItem(E cmp, E val) {return UNSAFE.compareAndSwapObject(this, itemOffset, cmp, val);}// 设置Node中的指针域nextvoid lazySetNext(Node<E> val) {UNSAFE.putOrderedObject(this, nextOffset, val);}// 更新Node中的指针域nextboolean casNext(Node<E> cmp, Node<E> val) {return UNSAFE.compareAndSwapObject(this, nextOffset, cmp, val);}private static final sun.misc.Unsafe UNSAFE;private static final long itemOffset;private static final long nextOffset;static {try {UNSAFE = sun.misc.Unsafe.getUnsafe();Class<?> k = Node.class;itemOffset = UNSAFE.objectFieldOffset(k.getDeclaredField("item"));nextOffset = UNSAFE.objectFieldOffset(k.getDeclaredField("next"));} catch (Exception e) {throw new Error(e);}}}
ConcurrentLinkedQueue 类有下面两个构造方法:
// 默认构造方法,head节点存储的元素为空,tail节点等于head节点public ConcurrentLinkedQueue() {head = tail = new Node<E>(null);}// 根据其他集合来创建队列public ConcurrentLinkedQueue(Collection<? extends E> c) {Node<E> h = null, t = null;// 遍历节点for (E e : c) {// 若节点为null,则直接抛出 NullPointerException 异常checkNotNull(e);Node<E> newNode = new Node<E>(e);if (h == null)h = t = newNode;else {t.lazySetNext(newNode);t = newNode;}}if (h == null)h = t = new Node<E>(null);head = h;tail = t;}
可以看出没有元素的情况下 head 节点存储的元素为空,tail 节点等于 head 节点。
入队操作
由于 tail 和 head 都是 volatile 变量,对它们的读操作会远远高于写操作带来的消耗。为了减少 CAS 的操作,插入结点的时候并不会每次都将 tail 结点更新为最新插入的结点。而是更新两个结点之后才会hop一下。
public boolean offer(E e) {
checkNotNull(e);
// 创建入队节点
final Node newNode = new Node(e);
// 循环 CAS 直到入队成功// 1、根据tail节点定位出尾节点(last node);// 2、将新节点置为尾节点的下一个节点;// 3、casTail更新尾节点for (Node<E> t = tail, p = t;;) {// p用来表示队列的尾节点,初始情况下等于 tail 节点// q是p的next节点Node<E> q = p.next;// 判断p是不是尾节点,tail节点不一定是尾节点,判断是不是尾节点的依据是该节点的next是不是null// 如果p是尾节点if (q == null) {// 设置p节点的下一个节点为新节点,设置成功则casNext返回true;// 否则返回false,说明有其他线程更新过尾节点,此时就会回到14行再次循环if (p.casNext(null, newNode)) {// 如果p != t,则将入队节点设置成tail节点,// 更新失败了也没关系,因为失败了表示有其他线程成功更新了tail节点if (p != t) // 此时一次更新两个结点casTail(t, newNode); // Failure is OKreturn true;}}// 多线程操作时候,由于 poll 时候会把旧的head变为自引用,然后将head的next设置为新的head// 所以这里需要重新找新的head,因为新的head后面的节点才是激活的节点else if (p == q)// 此时队列已经丢了,我们需要从定位队列。如果 tail 更新到了新队列就使用 tail// 如果tail没有更新到新队列,使用新队列的 head 进行遍历p = (t != (t = tail)) ? t : head;// 寻找尾节点else// Check for tail updates after two hops.p = (p != t && t != (t = tail)) ? t : q;}
}
### 出队操作并不是每次出队时都更新 head 节点,当 head 节点里有元素时,直接弹出head节点里的元素,而不会更新 head 节点。只有当 head 节点里没有元素时,出队操作才会更新 head 节点。这种做法通过减少使用 CAS 更新 head 节点的消耗,从而提高出队效率。<div align="center"><img width="80%" src="http://blogfileqiniu.isjinhao.site/e030ae8e-b768-43a7-a632-2d9df6d5daff" /></div>```javapublic E poll() {restartFromHead:for (;;) {for (Node<E> h = head, p = h, q;;) {E item = p.item;// head 里有元素的时候,直接替换为空并出队if (item != null && p.casItem(item, null)) {if (p != h) // 一次跳两个结点updateHead(h, ((q = p.next) != null) ? q : p);return item;}// 此时说明只有一个头结点else if ((q = p.next) == null) {updateHead(h, p);return null;}// 此时需要重定位headelse if (p == q)continue restartFromHead;elsep = q; // p 向前移动}}}final void updateHead(Node<E> h, Node<E> p) {// head 指向 pif (h != p && casHead(h, p))// h 的 next 指向自己h.lazySetNext(h);}
ConcurrentHashMap
重要成员属性的介绍
// The array of bins. Lazily initialized upon first insertion.// Size is always a power of two. Accessed directly by iterators.transient volatile Node<K,V>[] table;// The next table to use; non-null only while resizing.private transient volatile Node<K,V>[] nextTable;// Base counter value, used mainly when there is no contention,// but also as a fallback during table initialization races. Updated via CAS.private transient volatile long baseCount;// Table initialization and resizing control. When negative, the// table is being initialized or resized:// 1. -1 for initialization, else// 2. -(1 + the number of active resizing threads).// Otherwise, when table is null, holds the initial table size to use upon// creation, or 0 for default. After initialization, holds the// next element count value upon which to resize the table.private transient volatile int sizeCtl;static class Node<K,V> implements Map.Entry<K,V> {final int hash;final K key;volatile V val; // volatilevolatile Node<K,V> next; // volatile}
增加结点
public V put(K key, V value) {return putVal(key, value, false);}
putVal 的方法比较多,我们分两个部分进行分析。先看初始化。
final V putVal(K key, V value, boolean onlyIfAbsent) {if (key == null || value == null) throw new NullPointerException();int hash = spread(key.hashCode());int binCount = 0;for (Node<K,V>[] tab = table;;) {Node<K,V> f; int n, i, fh;if (tab == null || (n = tab.length) == 0)tab = initTable();
initTable()
private final Node<K,V>[] initTable() {Node<K,V>[] tab; int sc;while ((tab = table) == null || tab.length == 0) {if ((sc = sizeCtl) < 0)Thread.yield(); // lost initialization race; just spin// 正在初始化则 sc 为-1。(Object o, long offset, int expected, int x);else if (U.compareAndSwapInt(this, SIZECTL, sc, -1)) {try {// 再次判断表是否为空if ((tab = table) == null || tab.length == 0) {// 由于 sizeCtl 和 sc 进行了Swap。sc 大于0则使用 scint n = (sc > 0) ? sc : DEFAULT_CAPACITY;@SuppressWarnings("unchecked")Node<K,V>[] nt = (Node<K,V>[])new Node<?,?>[n];table = tab = nt;// 等效于 sc *= 0.75sc = n - (n >>> 2);}} finally {sizeCtl = sc;}break;}}return tab;}
当前桶的第一个结点
else if ((f = tabAt(tab, i = (n - 1) & hash)) == null) {// expect 为 null 时,设置 Nodeif (casTabAt(tab, i, null,new Node<K,V>(hash, key, value, null)))break; // no lock when adding to empty bin}
检测到桶结点是 ForwardingNode 类型,协助扩容
// f.hash 并不是 hashCode()。是一种结点状态else if ((fh = f.hash) == MOVED)tab = helpTransfer(tab, f); // 后面单独分析
插入结点
else {V oldVal = null;// f 是桶的第一个结点synchronized (f) {if (tabAt(tab, i) == f) {// 正常的按链表插入if (fh >= 0) {binCount = 1;for (Node<K,V> e = f;; ++binCount) {K ek;// 如果是 equal() 的结点if (e.hash == hash && ((ek = e.key) == key ||(ek != null && key.equals(ek)))) {oldVal = e.val;if (!onlyIfAbsent) // 是否仅当不存在此结点才插入e.val = value;break;}// 非 equal() 的结点Node<K,V> pred = e;if ((e = e.next) == null) {pred.next = new Node<K,V>(hash, key, value, null);break;}}}// 向红黑树中添加元素,TreeBin 结点的 hash 值为 TREEBIN(-2)else if (f instanceof TreeBin) {Node<K,V> p;binCount = 2;// 如果新增一个结点,返回 null,如果已存在此结点返回旧结点if ((p = ((TreeBin<K,V>)f).putTreeVal(hash, key, value)) != null) {oldVal = p.val;if (!onlyIfAbsent)p.val = value;}}}}// binCount == 0 说明向红黑树中添加或修改一个节点成功// binCount == 0 说明 put 操作将一个新节点添加成为某个桶的首节点// binCount > 2 说明向一个链表中插入结点// TREEIFY_THRESHOLD 最小为2if (binCount != 0) {if (binCount >= TREEIFY_THRESHOLD)treeifyBin(tab, i);if (oldVal != null)return oldVal;break;}}}// CAS 更新baseCount,并判断是否需要扩容addCount(1L, binCount);// 程序走到这一步说明此次 put 操作是一个添加操作,否则早就 return 返回了return null;}
看完 pulVal() 的大体逻辑之后,我们再来看看被跳过的并发时协助扩容的场景。
ForwardingNode
static final class ForwardingNode<K,V> extends Node<K,V> {final Node<K,V>[] nextTable;ForwardingNode(Node<K,V>[] tab) {// 状态为 MOVED,与上面的代码块对应super(MOVED, null, null, null);this.nextTable = tab;}}
这个节点内部保存了 nextTable 的引用,它指向一张 hash 表。在扩容操作中,我们需要对每个桶中的结点进行分离和转移,如果某个桶结点中所有节点都已经迁移完成了(已经被转移到新表 nextTable 中了),那么会在原 table 表的该位置挂上一个 ForwardingNode 结点,说明此桶已经完成迁移。
ForwardingNode 继承自 Node 结点,并且它唯一的构造函数将构建一个键,值 next 都为 null 的结点,反正它就是个标识,无需那些属性。但是 hash 值却为 MOVED。
所以,我们在 putVal 方法中遍历整个 hash 表的桶结点,如果遇到 hash 值等于 MOVED,说明已经有线程正在扩容 rehash 操作,整体上还未完成,不过我们要插入的桶的位置已经完成了所有节点的迁移。
由于检测到当前哈希表正在扩容,于是让当前线程去协助扩容。
helpTransfer()
final Node<K,V>[] helpTransfer(Node<K,V>[] tab, Node<K,V> f) {Node<K,V>[] nextTab; int sc;// 旧表不为空 && 结点是 ForwardingNode 类型 && 新表不为空if (tab != null && (f instanceof ForwardingNode) &&(nextTab = ((ForwardingNode<K,V>)f).nextTable) != null) {// 默认情况下:RESIZE_STAMP_SHIFT 和 RESIZE_STAMP_BITS 都是 16// rs 的后16位表示int rs = resizeStamp(tab.length);while (nextTab == nextTable && table == tab && (sc = sizeCtl) < 0) {if ((sc >>> RESIZE_STAMP_SHIFT) != rs || sc == rs + 1 ||sc == rs + MAX_RESIZERS || transferIndex <= 0)break;if (U.compareAndSwapInt(this, SIZECTL, sc, sc + 1)) {transfer(tab, nextTab);break;}}return nextTab;}return table;}
transfer()
// 第一部分private final void transfer(Node<K,V>[] tab, Node<K,V>[] nextTab) {int n = tab.length, stride;// 计算单个线程允许处理的最少table桶首节点个数,不能小于 16if ((stride = (NCPU > 1) ? (n >>> 3) / NCPU : n) < MIN_TRANSFER_STRIDE)stride = MIN_TRANSFER_STRIDE;// 刚开始扩容,初始化 nextTab//if (nextTab == null) {try {@SuppressWarnings("unchecked")Node<K,V>[] nt = (Node<K,V>[])new Node<?,?>[n << 1]; // 扩大二倍nextTab = nt;} catch (Throwable ex) {sizeCtl = Integer.MAX_VALUE;return;}nextTable = nextTab;// transferIndex 指向最后一个桶,方便从后向前遍历transferIndex = n;}int nextn = nextTab.length;// 定义 ForwardingNode 用于标记迁移完成的桶// 当旧表数组槽为空或元素复制完后,旧表的数组槽放入该ForwardingNode<K,V>结点,// 其他线程若读到该结点,则会在新表中读,若发生写则会帮助扩容ForwardingNode<K,V> fwd = new ForwardingNode<K,V>(nextTab);
这部分代码还是比较简单的,主要完成的是对单个线程能处理的最少桶结点个数的计算和一些属性的初始化操作。
// 第二部分,并发扩容控制的核心// advance开始为true时会进入下面的while循环申请一段数组槽中元素赋值的任务,// 完成一个旧数组槽的复制后也会置为trueboolean advance = true;// 是否完成所有复制的标志位boolean finishing = false;// i 指向当前桶,bound 指向当前线程需要处理的桶结点的区间下限for (int i = 0, bound = 0;;) {Node<K,V> f; int fh;// 这个 while 循环的目的就是通过 --i 遍历当前线程所分配到的桶结点// 一个桶一个桶的处理while (advance) {int nextIndex, nextBound;if (--i >= bound || finishing)advance = false;// transferIndex <= 0 说明已经没有需要迁移的桶了else if ((nextIndex = transferIndex) <= 0) {i = -1;advance = false;}// 更新 transferIndex// 为当前线程分配任务,处理的桶结点区间为(nextBound,nextIndex)else if (U.compareAndSwapInt(this,TRANSFERINDEX,nextIndex,nextBound = (nextIndex > stride ? nextIndex - stride : 0))) {bound = nextBound;i = nextIndex - 1;advance = false;}}// 当前线程所有任务完成if (i < 0 || i >= n || i + n >= nextn) {int sc;if (finishing) {nextTable = null;table = nextTab;sizeCtl = (n << 1) - (n >>> 1);return;}if (U.compareAndSwapInt(this, SIZECTL, sc = sizeCtl, sc - 1)) {if ((sc - 2) != resizeStamp(n) << RESIZE_STAMP_SHIFT)return;finishing = advance = true;i = n;}}// 待迁移桶为空,那么在此位置 CAS 添加 ForwardingNode 结点标识该桶已经被处理过了else if ((f = tabAt(tab, i)) == null)advance = casTabAt(tab, i, null, fwd);// 如果扫描到 ForwardingNode,说明此桶已经被处理过了,跳过即可else if ((fh = f.hash) == MOVED)advance = true;

若有收获,就点个赞吧
0 人点赞
