HTML 和表单 (HTML & Forms)
REST framework 适用于返回 API 样式响应和常规 HTML 页面。此外,序列化器可用作 HTML 表单并在模板中渲染。
渲染 HTML (Rendering HTML)
为了返回 HTML 响应,您需要使用 TemplateHTMLRenderer 或 StaticHTMLRenderer。
TemplateHTMLRenderer 类期望响应包含上下文数据的字典,并基于必须在视图或响应中指定的模板渲染 HTML 页面。
StaticHTMLRender 类期望响应包含预渲染 HTML 内容的字符串。
由于静态 HTML 页面通常具有与 API 响应不同的行为,因此您可能需要显式编写任何 HTML 视图,而不是依赖于内置的通用视图。
下面是一个视图示例,它返回 “Profile” 实例列表,在 HTML 模板中渲染:
views.py:
from my_project.example.models import Profilefrom rest_framework.renderers import TemplateHTMLRendererfrom rest_framework.response import Responsefrom rest_framework.views import APIViewclass ProfileList(APIView):renderer_classes = [TemplateHTMLRenderer]template_name = 'profile_list.html'def get(self, request):queryset = Profile.objects.all()return Response({'profiles': queryset})
profile_list.html:
<html><body><h1>Profiles</h1><ul>{% for profile in profiles %}<li>{{ profile.name }}</li>{% endfor %}</ul></body></html>
渲染表单 (Rendering Forms)
序列化器可以通过使用 render_form 模板标记渲染为表单,并将序列化器实例作为模板的上下文。
以下视图演示了在模板中使用序列化器查看和更新模型实例的示例:
views.py:
from django.shortcuts import get_object_or_404from my_project.example.models import Profilefrom rest_framework.renderers import TemplateHTMLRendererfrom rest_framework.views import APIViewclass ProfileDetail(APIView):renderer_classes = [TemplateHTMLRenderer]template_name = 'profile_detail.html'def get(self, request, pk):profile = get_object_or_404(Profile, pk=pk)serializer = ProfileSerializer(profile)return Response({'serializer': serializer, 'profile': profile})def post(self, request, pk):profile = get_object_or_404(Profile, pk=pk)serializer = ProfileSerializer(profile, data=request.data)if not serializer.is_valid():return Response({'serializer': serializer, 'profile': profile})serializer.save()return redirect('profile-list')
profile_detail.html:
{% load rest_framework %}<html><body><h1>Profile - {{ profile.name }}</h1><form action="{% url 'profile-detail' pk=profile.pk %}" method="POST">{% csrf_token %}{% render_form serializer %}<input type="submit" value="Save"></form></body></html>
使用模板包 (Using template packs)
render_form 标记采用可选的 template_pack 参数,该参数指定应该使用哪个模板目录来渲染表单和表单字段。
REST framework 包括三个内置的模板包,全部基于 Bootstrap 3。内置样式是 horizontal,vertical 和 inline。默认样式为 horizontal。要使用任何这些模板包,您还需要包含 Bootstrap 3 CSS。
以下 HTML 将链接到 Bootstrap 3 CSS 的 CDN 托管版本:
<head>…<link rel="stylesheet" href="https://maxcdn.bootstrapcdn.com/bootstrap/3.3.5/css/bootstrap.min.css"></head>
第三方包可以包括备用模板包,通过捆绑包含必要表单和字段模板的模板目录。
让我们看看如何渲染三个可用的模板包。对于这些示例,我们将使用单个序列化器类来渲染 “登录” 表单。
class LoginSerializer(serializers.Serializer):email = serializers.EmailField(max_length=100,style={'placeholder': 'Email', 'autofocus': True})password = serializers.CharField(max_length=100,style={'input_type': 'password', 'placeholder': 'Password'})remember_me = serializers.BooleanField()
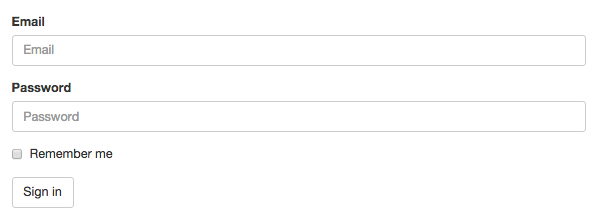
rest_framework/vertical
使用标准 Bootstrap 布局在其相应的控件输入上方显示表单标签。
这是默认模板包。
{% load rest_framework %}...<form action="{% url 'login' %}" method="post" novalidate>{% csrf_token %}{% render_form serializer template_pack='rest_framework/vertical' %}<button type="submit" class="btn btn-default">Sign in</button></form>
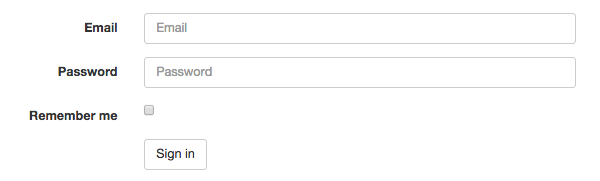
rest_framework/horizontal
使用 2/10 列拆分将标签和控件并排显示。
这是可浏览 API 和管理员渲染器中使用的表单样式。
{% load rest_framework %}...<form class="form-horizontal" action="{% url 'login' %}" method="post" novalidate>{% csrf_token %}{% render_form serializer %}<div class="form-group"><div class="col-sm-offset-2 col-sm-10"><button type="submit" class="btn btn-default">Sign in</button></div></div></form>
rest_framework/inline
一个紧凑的表单样式,以内联方式显示所有控件。
{% load rest_framework %}...<form class="form-inline" action="{% url 'login' %}" method="post" novalidate>{% csrf_token %}{% render_form serializer template_pack='rest_framework/inline' %}<button type="submit" class="btn btn-default">Sign in</button></form>

字段样式 (Field styles)
序列化器字段可以通过使用 style 关键字参数自定义其渲染样式。此参数是控制所用模板和布局的选项字典。
自定义字段样式的最常用方法是使用 base_template 样式关键字参数来选择应使用模板包中的哪个模板。
例如,要将 CharField 渲染为 HTML textarea 而不是默认的 HTML 输入,您可以使用以下内容:
details = serializers.CharField(max_length=1000,style={'base_template': 'textarea.html'})
如果您希望使用不是包含的模板包的一部分的自定义模板渲染字段,则可以使用 template 样式选项来完全指定模板名称:
details = serializers.CharField(max_length=1000,style={'template': 'my-field-templates/custom-input.html'})
字段模板还可以使用其他样式属性,具体取决于其类型。例如,textarea.html 模板还接受 rows 属性,该属性可用于影响控件的大小。
details = serializers.CharField(max_length=1000,style={'base_template': 'textarea.html', 'rows': 10})
下面列出了 base_template 选项及其相关样式选项的完整列表。
| base_template | 有效字段类型 | 其它样式选项 |
|---|---|---|
| input.html | 任何字符串,数字或日期/时间字段 | input_type, placeholder, hide_label, autofocus |
| textarea.html | CharField |
rows, placeholder, hide_label |
| select.html | ChoiceField 或相关字段类型 |
hide_label |
| radio.html | ChoiceField 或相关字段类型 |
inline, hide_label |
| select_multiple.html | MultipleChoiceField 或带有 many=True 的关系字段 |
hide_label |
| checkbox_multiple.html | MultipleChoiceField 或带有 many=True 的关系字段 |
inline, hide_label |
| checkbox.html | BooleanField |
hide_label |
| fieldset.html | 嵌套的序列化器 | hide_label |
| list_fieldset.html | ListField 或带有 many=True 的嵌套序列化器 |
hide_label |

若有收获,就点个赞吧
0 人点赞
